安達西 Andasibe/ 馬達加斯加旅遊與攝影完全攻略 — Top 7 必拍景點、1–3 天行程、美食餐廳推薦與攝影建議 Andasibe Travel & Photography Guide — Top 7 Photo Spots, 1–3 Day Itineraries, Dining & Pro Tips
Please see English version below
安達西貝(Andasibe)旅遊全攻略:含最佳拍攝點Top 5、1–3 天行程規劃、交通與住宿建議、在地餐廳與專業攝影技巧。想預訂當地包車或導覽(含司機)?留言詢問私房資源!
目錄(TOC)
不可錯過的5個原因
5個有趣冷知識
Top 7 必拍景點
1–3 天行程規劃
交通方式
住宿建議
推薦餐廳與美食
最佳旅行時間
預算建議
必備物品清單
攝影 Tips(專業拍攝建議)
安達西貝 Top 5 特殊動物介紹
安達西 Andasibe 馬達加斯加 FAQS(Andasibe Madagascar 常見問題)
總結(如想了解或推薦當地旅遊社和當地包車含司機服務,歡迎留言詢問)
不可錯過的5個原因
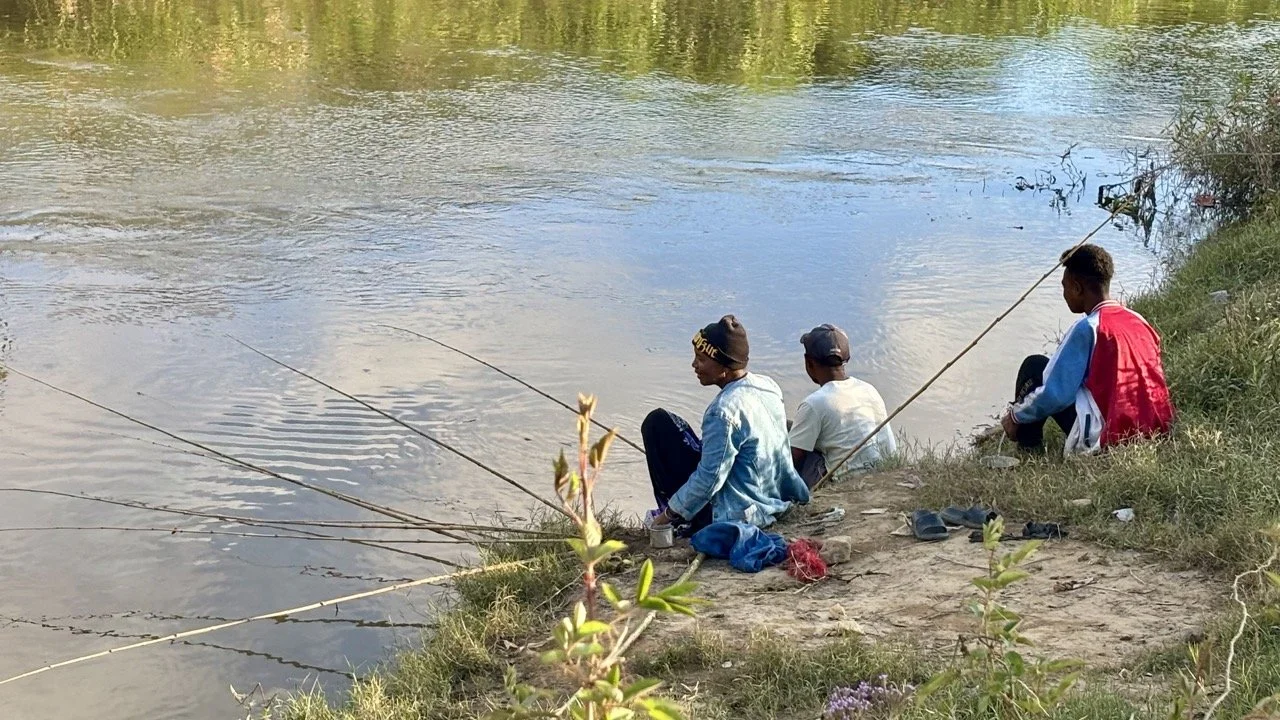
独特狐猴天堂:安達西貝是觀察世界最大狐猴 — Indri indri(吼猴) 的最佳地之一。
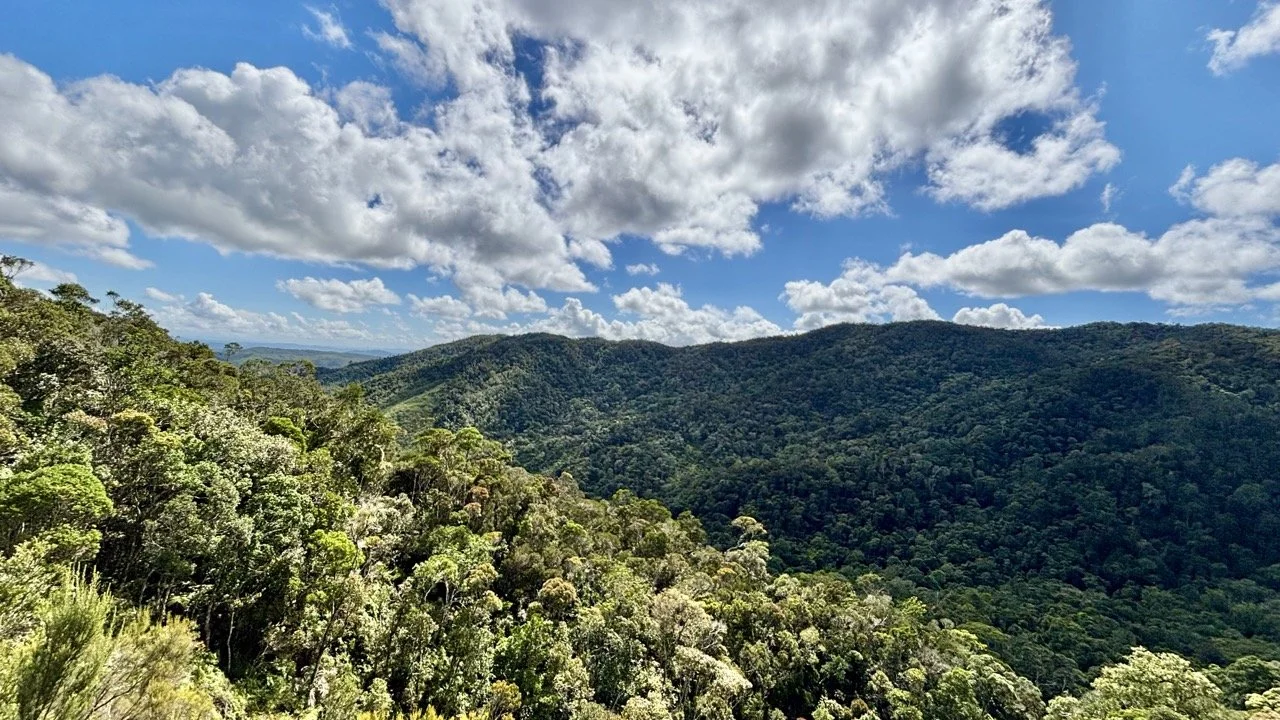
原始熱帶雨林:連綿保護林與瀑布,適合徒步與生態探索。
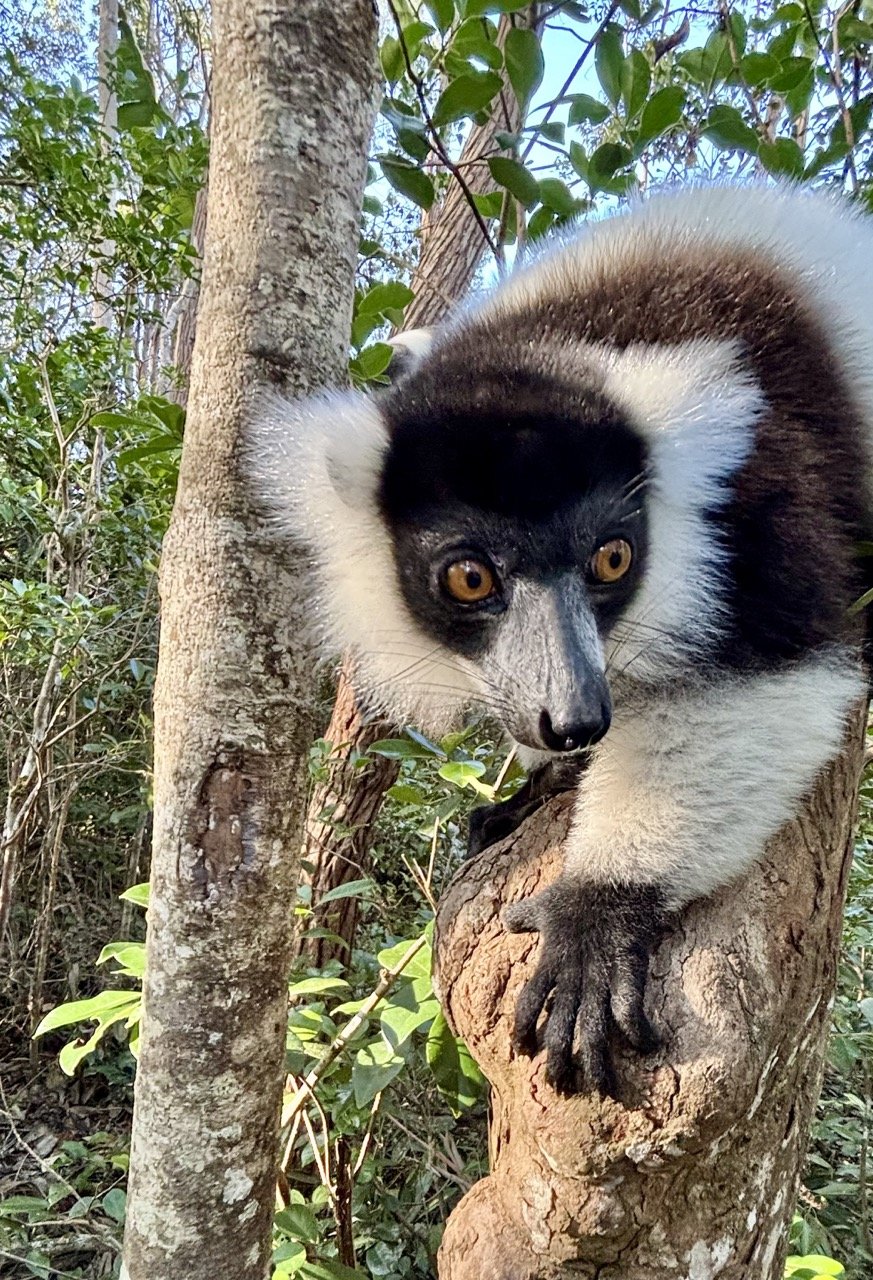
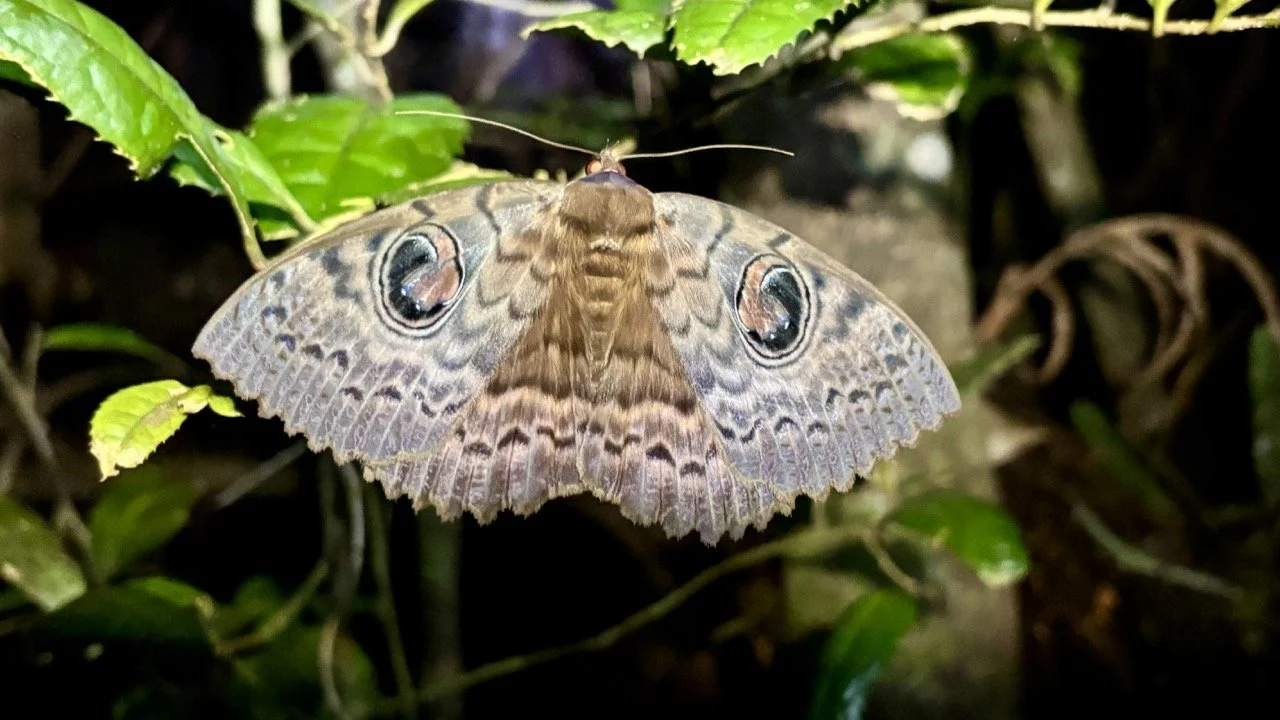
豐富生物多樣性:白頸狐猴、變色龍、鳥類與昆蟲,生態攝影素材豐富。
夜間導覽體驗:夜間觀察夜行性動物(小狐猴、樹蛙等)令人驚喜。
交通便利:從塔那那利佛(Antananarivo)出發僅約 3 小時車程,適合短程生態旅行。
5個有趣冷知識
Indri 的叫聲能傳遠達 2 公里,當地人稱其歌聲如「森林之聲」。
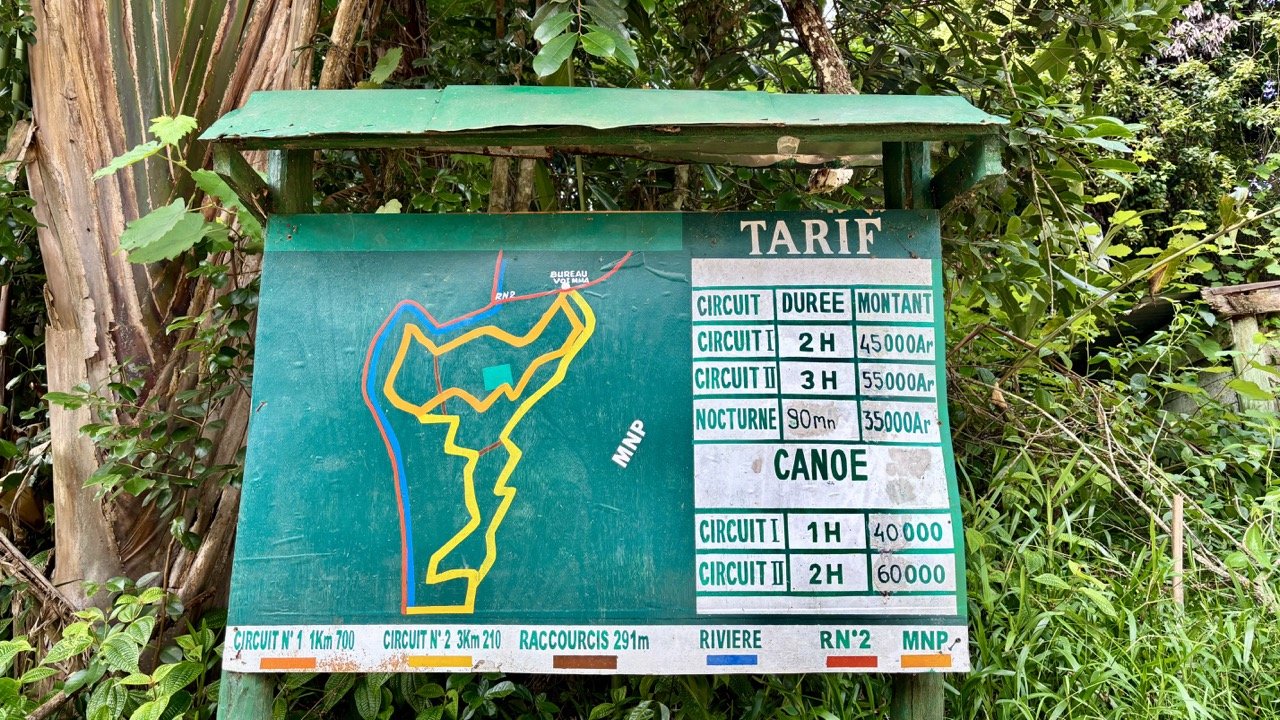
安達西貝‑曼塔迪亞國家公園分為 Andasibe(小區)與 Mantadia(深林)兩大片區,各有不同步道。
許多藥用植物僅在馬達加斯加島上出現,當地藥草文化源遠流長。
夜間導覽往往比白天更能遇見稀有小型生物。
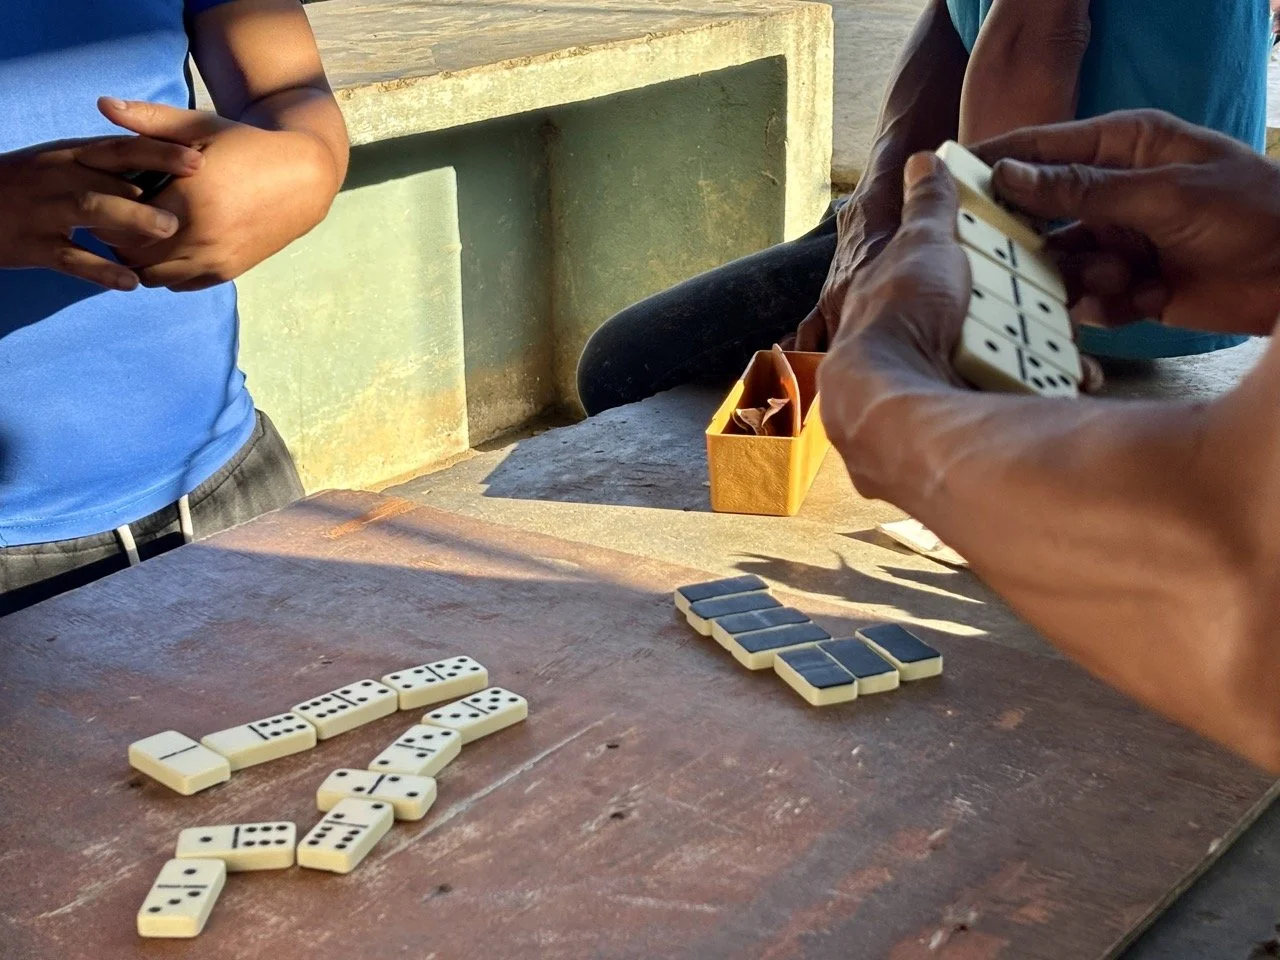
當地村莊保有手工編織與木雕工藝,適合作為伴手禮。
安達西 Andasibe Top 7 必拍景點
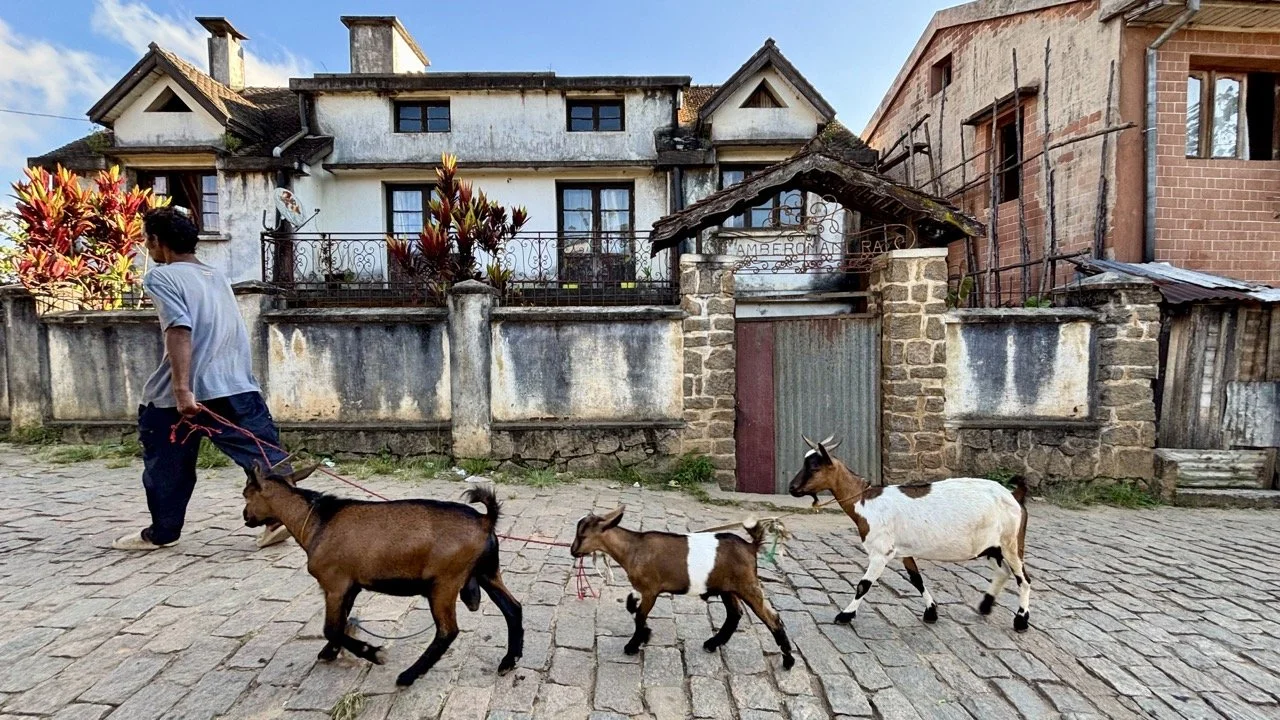
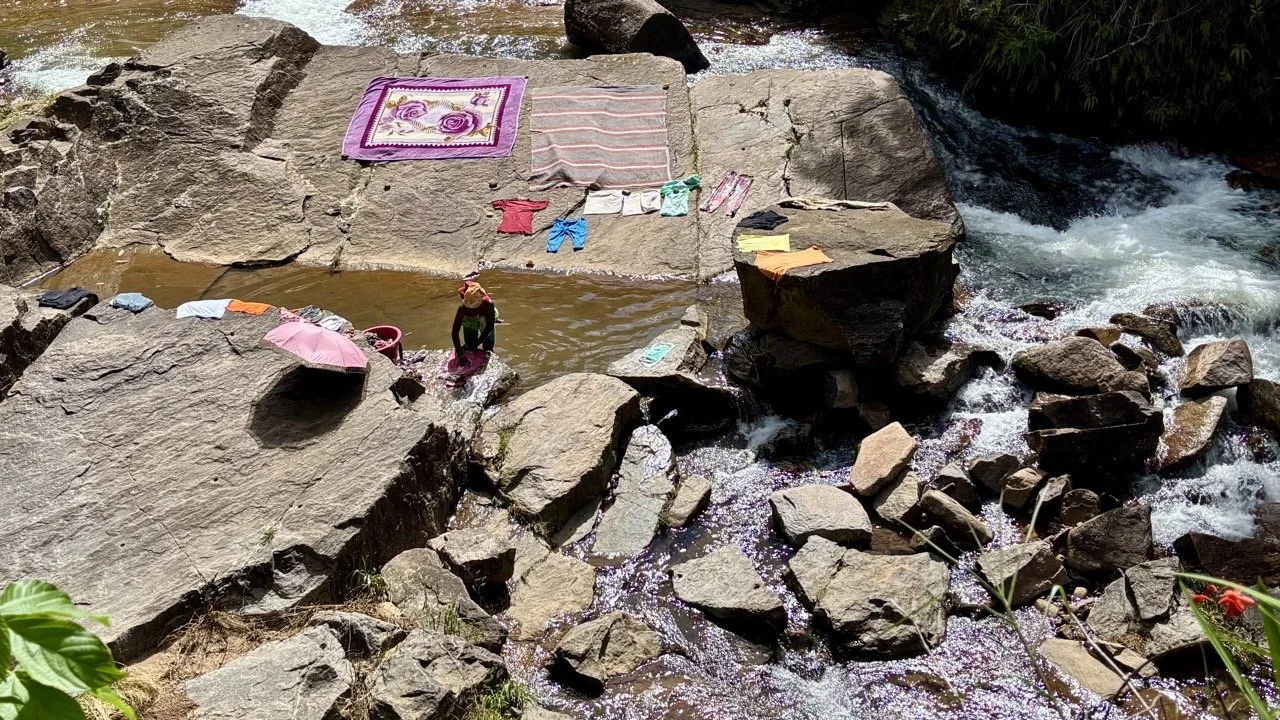
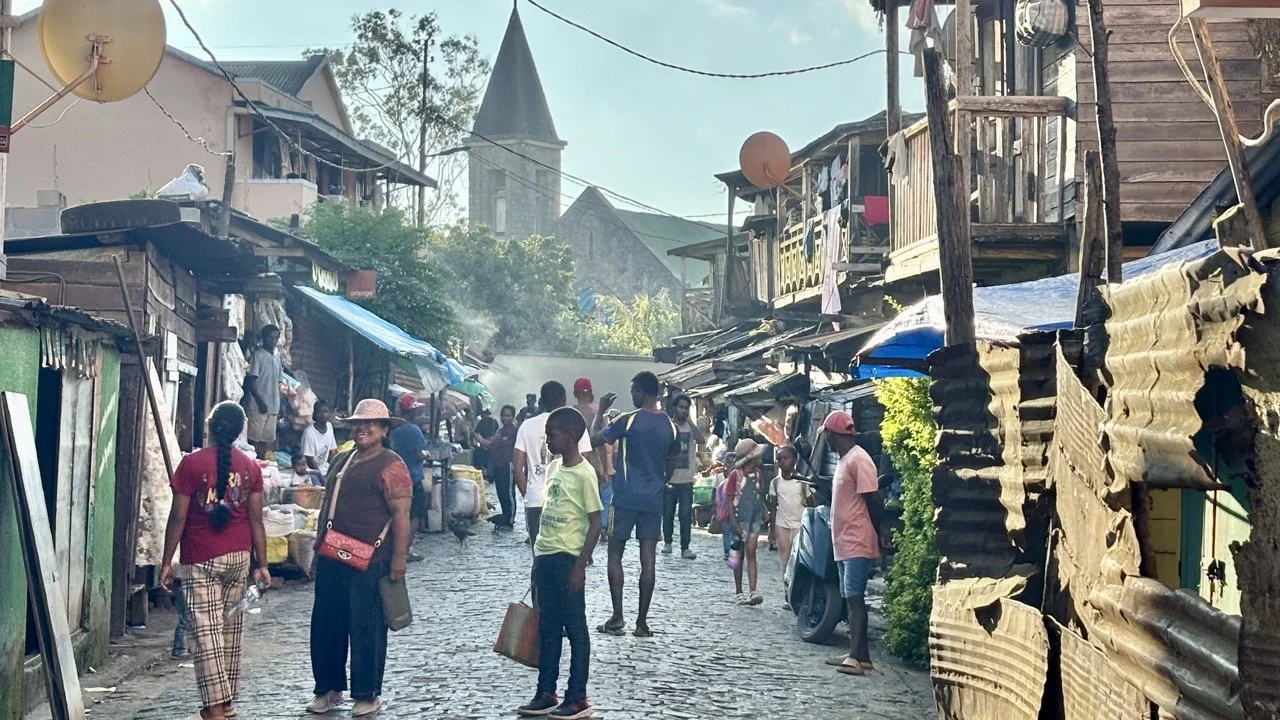
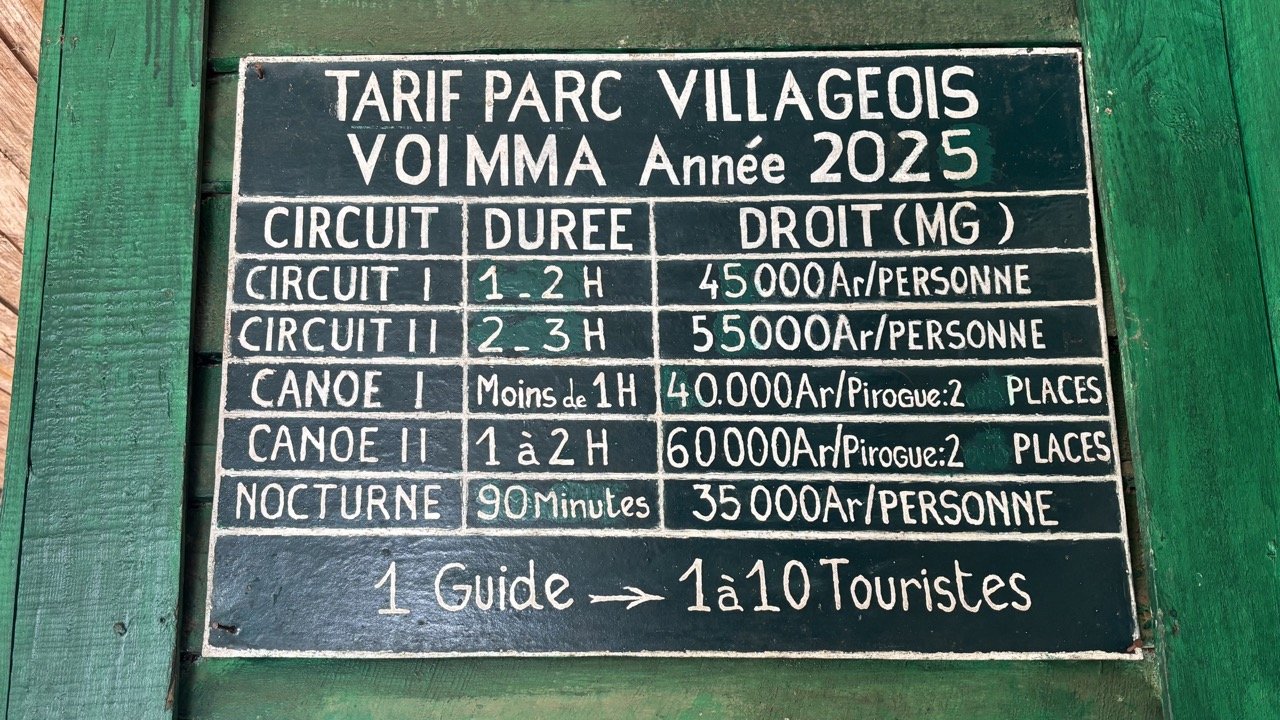
VOI 社區(VOI Community)
推薦原因與特色:結合社區保育與在地文化體驗,可拍攝居民生活、手工藝與保育導覽的溫暖故事畫面,題材具人文深度。
交通:從安達西貝鎮短程包車或計程車可達;部分社區導覽需提前預約。
最佳攝影建議:清晨柔光拍攝活動與工作情境,使用24–70mm抓取環境人像、50–85mm拍近距離人像;拍攝前先徵求同意並以小禮致謝,可換取自然表情。安納拉馬扎特拉國家公園 / Andasibe 保護區(Analamazaotra NP)
推薦原因與特色:觀察Indri(吼猴)與多種狐猴最穩定的地點,步道平坦且導覽成熟,適合各級攝影師進行野生動物拍攝。
交通:自安達西貝鎮或塔那那利佛包車/計程車前往,園區入口設有導遊登記處。
最佳攝影建議:清晨06:00–09:00為黃金時段;攜帶70–200mm長焦拍動物肖像與24–70mm拍環境畫面;使用靜音快門、連拍與適度提高ISO以避免驚擾。Vakona 森林公園(Vakona Lodge & Lemur Island)
推薦原因與特色:Lemur Island 可近距離互動拍攝狐猴,人像與動物結合題材豐富;園區亦有湖泊與森林步道,適合多樣構圖。
交通:自安達西貝鎮約10–20分鐘車程,多數旅館提供接送或含接駁的行程。
最佳攝影建議:50–85mm或24–70mm為首選;保持低姿態、緩慢移動以免驚動動物;強光時使用偏光鏡減少反光,人像可用大光圈創造背景模糊。Mitsinjo 生態保育區(Mitsinjo Reserve)
推薦原因與特色:社區經營的保護區,夜間導覽豐富,蛙類、昆蟲與夜行性動物機會高,亦積極推動植樹與教育計畫。
交通:距離安達西貝短程步行或車程可達;建議預約志工或導覽人員帶隊。
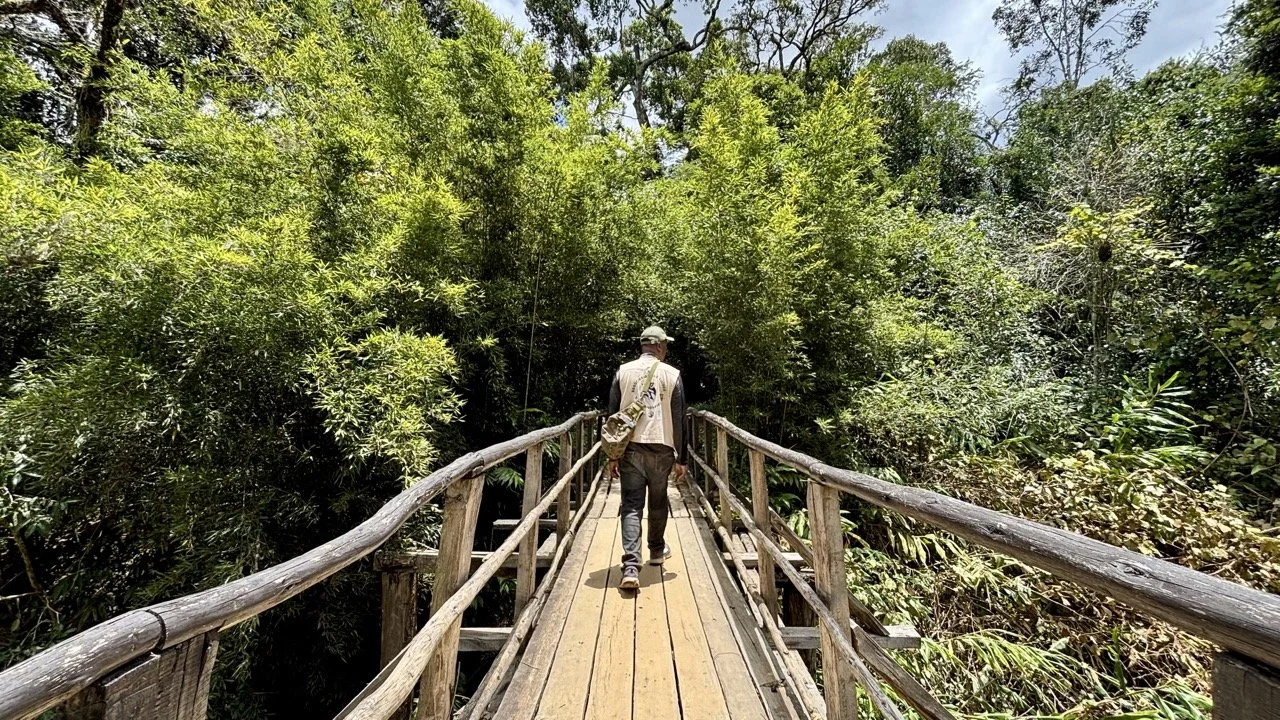
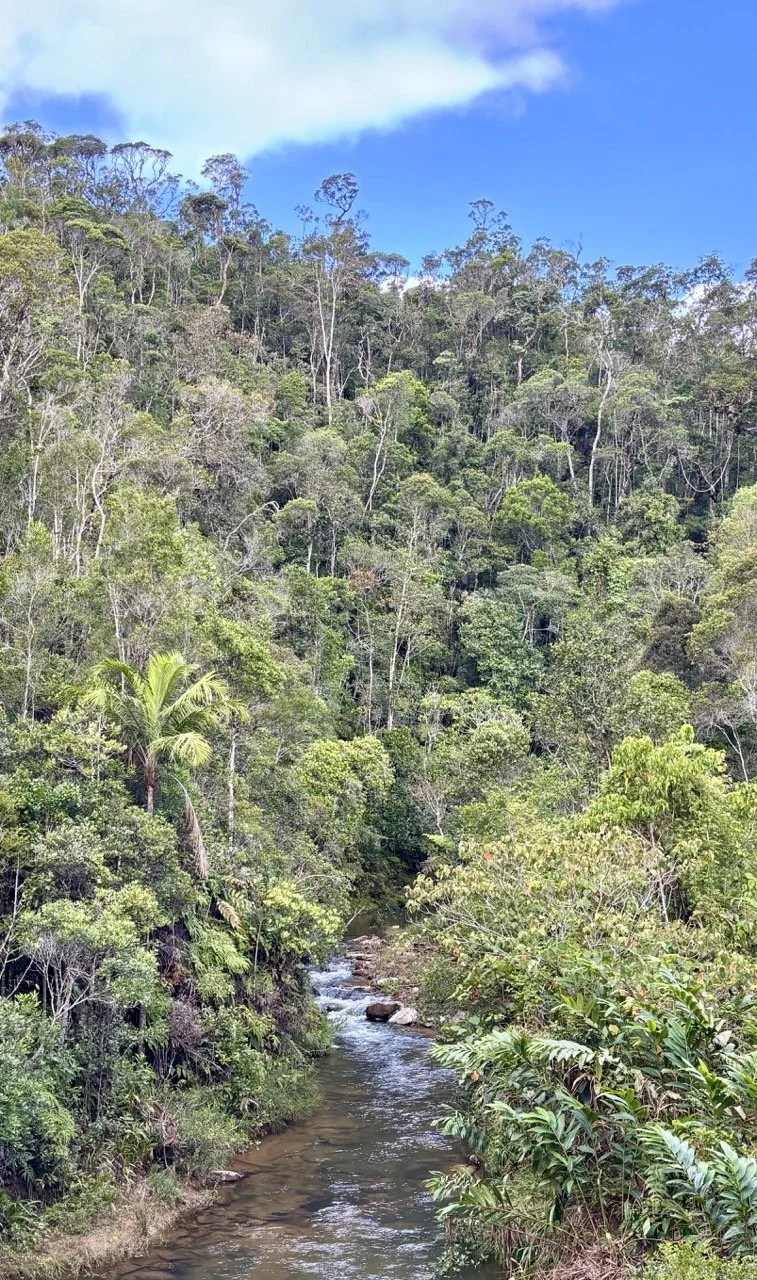
最佳攝影建議:夜間微距最佳,備100mm或微距鏡頭、三腳架與小型LED燈;白天以24–70mm或70–200mm捕捉鳥類與植被細節。Maromizaha 原始/次生森林(Maromizaha Reserve)
推薦原因與特色:遊客較少的原始或次生林,動物行為更自然,適合長時間追蹤與原生態拍攝,是靜態與動態題材兼備的祕境。
交通:需包車或越野車前往,多為半日或全天行程,建議與導遊先規劃路線與補給。
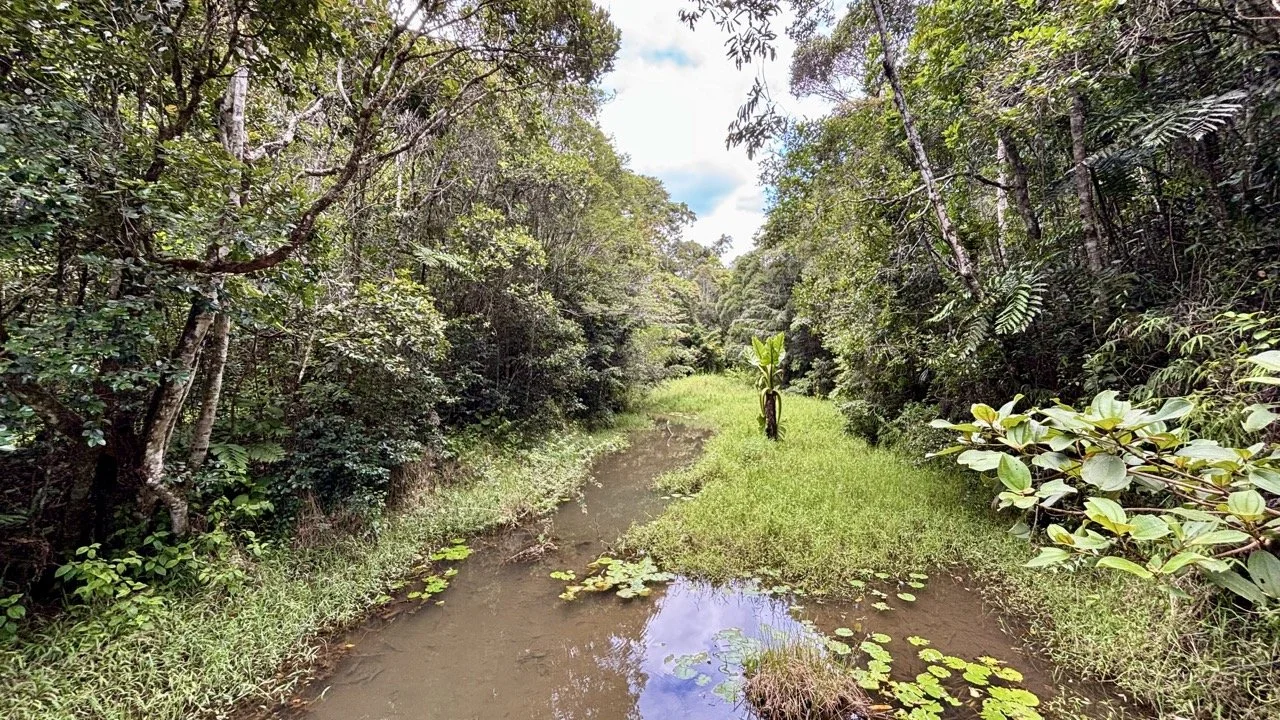
最佳攝影建議:廣角(16–35mm)捕捉森林縱深與樹冠,使用中長焦追蹤動物行為;攜帶輕便三腳架與防潮裝備,備用高感光設定因應林下弱光。Vohimana 自然保護區(Vohimana Reserve)
推薦原因與特色:結合植物多樣性展示與生態旅遊,園區提供導覽與住宿選項,適合拍攝植物地景、鳥類與清晨露珠細節。
交通:自安達西貝包車較為方便,可安排為過夜或休憩站點,便於分段探索。
最佳攝影建議:24–70mm拍攝植物地景與細節,70–200mm捕捉鳥類活動;利用側光及偏光鏡強化葉面紋理與露珠光澤。Madagascar Exotic(私人保育園區 / 類Palmarium)
推薦原因與特色:私人保育或類Palmarium園區,通常可近距離觀察狐猴、變色龍與稀有爬蟲類,成功率高、適合拍攝特寫與互動畫面,並常提供住宿與專業導覽。
交通:視園區位置而定,通常需包車並事先預約,部分園區提供接送或住宿套裝。
最佳攝影建議:使用100–200mm長焦或微距鏡拍攝特寫細節;控制背景與光線以突顯動物紋理;在園區內嚴格遵守規定,確保動物舒適與安全。結語
以上七大景點涵蓋社區保育、人文互動、深林徒步與私人保育園區,提供豐富的野生動物、人文與微距拍攝題材。如需我將這些景點整合為 1–3 天攝影行程(含建議拍攝時段與路線地圖),或協助預訂在地導遊與包車含司機服務,歡迎留言告訴我你的出發日期與拍攝偏好,我會為你量身規劃。
安達西貝 1–3 天攝影與生態行程
簡介
安達西貝(Andasibe)是馬達加斯加最精彩的生態攝影場域之一:Indri 吼猴、狐猴、變色龍、豐富的夜間生態,與在地保育社區一起,構成你不可錯過的 1–3 天行程。本行程整合 VOI community、Analamazaotra NP、Vakona Forest Park、Mitsinjo、Maromizaha、Vohimana 及 Madagascar Exotic 類保育園區,含交通建議、拍攝時段、器材提示與預算估算,幫你把拍攝效率最大化。立即收藏並留言索取司機+導遊推薦。
1 日精華(短程 / 時間有限者) — 早出晚歸,重點拍 Indri 與社區人文
05:30 起床 → 06:00 抵達 Analamazaotra NP(Andasibe Reserve)入口。
重點:清晨 06:00–09:00 為 Indri 活動與叫聲高峰,最佳拍攝窗口。器材:70–200mm + 24–70mm,靜音模式、連拍與高 ISO 準備。10:30 回到鎮上休息、午餐(在地餐館:嘗試米飯與當地燉菜)。
13:30 前往 VOI community(或 Mitsinjo 若需更快抵達)進行社區保育互動與人文拍攝。
重點:24–70mm 捕捉環境人像,50–85mm 拍近距離表情;拍人像前請先徵求同意。16:00 前往 Vakona Forest Park(Lemur Island)做近距離狐猴互動人像攝影(拍攝到傍晚黃金光)。
19:00 晚餐與夜間簡短整理或夜遊(如時間允許可安排 Mitsinjo 夜間導覽)。
預算參考:單日交通 + 導遊 ~ €40–€80;門票另計(園區與夜導約 €10–€25 視項目)。
2 日推薦(生態深度 + 夜觀)— 野生動物、互動、人文與夜間微距
Day 1 — Indri 與社區人像
06:00 Analamazaotra(Indri 追蹤)→ 10:00 回鎮上午餐 → 13:00 VOI community 體驗並拍社區保育故事(含導覽)→ 16:00 Vakona Lemur Island 互動拍攝 → 19:00 晚餐 → 20:00 Mitsinjo 夜間導覽(蛙類、昆蟲、夜行性狐猴)。
Day 2 — Mantadia / Maromizaha 深林探險(全天)06:00 出發至 Maromizaha 或 Mantadia(視季節與體能選一),全天林間徒步、瀑布與鳥類拍攝。器材:廣角 16–35mm(森林縱深)、70–200mm(鳥類)、三腳架與偏光鏡。傍晚返回或選擇在附近住宿以節省返程時間。
預算參考:兩日行程(含包車/導遊/門票/部分餐食)約 €120–€250/人(視車輛與人數分攤)。
3 日深度(攝影師專案)— 全景、微距、人文與私保育園區
Day 1:Analamazaotra 清晨 Indri → VOI 社區午後人文拍攝 → Mitsinjo 夜遊(夜間微距)
Day 2:全天 Maromizaha 深林(森林縱深、瀑布、野生動物行為)
Day 3:Vohimana 早鳥觀鳥 + Madagascar Exotic 或類 Palmarium 私人保育園區近距離狐猴/變色龍特寫;回程在鎮上整理照片與採買伴手禮。
攝影建議:分三種時段分配鏡頭(廣角晨昏 / 中焦全天 / 長焦追蹤或微距),每晚備份照片與電池、並以防潮袋保護器材。
預算參考:三日深度攝影(含高級導遊、包車、門票與 1 次近距離保育園住宿)€250–€500/人。

交通建議(效率與安全優先)
最推薦:在塔那那利佛(Antananarivo)包車到 Andasibe(含司機/導遊)。司機熟路況、能在清晨與黃昏精準接駁。
公共交通:有本地巴士與出租選項,但耗時且不利於早晚拍攝時段控制。
車種考量:雨季建議 4x4;乾季普通車亦可但請視路況彈性安排。
建議預訂:若拍攝行程緊湊,請提前預訂包車+註冊導遊,並確認各保護區門票與夜導可用性。
攝影實戰建議(提升成功率)
時段管理:把最重要景點(Indri、Maromizaha、Vakona)安排在清晨或傍晚。
設定範例:動物肖像 1/500s+、f/4–f/8、ISO 根據光線上升;森林長曝拍瀑布用 ND、三腳架、f/8–f/11。
音與倫理:保持安靜、使用靜音快門(若可),不餵食、不追逐、不使用強閃。
裝備保護:雨林潮濕,帶乾燥盒、防潮袋與快速擦拭布;備多顆電池並分開存放。
夜拍工具:微距/100mm、便攜三腳架、低光 LED、遙控快門與高 ISO 鏡頭(f/2.8 或更快)。
小貼士(節省時間與成本)
共乘分攤:包車時與其他旅客合拼能顯著降低人均成本。
預先通告:若想在 VOI 或 Mitsinjo 做社區導覽拍攝,提前告知並取得同意。
食宿安排:選擇靠近公園入口或鎮中心的住宿可減少接駁耗時。
資料備份:每天至少備份兩份照片(外接硬碟 + 雲端)。
結語
需要當地司機/導遊推薦?請回覆你的出發日期、同行人數與預算,我會回傳我這趟行程推薦當地旅行社和當地司導的聯絡方式。

安達西 Andasibe/ 馬達加斯加交通方式
飛機 + 車:國際抵達 Antananarivo(TNR),可包車或租車前往 Andasibe(約 2.5–3 小時)。
公車/出租:亦有公共車班與私人司機服務(建議預約),山路有彎且雨季泥濘,4x4 更穩妥。
建議:若想高效拍攝,預訂當地包車含司機 + 導遊最為方便(如需推薦,歡迎留言)。
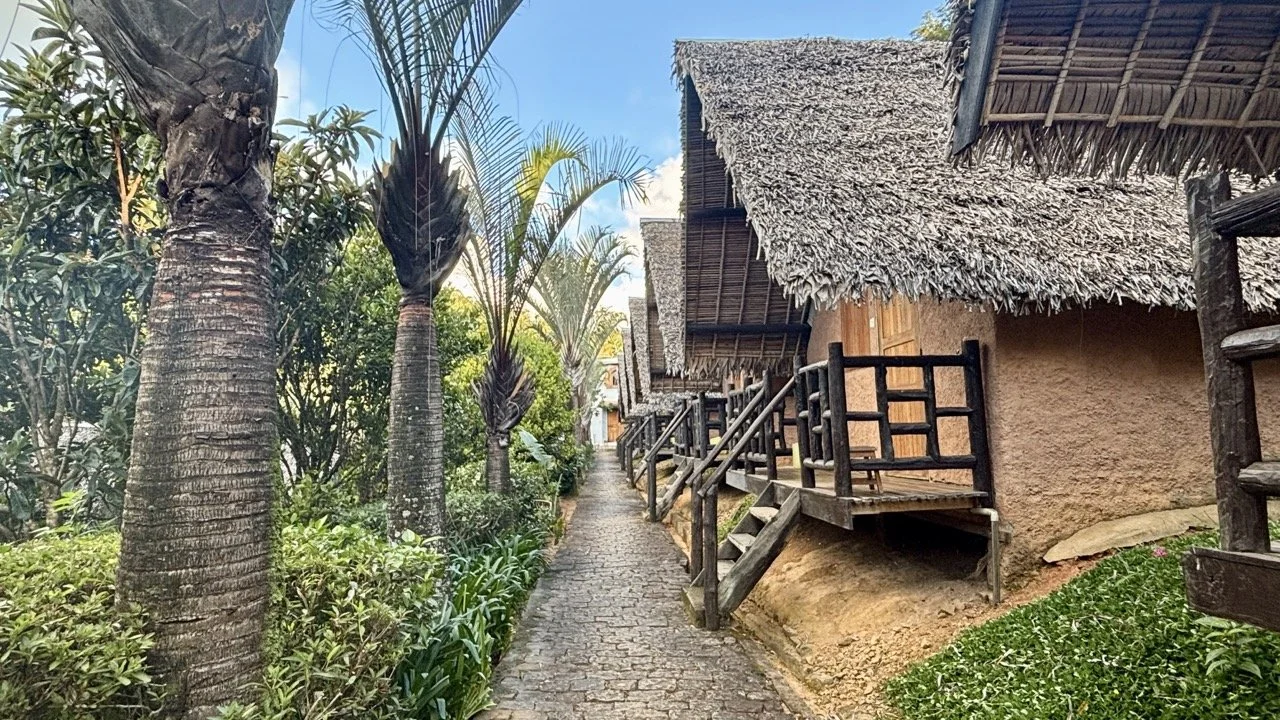
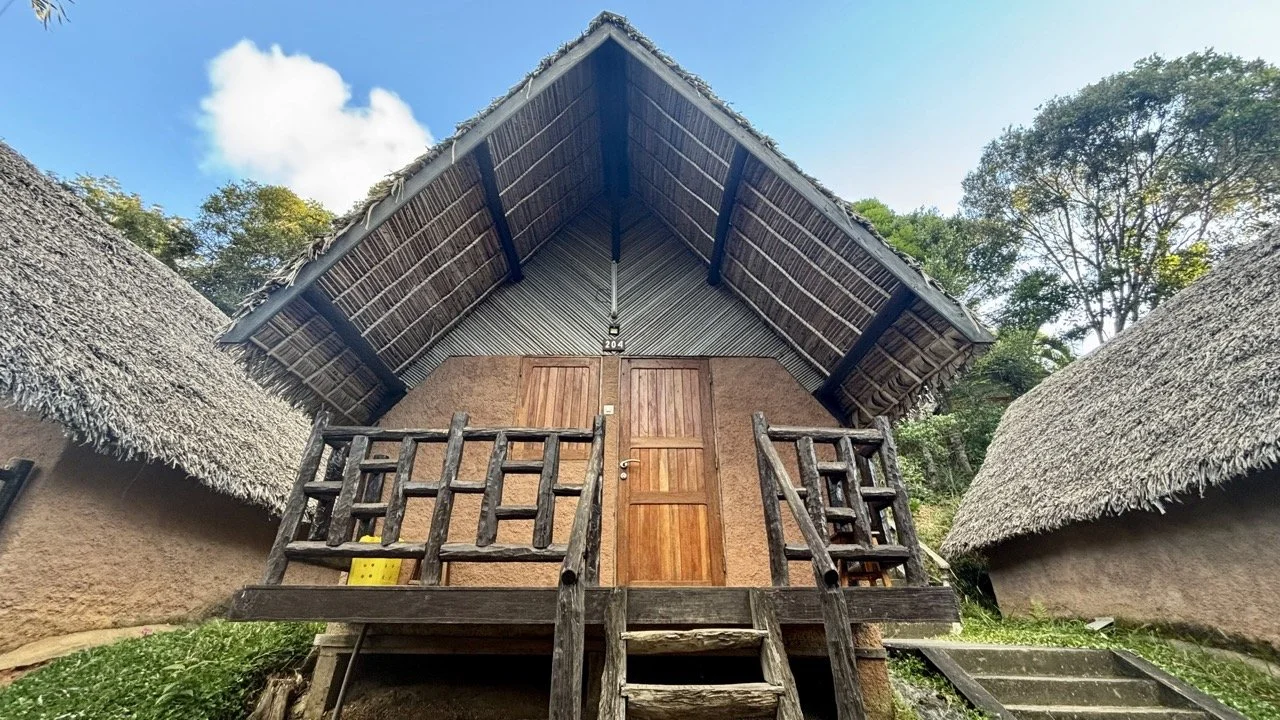
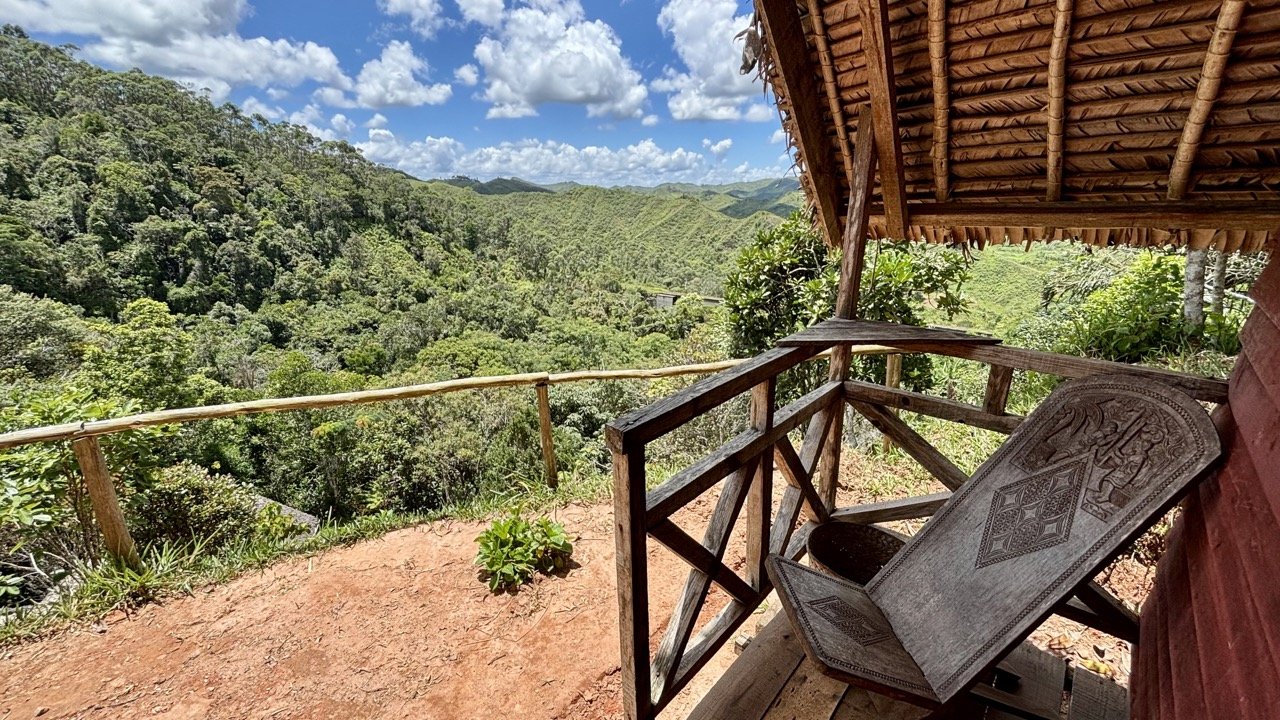
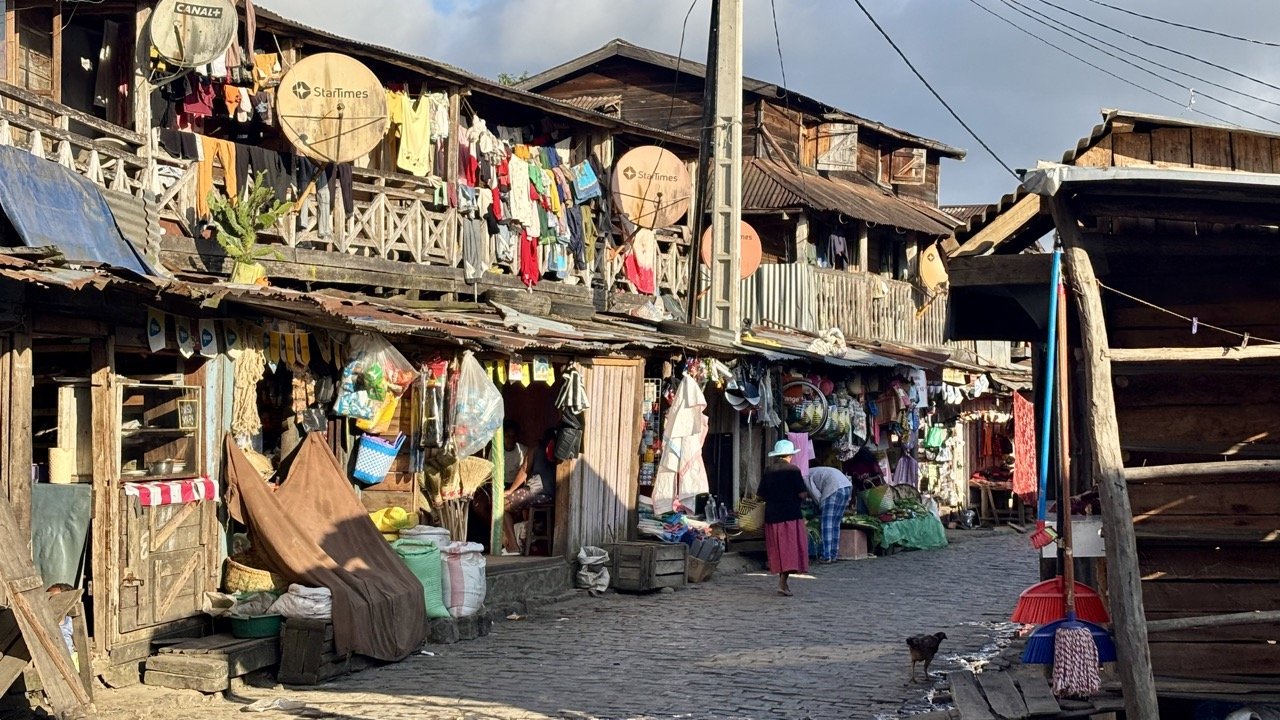
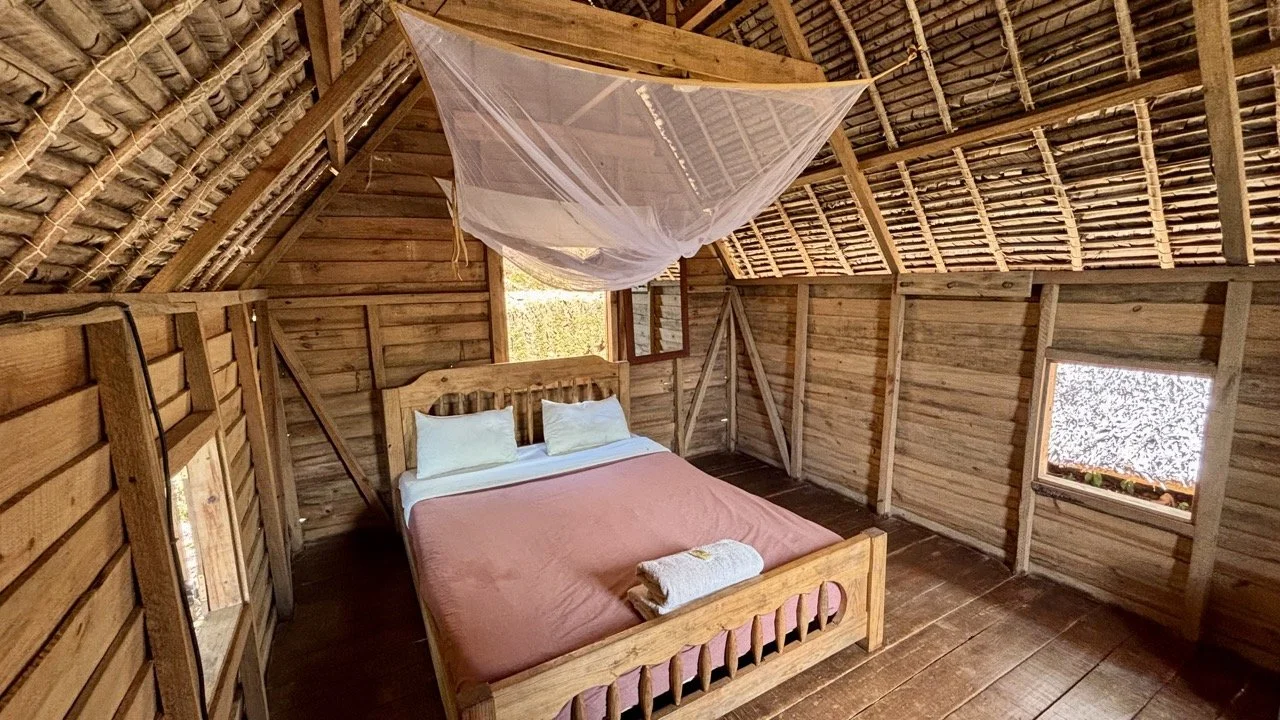
安達西 Andasibe/ 馬達加斯加住宿建議
選擇依旅遊需求:生態小木屋(接近步道)、中階旅館(市區便利)或高級生態 Lodge(含導覽)。
提示:旺季請提前 1–2 個月預訂;部分林緣住宿含早鳥喚醒服務,便於清晨追蹤 Indri。
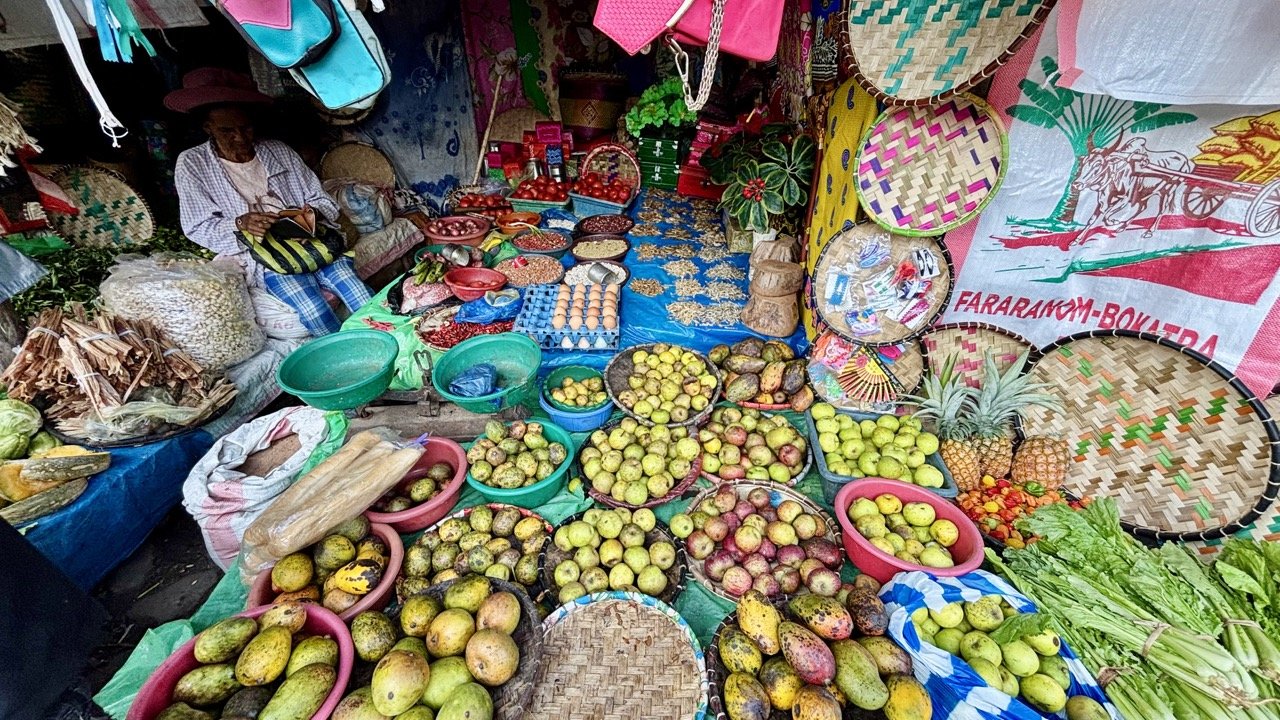
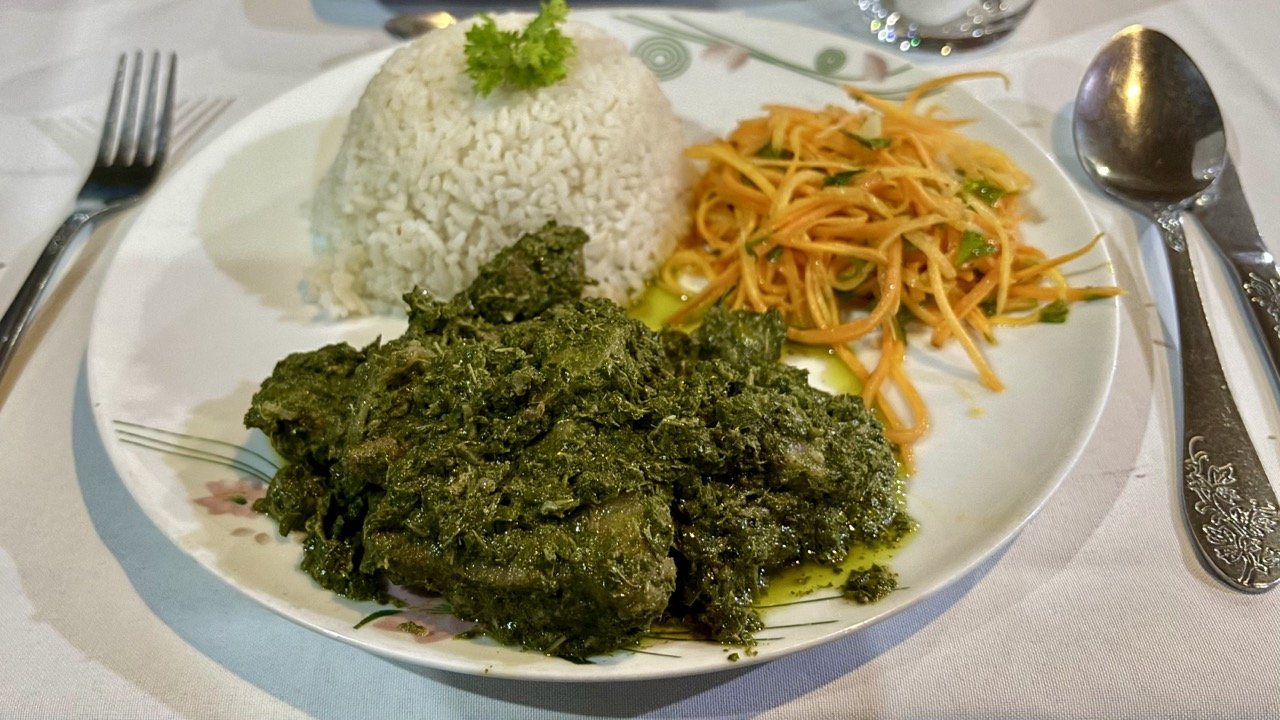
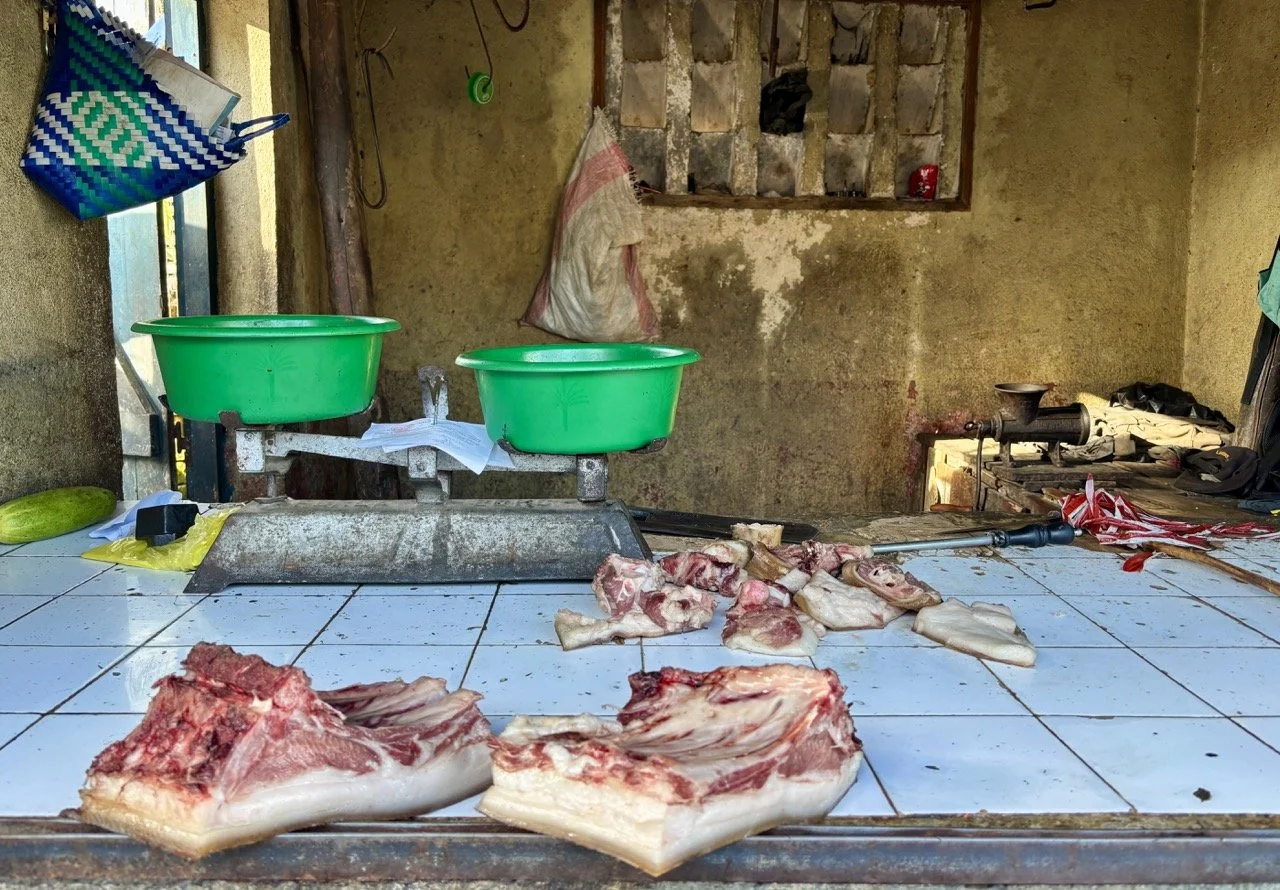
安達西貝Top 5 推薦餐廳與美食
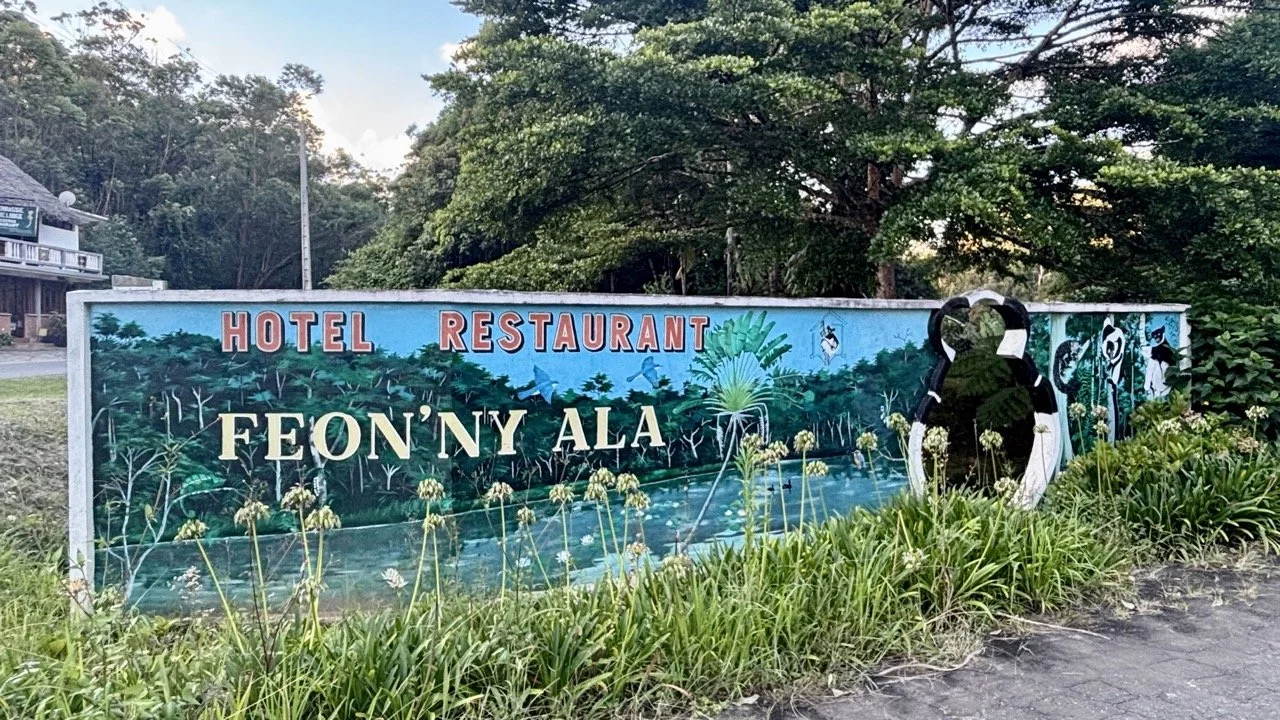
Feon’ny Ala(Feon’ny Ala Restaurant)
推薦原因:安達西貝人氣最旺的在地餐廳之一,環境接近公園入口,觀光客與導遊常推;口味道地,服務快速。
必吃菜:烤魚 / Grilled fish、當地風味燉菜(romazava 類)、熱帶果汁。
價位範圍:約 €5–€15/人(算親民、適合旅人)。
交通如何到達:步行或短程計程車可達,位於主要旅遊路線上。Google Maps
2. Vakona Forest Lodge 餐廳(Vakona Forest Lodge Restaurant / Lemur Island dining)
推薦原因:位於 Vakona Lodge,環境樸實且景觀佳,適合安排在遊園後的悠閒用餐;可搭配 Lemur Island 行程。
必吃菜:當地風味套餐、烤雞或烤魚、簡單西式主餐與當地甜點。
價位範圍:約 €10–€25/人(旅宿餐廳價位)。
交通如何到達:從安達西貝鎮開車約 10–20 分鐘,多數旅館含接送或可請導遊安排。Google Maps
3. Andasibe Hotel 餐廳(Andasibe Hotel Restaurant)
推薦原因:中高階旅客常選擇的飯店餐廳,環境舒適、菜色穩定,適合整理照片與傳檔時順便用餐。
必吃菜:飯類主菜(rice dishes)、海鮮或 zebu(當地牛肉)料理、果汁飲品。
價位範圍:約 €12–€30/人。
交通如何到達:位於 Andasibe 區,步行或短程計程車可達;若入住旅館直接在館內用餐最方便。Google Maps
4. Mitsinjo 社區咖啡/餐點(Mitsinjo Community Café / Local community meals)
推薦原因:社區經營的簡餐與咖啡,能體驗當地保育工作者的日常與支持社區保育;餐點簡單但具在地風味。
必吃菜:當地小吃、簡單飯菜與新鮮果汁/咖啡。
價位範圍:約 €2–€10/人(平實)。
交通如何到達:距離安達西貝中心步行或短車程,建議預約或與當地導遊詢問開放時間。Google Maps
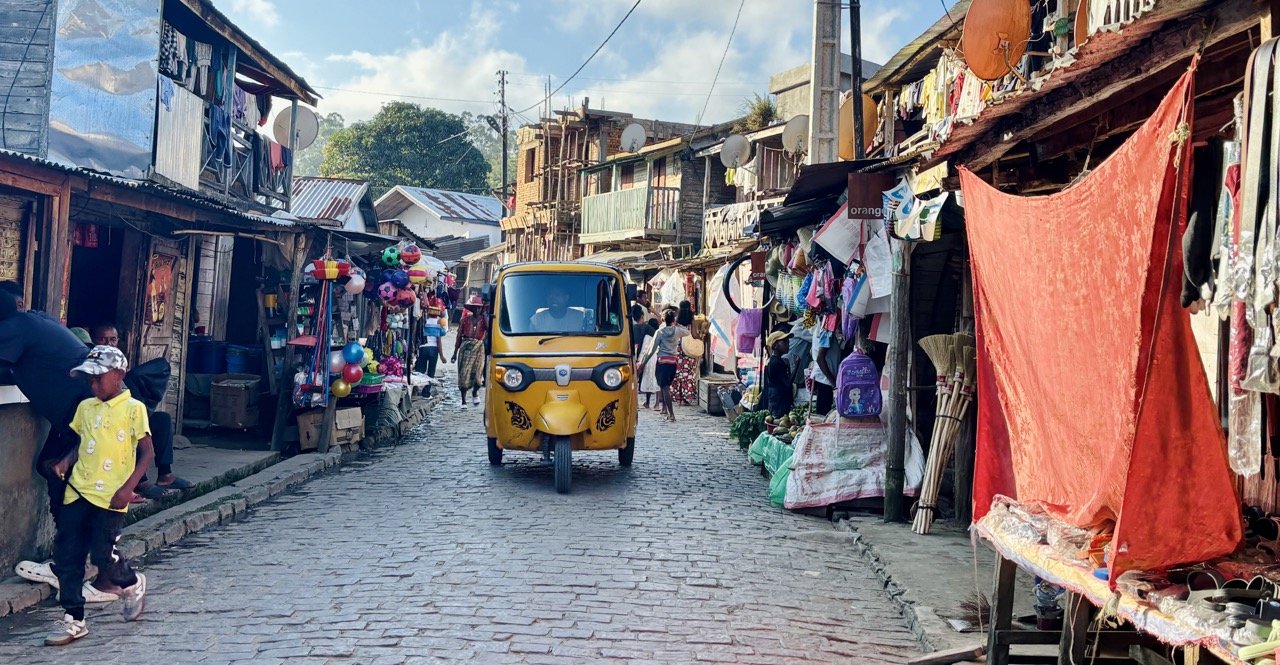
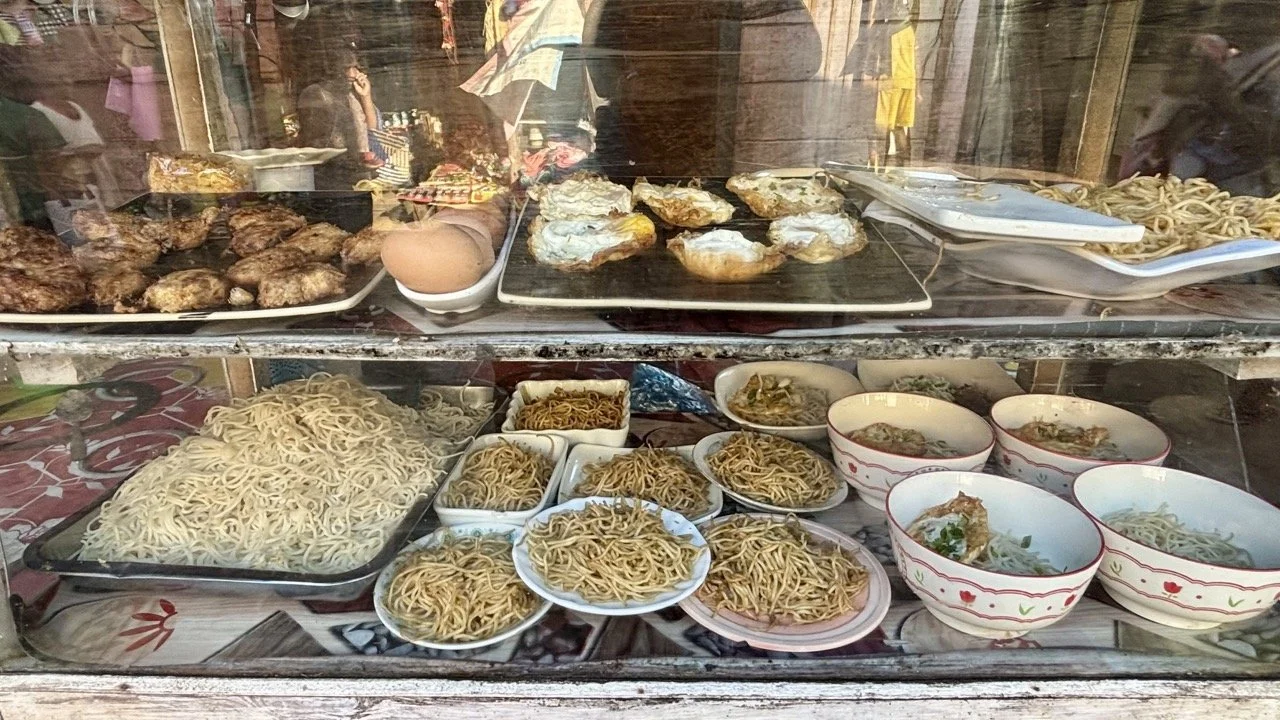
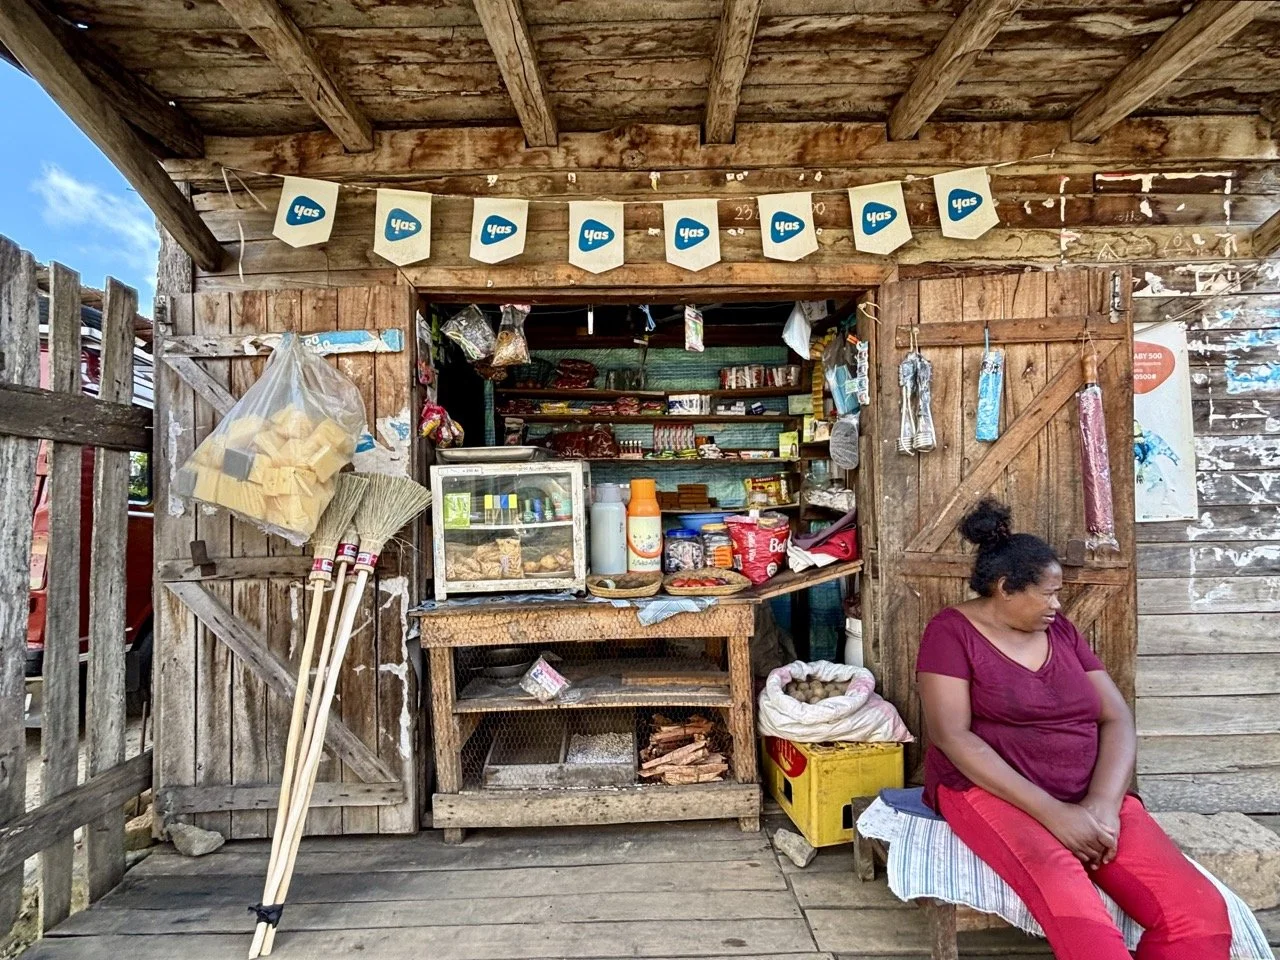
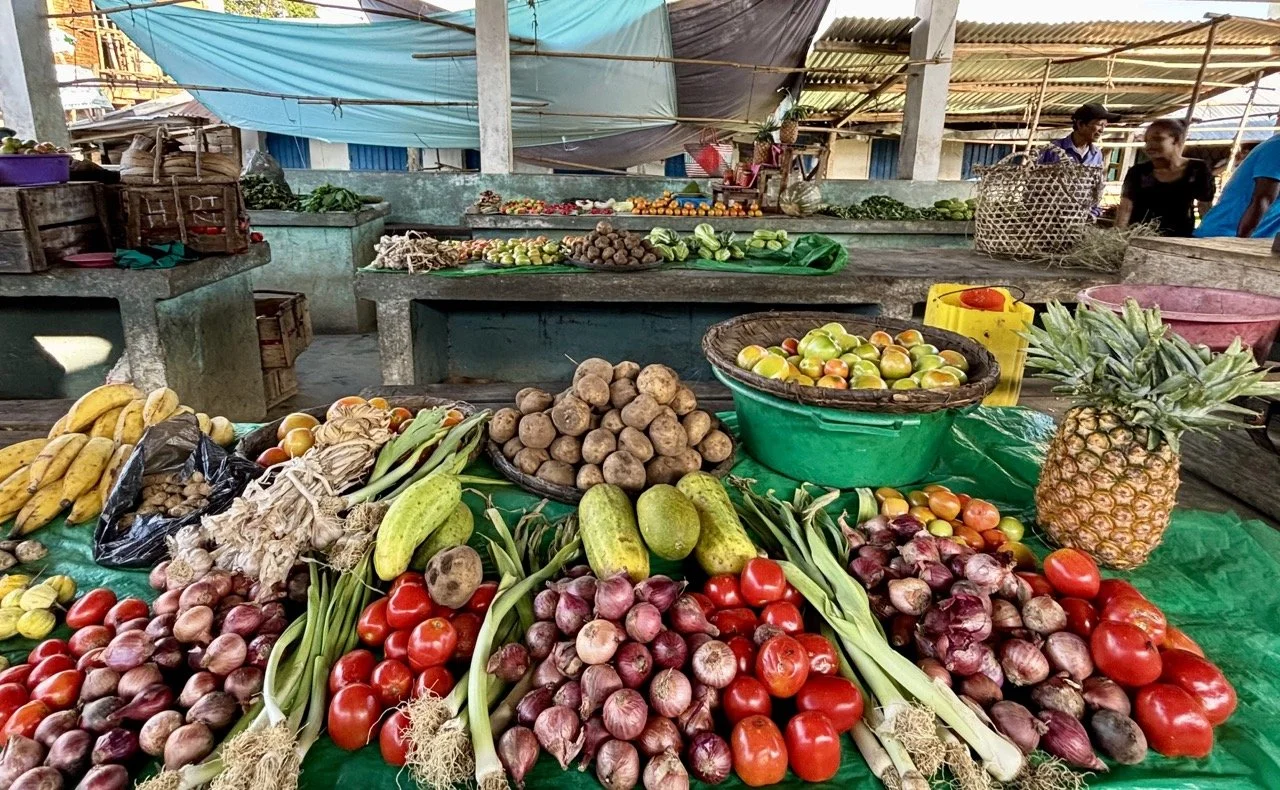
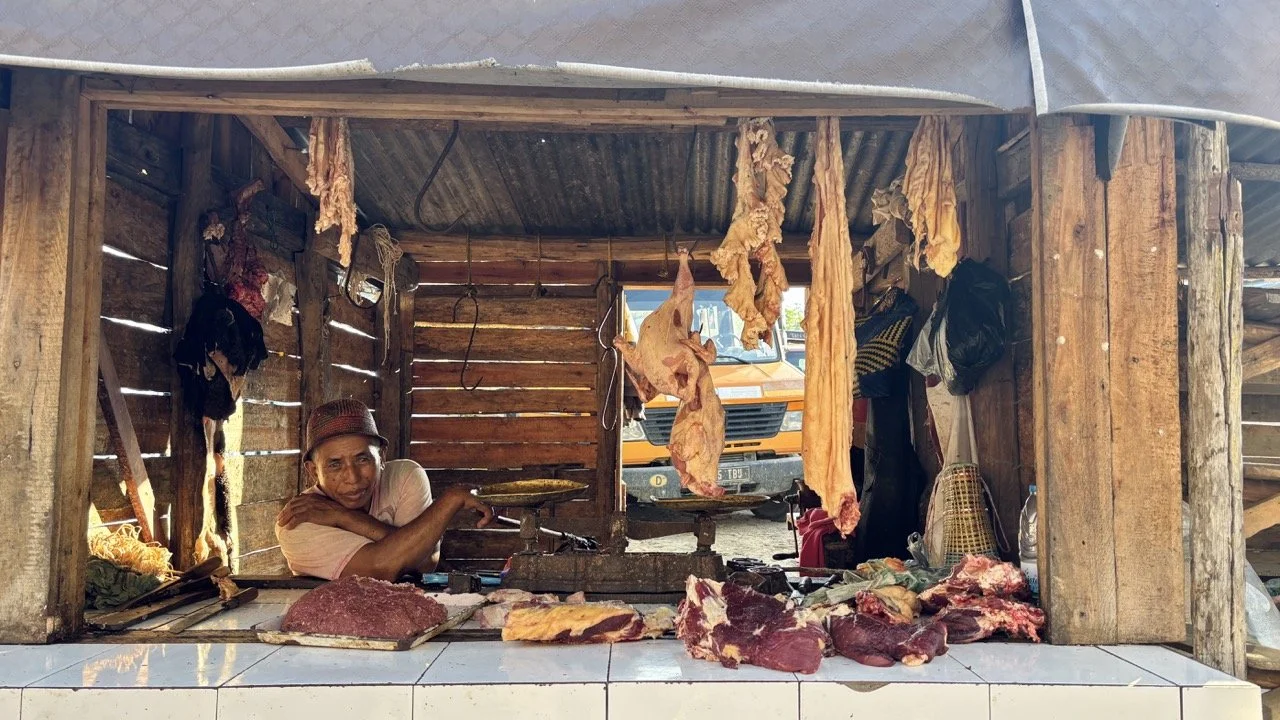
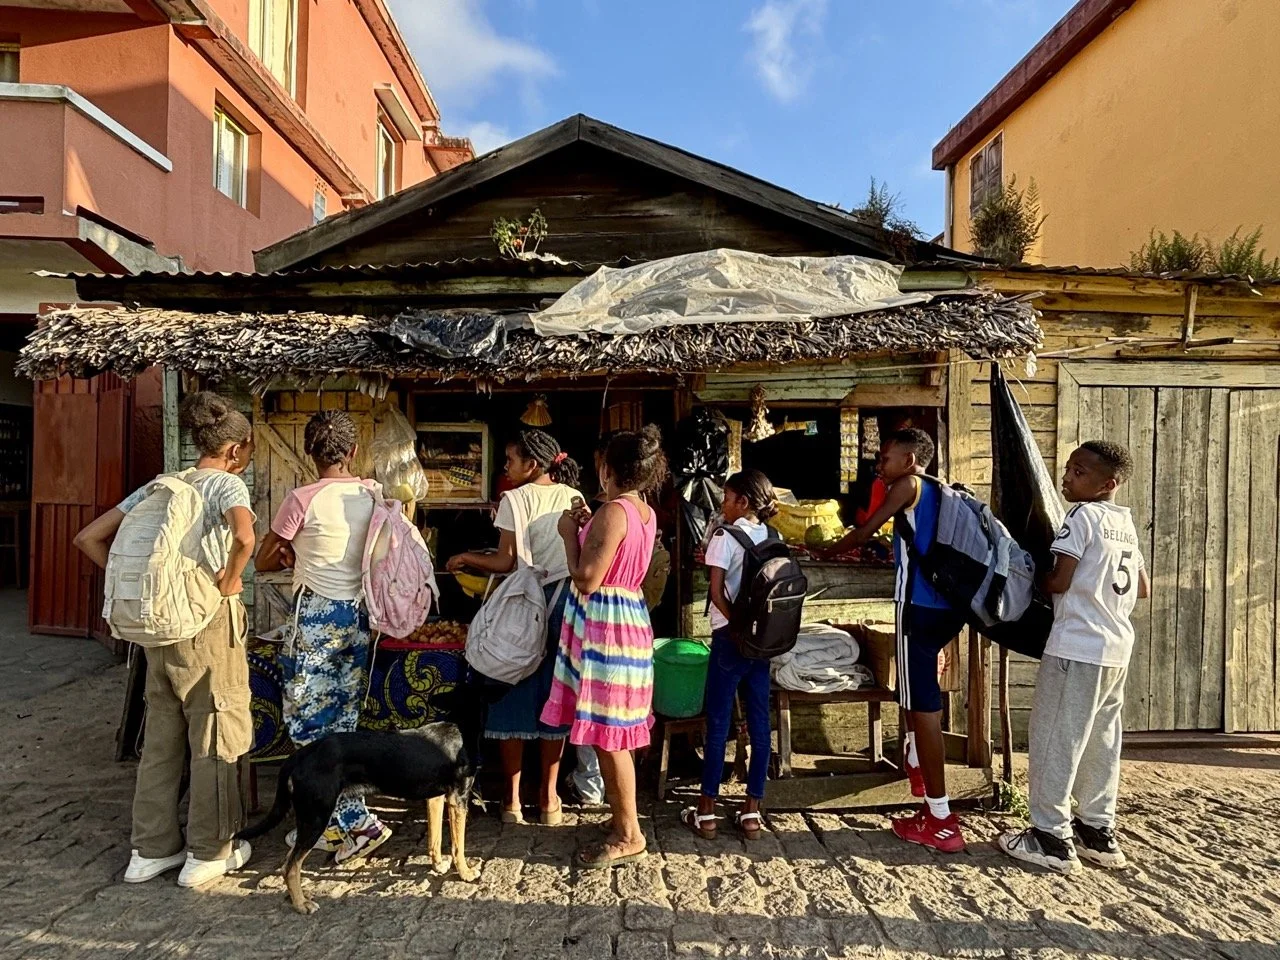
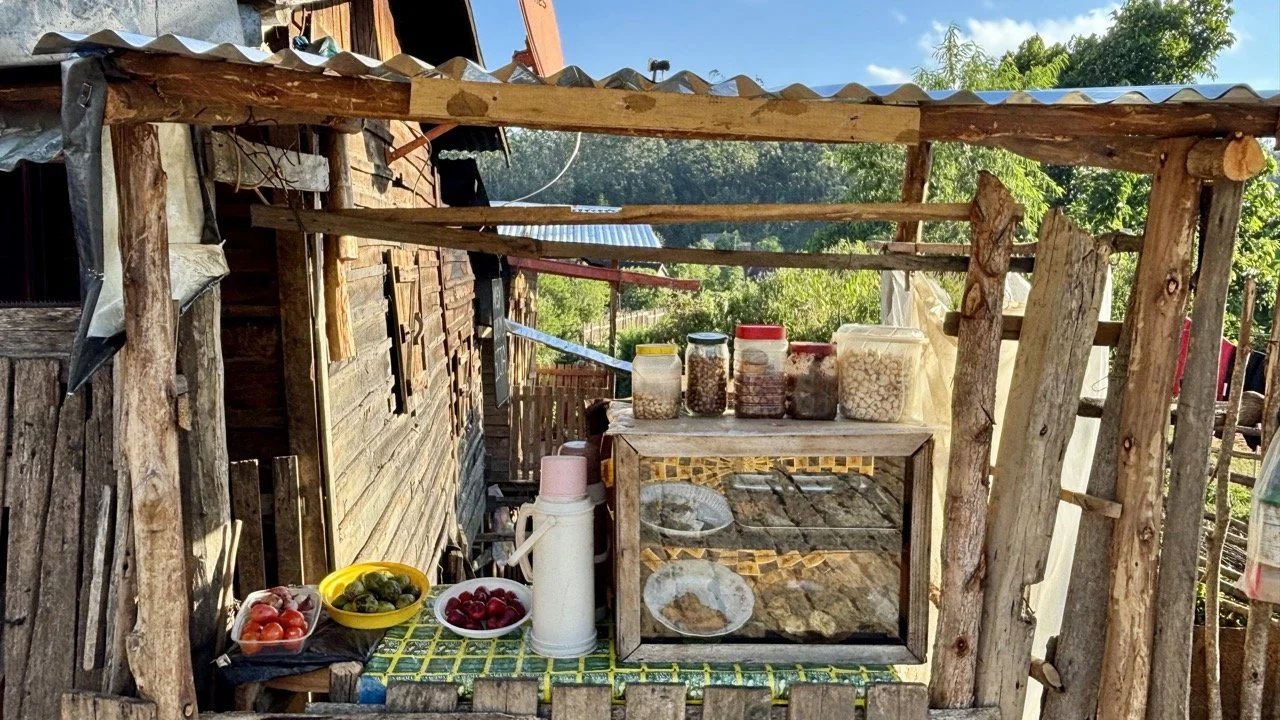
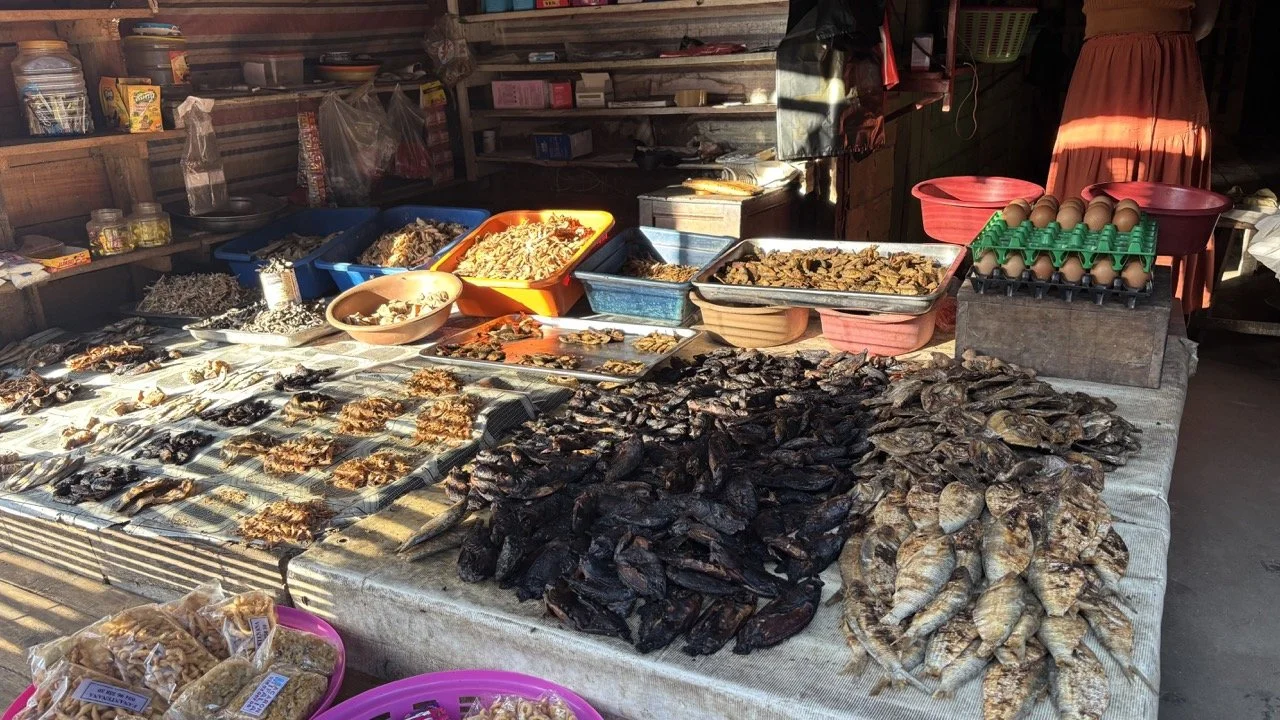
5. 本地小館與市集小吃(Local eateries & market stalls)
推薦原因:若想嚐到最地道、最便宜的馬達加斯加家常味,可於市集和路邊攤嘗試 mofo(炸麵點)、sambos(餡餅)與烤魚,能直接感受當地生活風味。
必吃菜:mofo、sambos、現烤魚與熱帶水果。
價位範圍:約 €0.5–€6/份(超親民)。
交通如何到達:在鎮中心或市場區步行即可探索;建議跟隨當地人氣攤位以確保新鮮。Google Maps
實用小貼士
預約建議:熱門飯店餐廳(如 Vakona、Andasibe Hotel)晚餐時段建議提前預約,尤其在旅遊旺季(乾季 5–10 月)。
現金與支付:安達西貝小店以現金(Ariary)為主,較大型旅館餐廳可能接受信用卡。
食安提示:若腸胃敏感,選擇熟食並飲用瓶裝水;小攤位請選翻桌率高且人多的攤位。
拍照友善:海邊或戶外餐廳黃昏光線好,拍食物與用餐情境照片效果佳;拍攝當地居民或漁民請先禮貌詢問同意。
安達西貝最佳旅行時間:何時拍 Indri、看狐猴與雨林最合適?(乾季 vs 雨季 實用比一比)
想在安達西貝(Andasibe)拍到經典的 Indri 吼聲、近距離狐猴與夢幻雨林倒影?選對旅行時間就能大幅提升拍攝成功率與旅遊品質。下面整理最實用的「乾季 / 雨季」比較、最佳月份、觀察野生動物與拍攝小撇步,幫你把 Andasibe 行程排得又安心又高效。
乾季(5–10 月) — 推薦指數:★★★★★(首選)
優點:天氣穩定、降雨少、道路乾爽,適合徒步與越野車行程;視野佳、晨昏能見度高,拍攝 Indri 吼猴、鳥類與森林全景的成功率高。
攝影優勢:清晨與黃昏的光線銳利,空氣透明,容易拍出高對比剪影與森林細節;瀑布水量較小但構圖更清晰。
野生動物觀察:Indri、其他狐猴與候鳥活躍且較易被尋獲;步道好走、導覽成功率高。
旅遊提示:屬於旅遊旺季,機票、內陸交通與住宿應提前預訂(建議至少 1–2 個月)。若計畫包車或請在地導遊,請同步確認接駁時間以配合清晨拍攝。
攝影裝備建議:廣角 16–35mm、標準 24–70mm、遠攝 70–200mm、偏光鏡、三腳架與多顆電池。
雨季(11–4 月) — 推薦指數:★★(備選/有特別偏好者)
優點:雨季植物繁茂、綠意濃厚,溪流與紅樹林更具生態活力;夜間與雨後的蛙類、昆蟲活動頻繁,適合微距攝影與夜拍。
限制:道路(尤其支線與偏遠路段)會泥濘或封閉,部分遠郊保護區需 4x4 才能安全抵達;猴麵包樹或長距離徒步的行程可能受限。
攝影建議:利用雨後的雲霧與濕潤光影創造氛圍照片,帶防水罩與速乾衣物;夜間微距(蛙、昆蟲)可拍得更多獨特題材。
旅遊提示:若只能在雨季前來,務必彈性安排行程並選擇有經驗的 4x4 司機與當地導遊;預留額外的交通時間與備案。
裝備補充:防水相機罩、防潮包、快乾衣物、備用電池(濕冷環境耗電快)。
最佳月份總結
首選:6–9 月(光線穩定、天氣最佳、野生動物可見率高)
次選:5 月、10 月(過渡月,人潮較少且天氣仍佳)
避開(如非必要):12–3 月(豪雨期、道路與活動受影響風險較高)
實用行前準備
票務與預訂:旺季提早預訂國內航班、住宿與包車;若需夜間導覽也請預約。
健康與保險:帶足防蚊(DEET)、常用藥與旅遊保險;雨季注意腹瀉與皮膚保護。
現金與通訊:當地小店多收現金(Ariary),請備足小額現金;訊號偏弱,預備離線地圖或司機聯絡方式。
安全:夜間觀察請結伴並由導遊帶領,切勿單獨進入保護區。
攝影實用小技巧(依季節調整)
乾季:把 Indri 与主要鳥種排在日出(06:00–09:00)或日落時段(16:30–18:30),善用逆光輪廓與低角度呈現。
雨季:專注於微距與氛圍攝影:捕捉露珠、雲霧、蛙類與變色龍;使用偏光鏡與柔光補光,避免強烈閃燈。
通用:隨時備好防潮袋、備用電池與現場備份(外置硬碟或雙卡槽相機),每天結束後立即備份與擦拭鏡頭。
結語
還在猶豫何時出發?告訴我你的出發月份與拍攝偏好(野生動物/人文/微距),我幫你量身建議最佳出發時間,並可推薦可靠的在地司機與導遊,讓你的 Andasibe 拍攝之旅更順利。
安達西 Andasibe/ 馬達加斯加預算建議
日均(中等旅遊):€50–€120/人(含交通、住宿、餐飲、導覽)。
小技巧:合併包車或加入小團能降低人均交通成本,導遊常為絕佳拍攝協助。
安達西 Andasibe/ 馬達加斯加必備物品清單
文件:護照、旅遊保險、當地現金(Ariary)。
服裝:輕便防水外套、快乾衣、登山鞋與帽子。
攝影:廣角 16–35mm、標準 24–70mm、遠攝 70–200mm、三腳架、偏光鏡、ND 濾鏡、備用電池、記憶卡、防塵防潮袋。
其他:驅蚊劑(含 DEET)、頭燈、急救包與能量補給。
安達西 Andasibe/ 馬達加斯加攝影 Tips(專業拍攝建議)
聲音與耐心:Indri 對聲音敏感,使用靜音拍攝並降低腳步聲。
構圖策略:將 Indri 與森林環境結合,留白與前景樹葉能增加深度。
早晚光線:清晨 06:00–09:00 與傍晚 16:30–18:30 為最佳拍攝時段(自然叫聲與光影最高)。
夜間拍攝:使用高 ISO 與快光圈鏡頭,避免使用強閃燈以免驚嚇動物。
生態倫理:不餵食、不追逐、不入侵巢區,尊重野生動物與導遊指示。
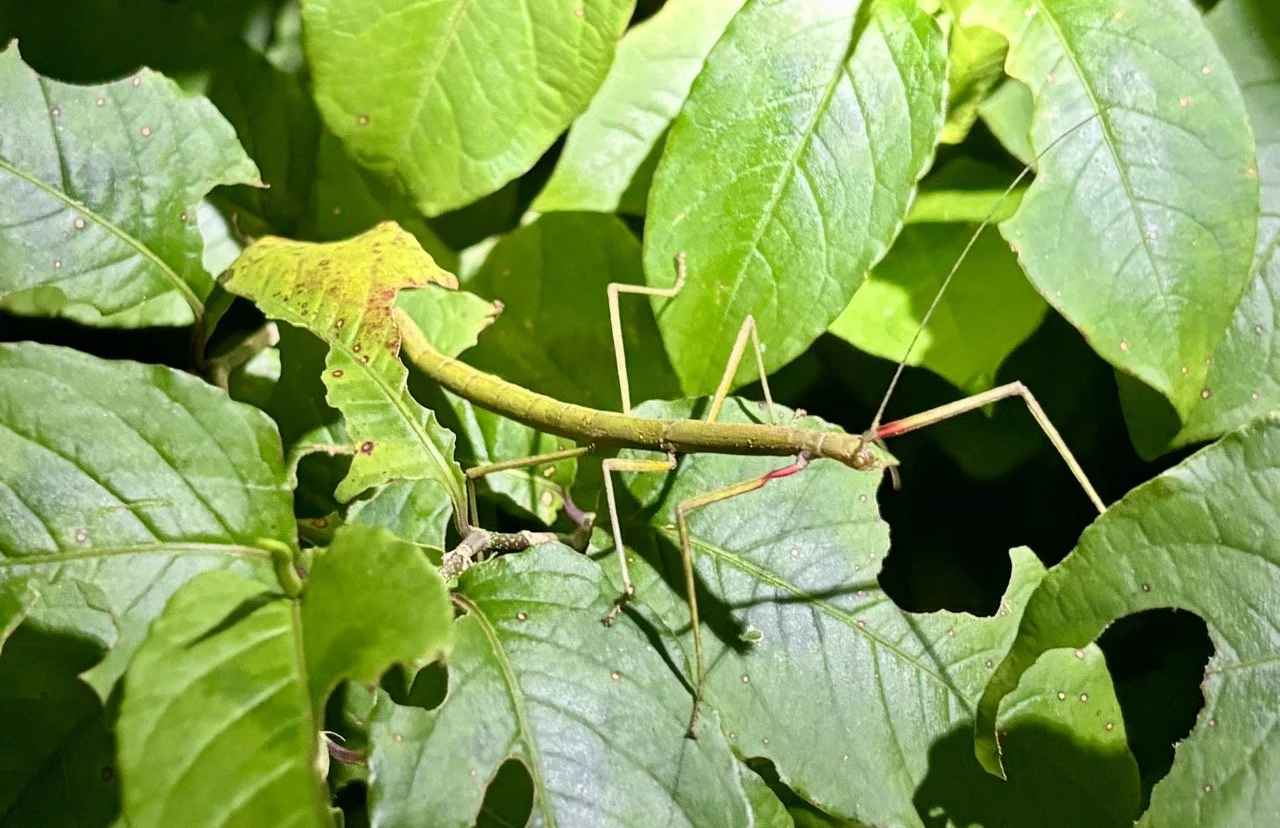
安達西貝 Top 5 特殊動物介紹
安達西貝(Andasibe)是馬達加斯加東部的生態寶庫,能遇見許多只在島上出現的奇特物種。下面整理「Top 5 必看動物」,包含牠們的獨特之處、在哪裡最容易看到、保育狀況與實用拍攝建議,幫你在 Andasibe 拍到有故事的自然肖像。
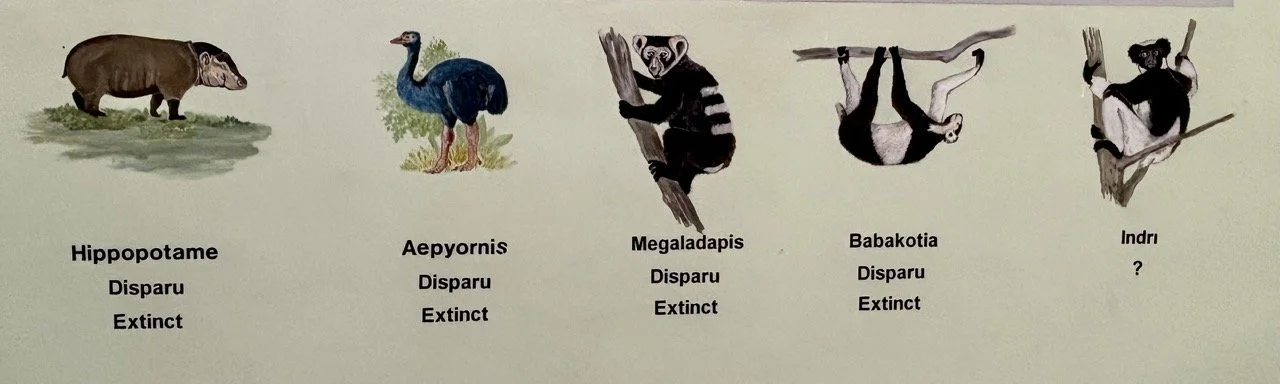
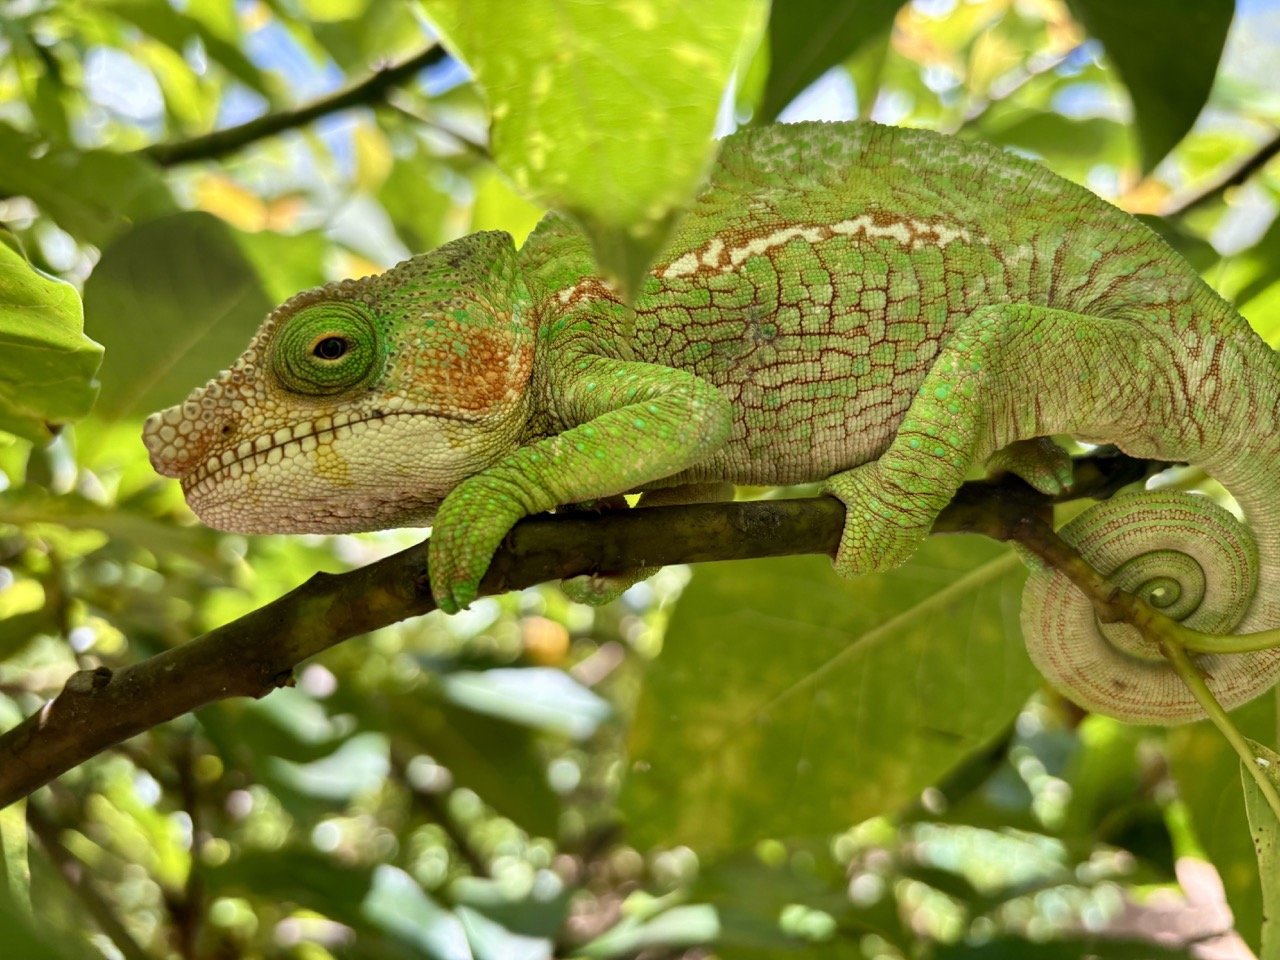
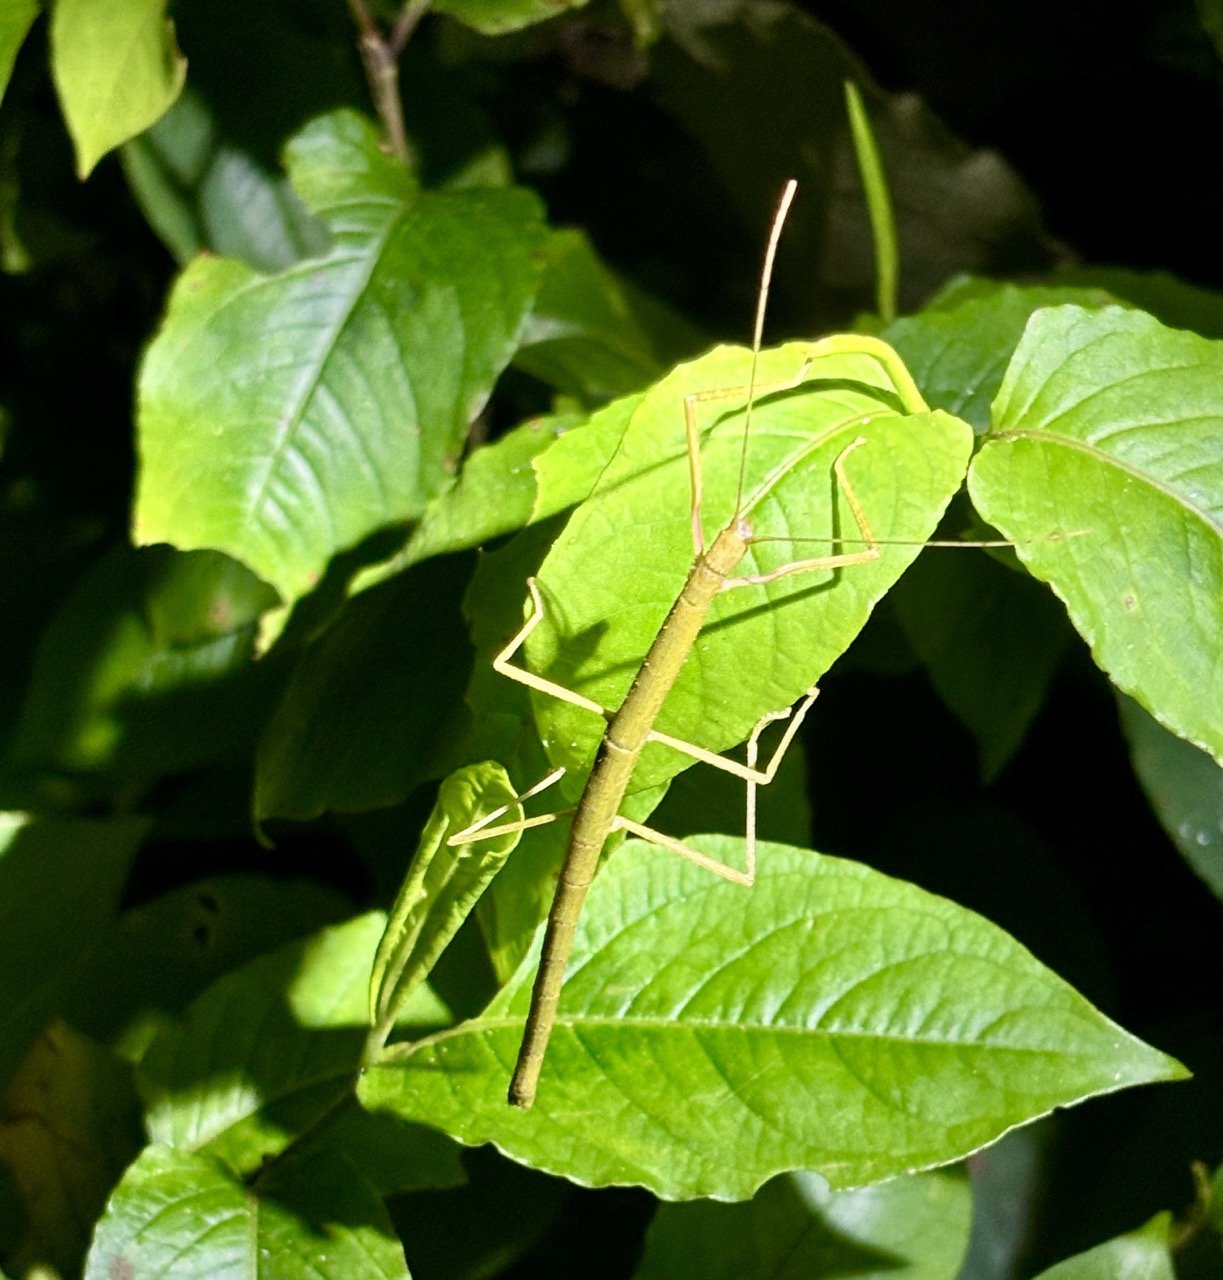
Indri(吼猴 / Indri indri) — 森林之歌的巨型歌者
獨特之處:Indri 是體型最大的狐猴之一,最著名的是清晨響亮、層次豐富的「吼聲」,能傳遞數公里。牠們幾乎沒有尾巴,行動以樹間跳躍與抱樹靜立為主,是 Andasibe 的明星物種與熱門拍攝對象。
在哪看:Analamazaotra / Andasibe Reserve 的清晨導覽極高機率見到。
保育狀況:受棲地破碎與伐木威脅,屬保育重點物種(IUCN 受威脅)。
拍攝建議:最佳時段 06:00–09:00;器材以 70–200mm 做動物肖像,24–70mm 捕捉環境與群體行為;使用靜音及連拍模式,不要大聲喧嘩或靠近巢區。錄下吼聲也能提升後製故事感。
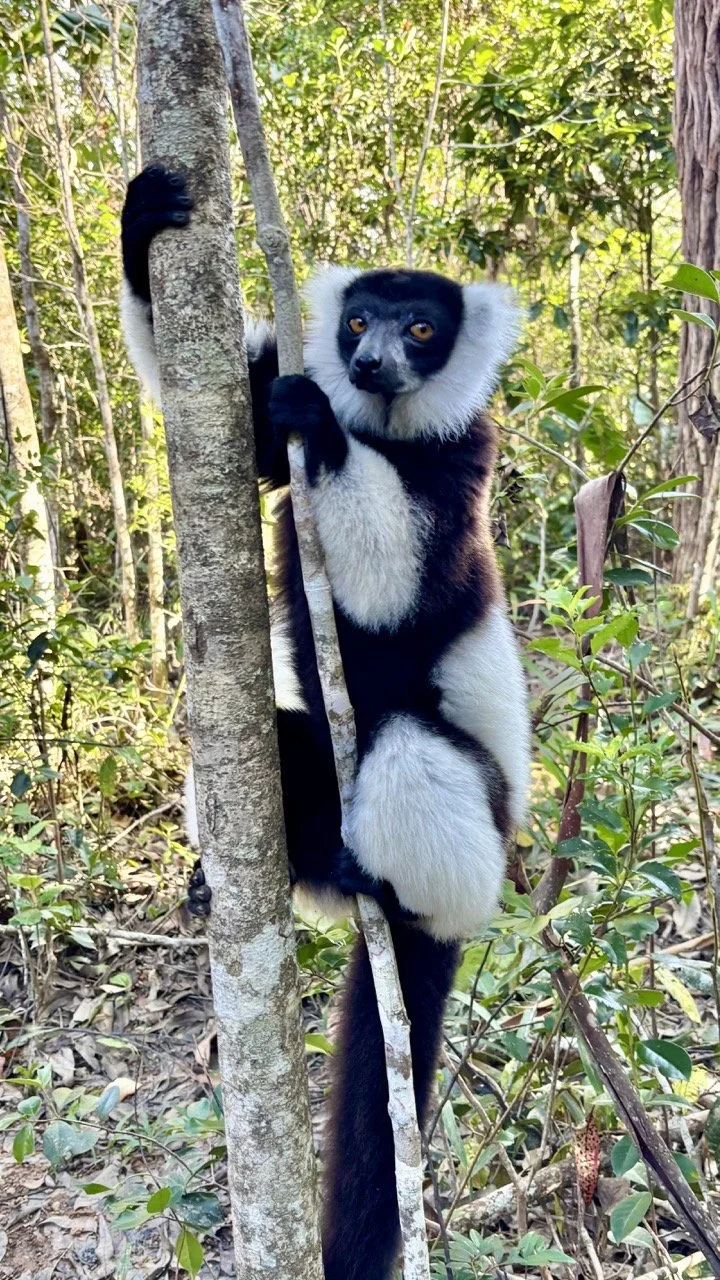
2. Diademed Sifaka(冠狀跳狐猴 / Propithecus diadema) — 色彩繽紛的樹上舞者
獨特之處:Diademed sifaka 毛色華美(白、金、黑交錯),動作優雅,跳躍時像森林舞者。牠們在高樹冠間移動快速,姿態優美,是高難度但獎勵豐厚的拍攝對象。
在哪看:Mantadia 國家公園與 Maromizaha 深林較常見,需較多徒步。
保育狀況:棲地縮減使其數量受壓,屬保育敏感物種。
拍攝建議:用 70–200mm 或更長焦段捕捉跳躍瞬間;預設高速快門(1/500s 以上),連拍模式與預測構圖(等候跳躍軌跡)。低角度構圖能突顯天空與樹冠背景。
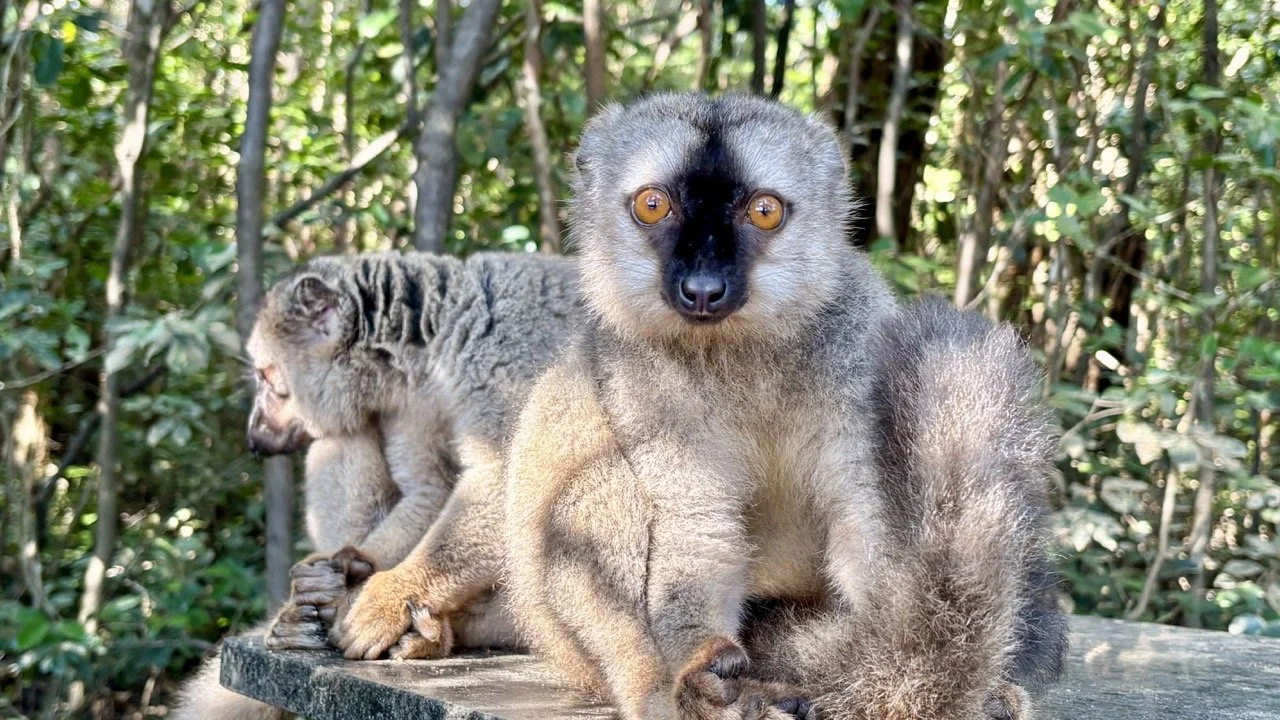
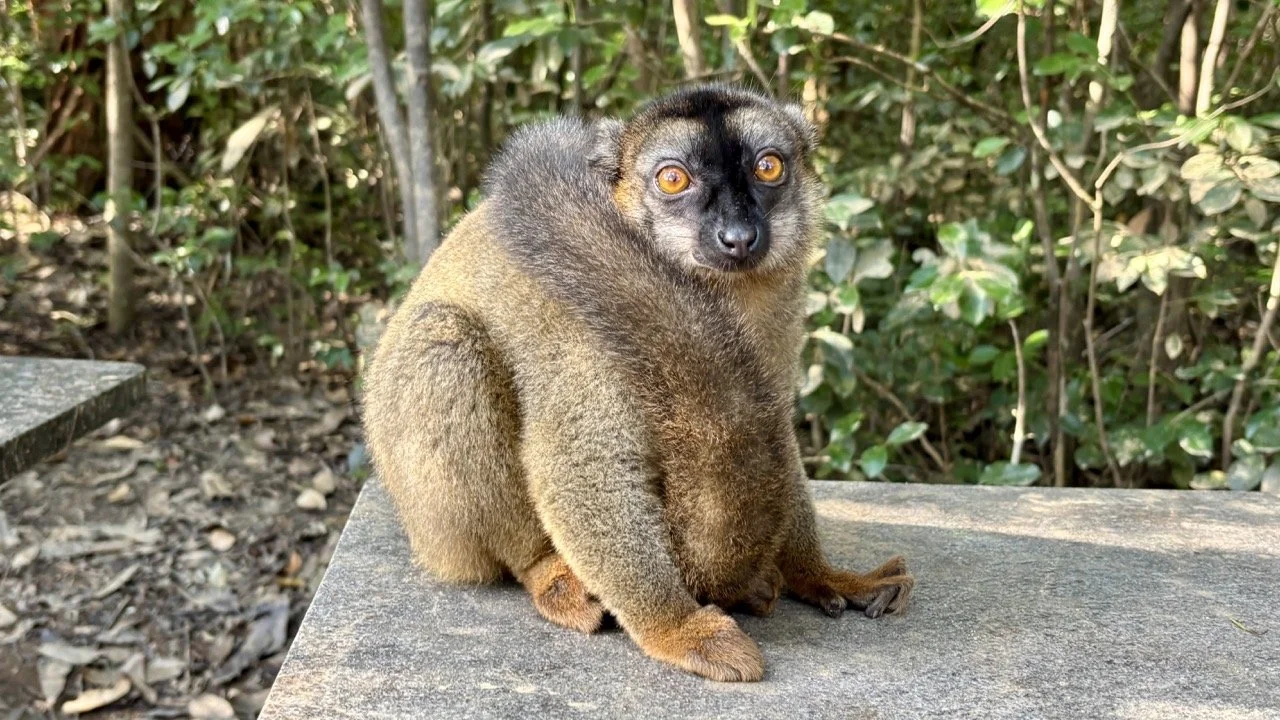
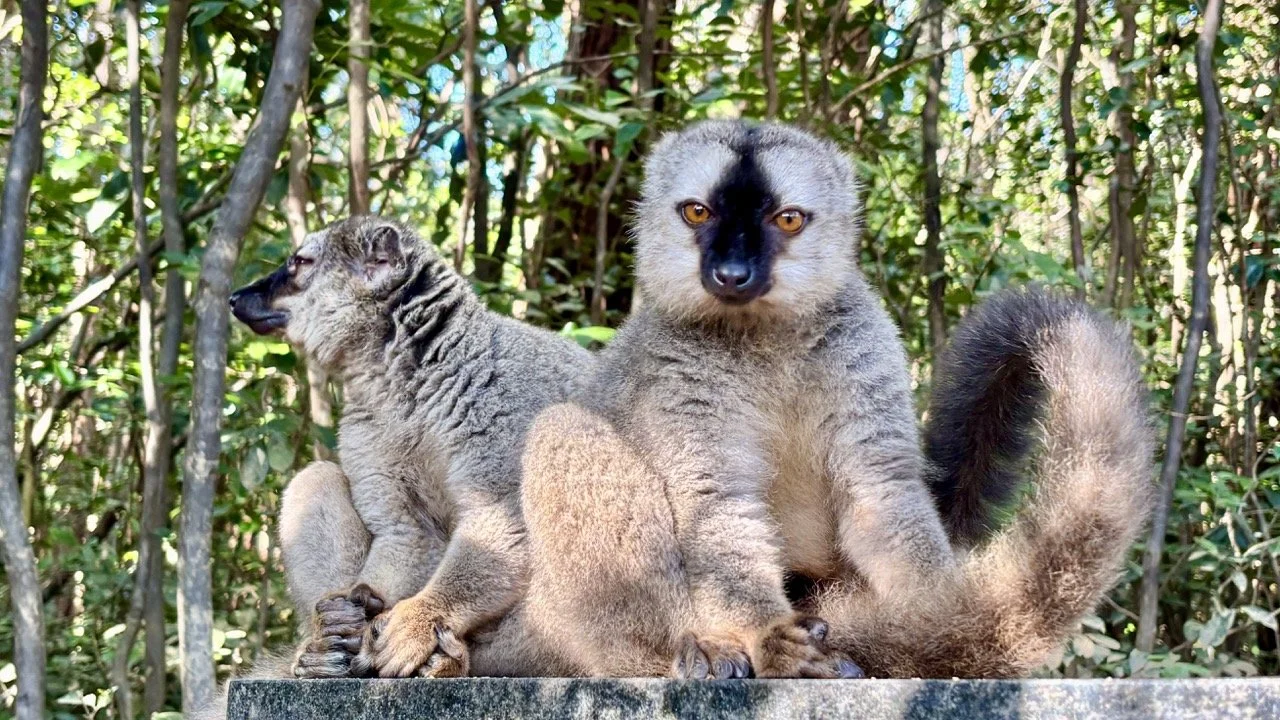
3. Common Brown Lemur(褐狐猴 / Eulemur fulvus) — 靈活且親近人的森林居民
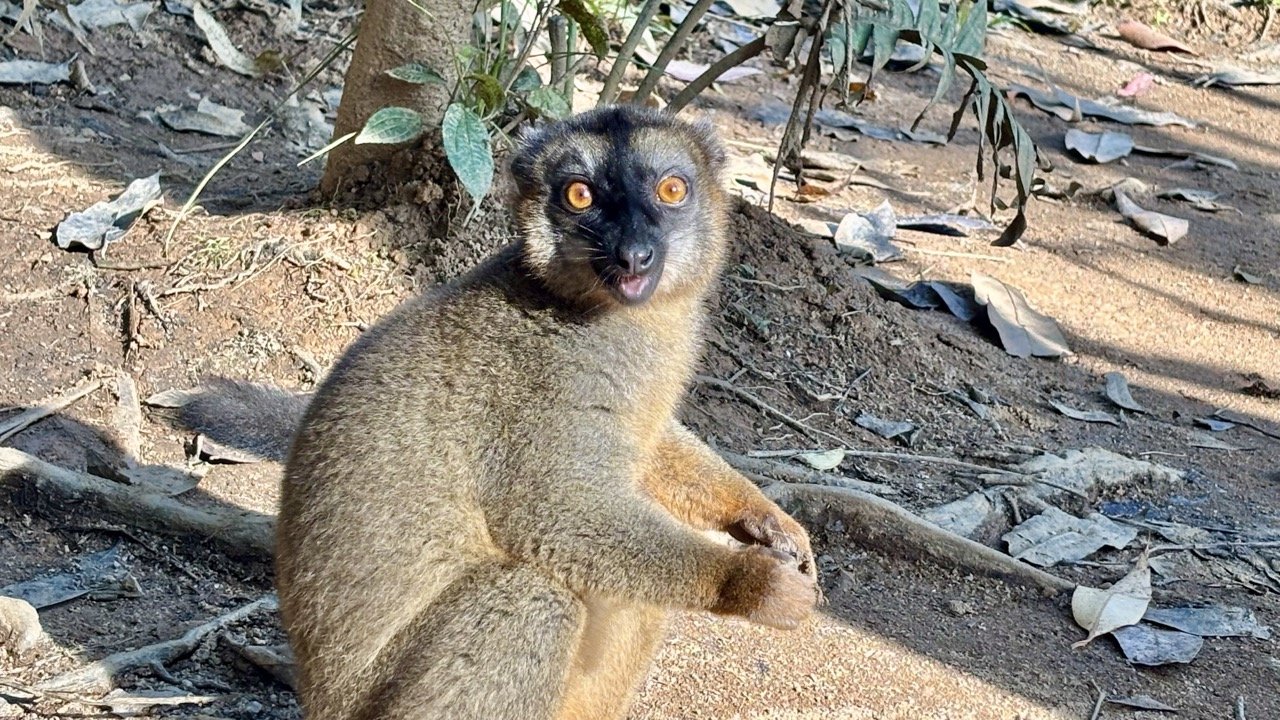
獨特之處:褐狐猴族群行動靈活、分布廣,是較容易觀察與拍攝的狐猴種類。牠們常在低層樹冠活動,行為多樣,包括覓食、社群互動與日間休息。
在哪看:Andasibe 及 Vakona 附近常見,Lemur Island(Vakona)易近距離拍攝。
保育狀況:雖非最危急種,但棲地與獵捕壓力仍需關注。
拍攝建議:50–200mm 中焦組合適合拉近人物感;在互動場景採用較大光圈(f/2.8–f/5.6)取得背景分離;人像式環境構圖能呈現行為與棲地。
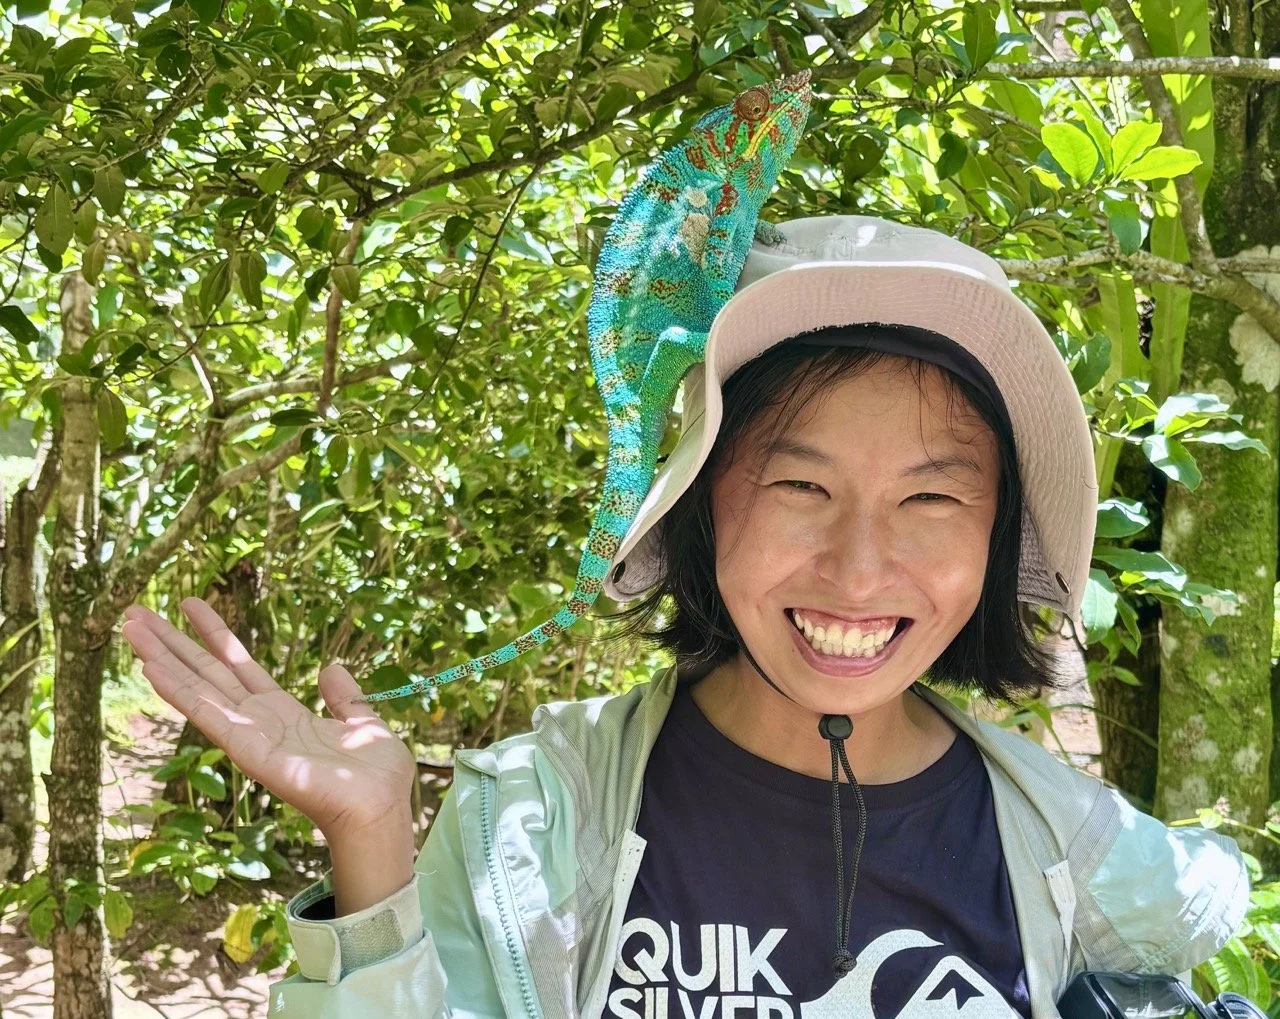
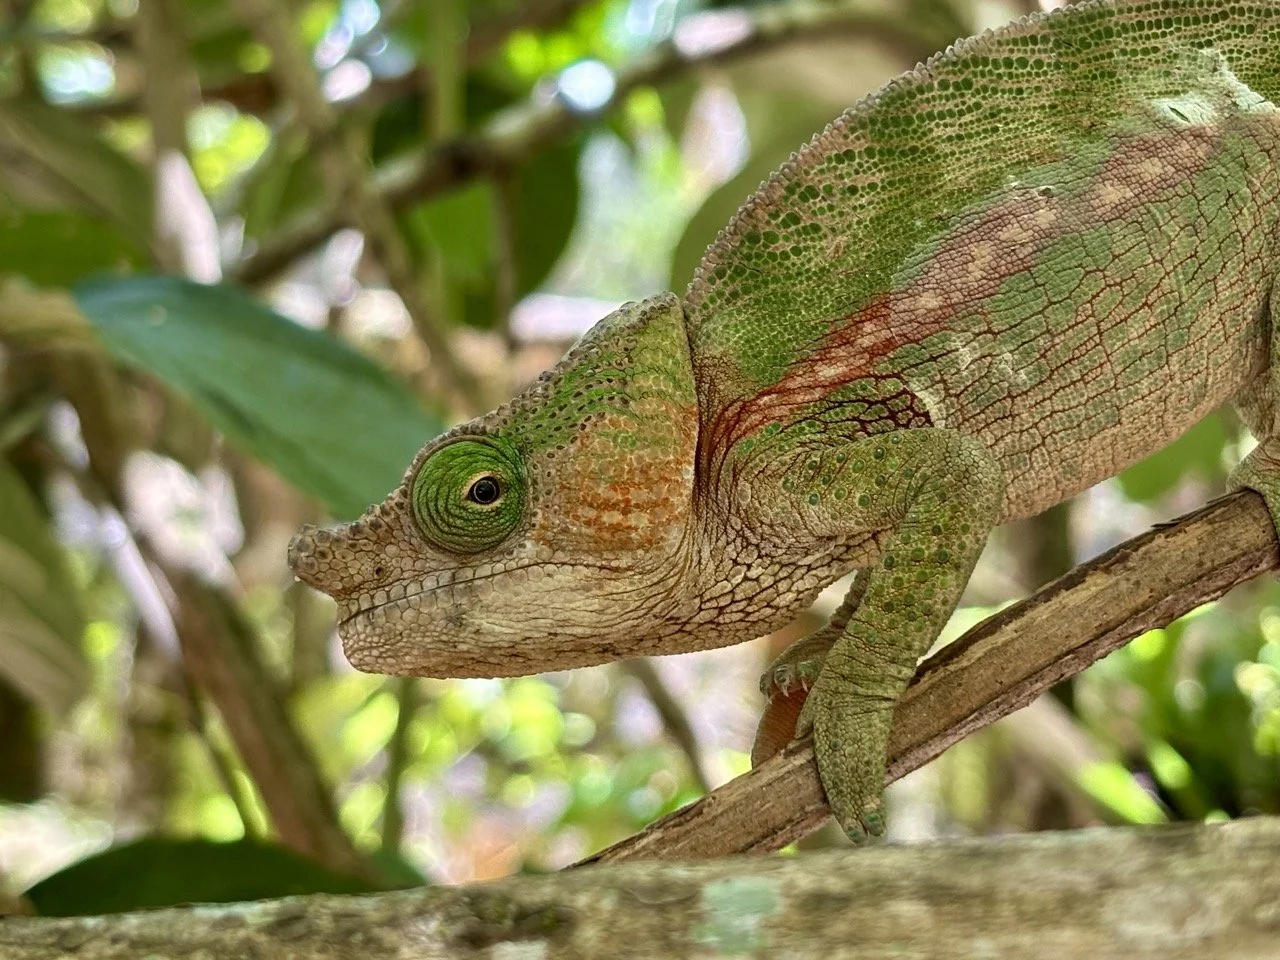
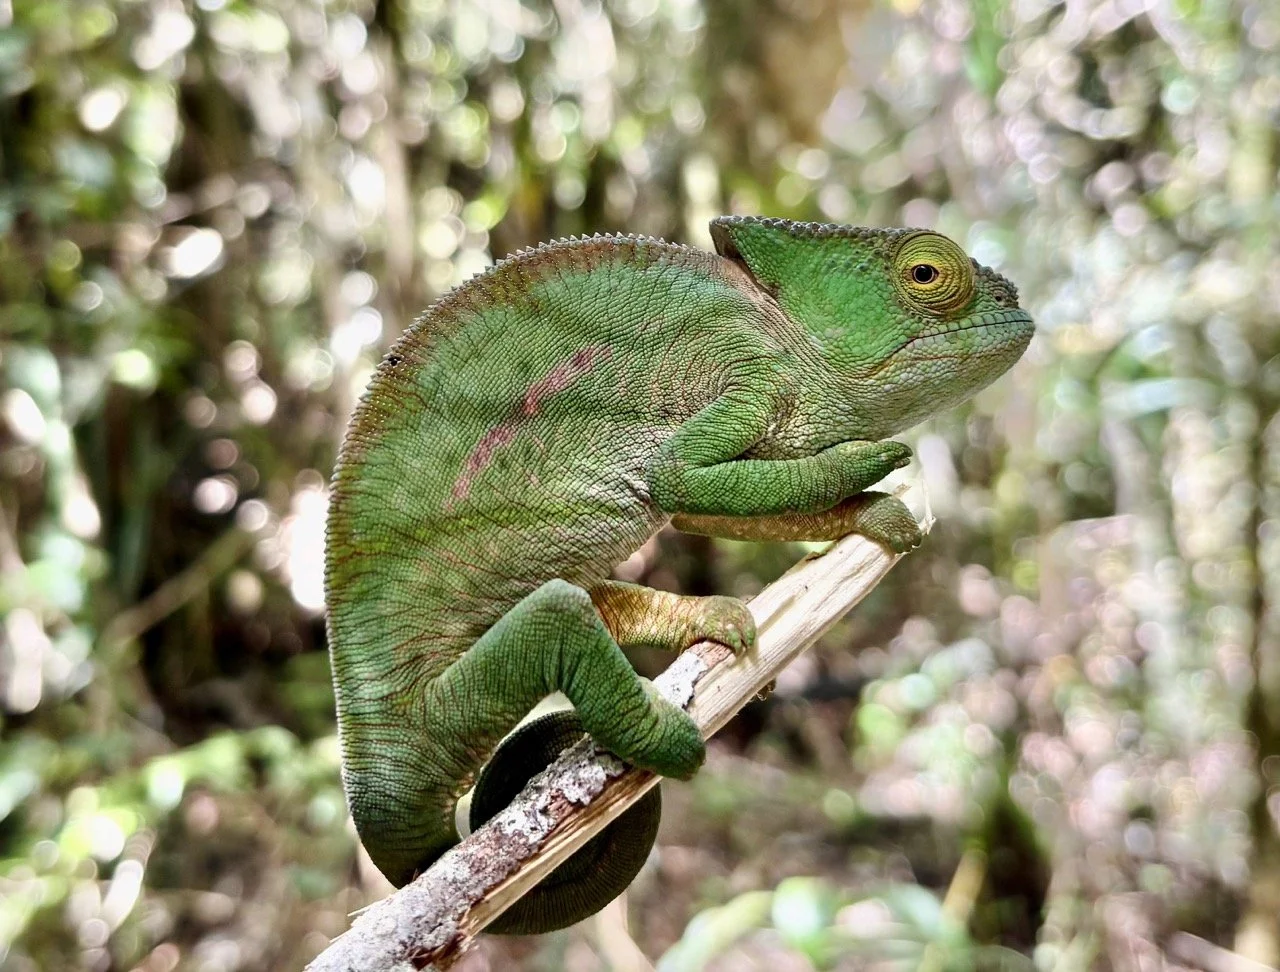
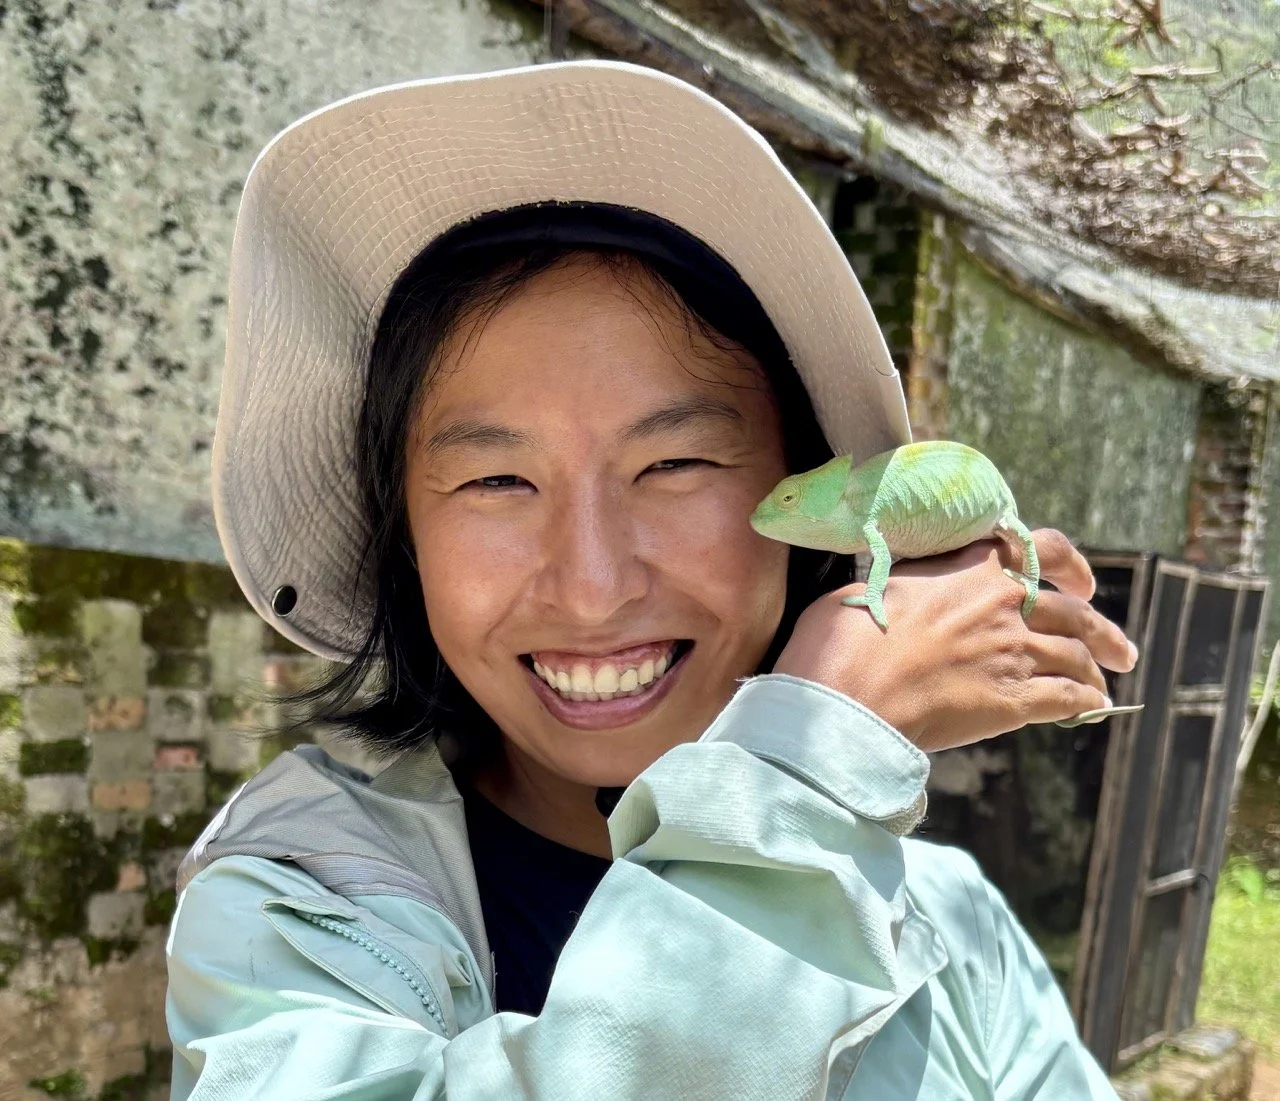
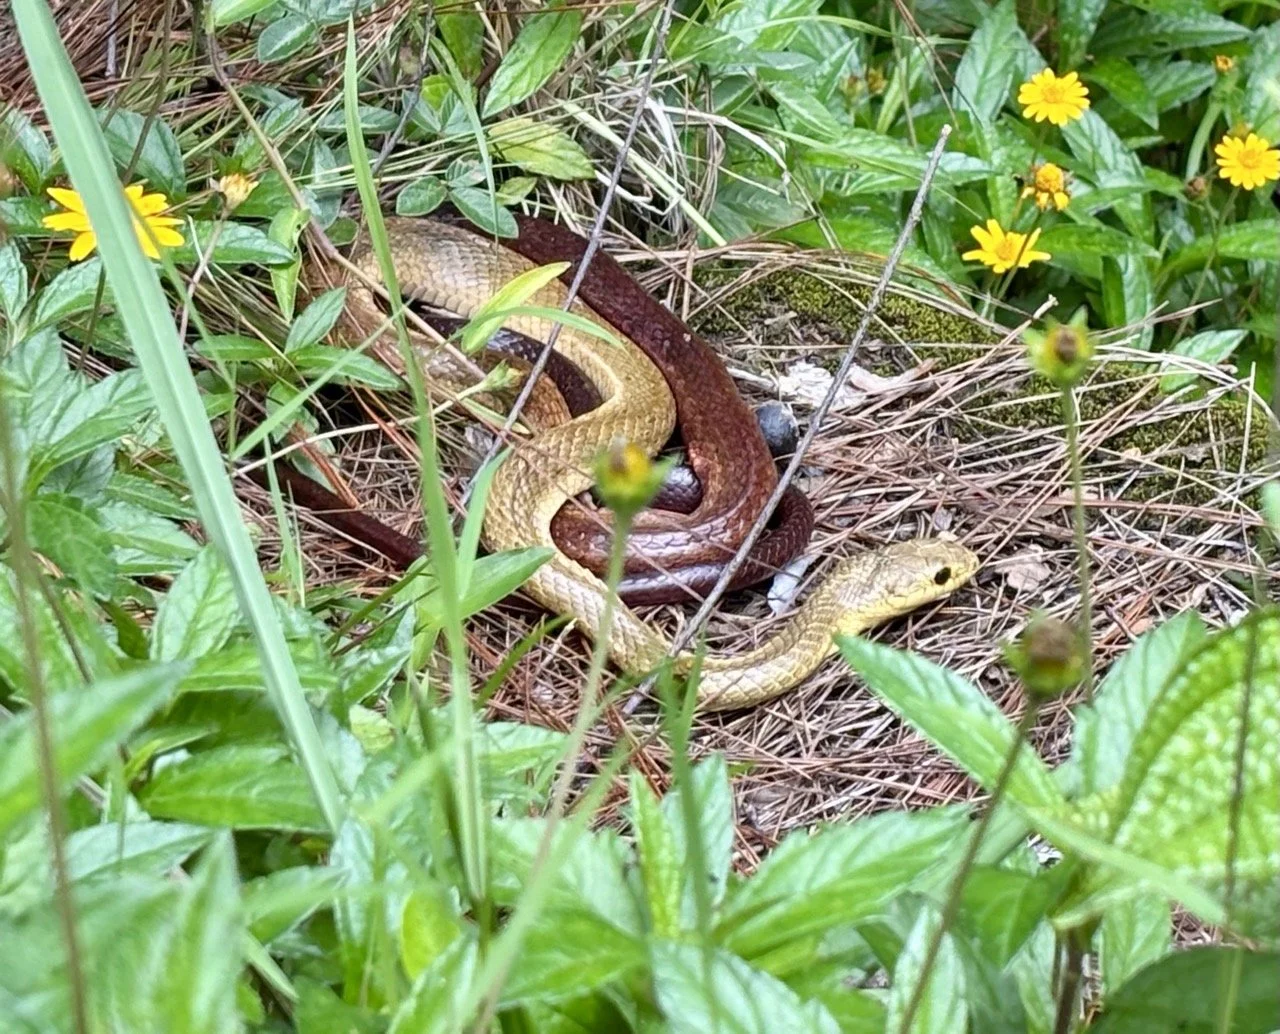
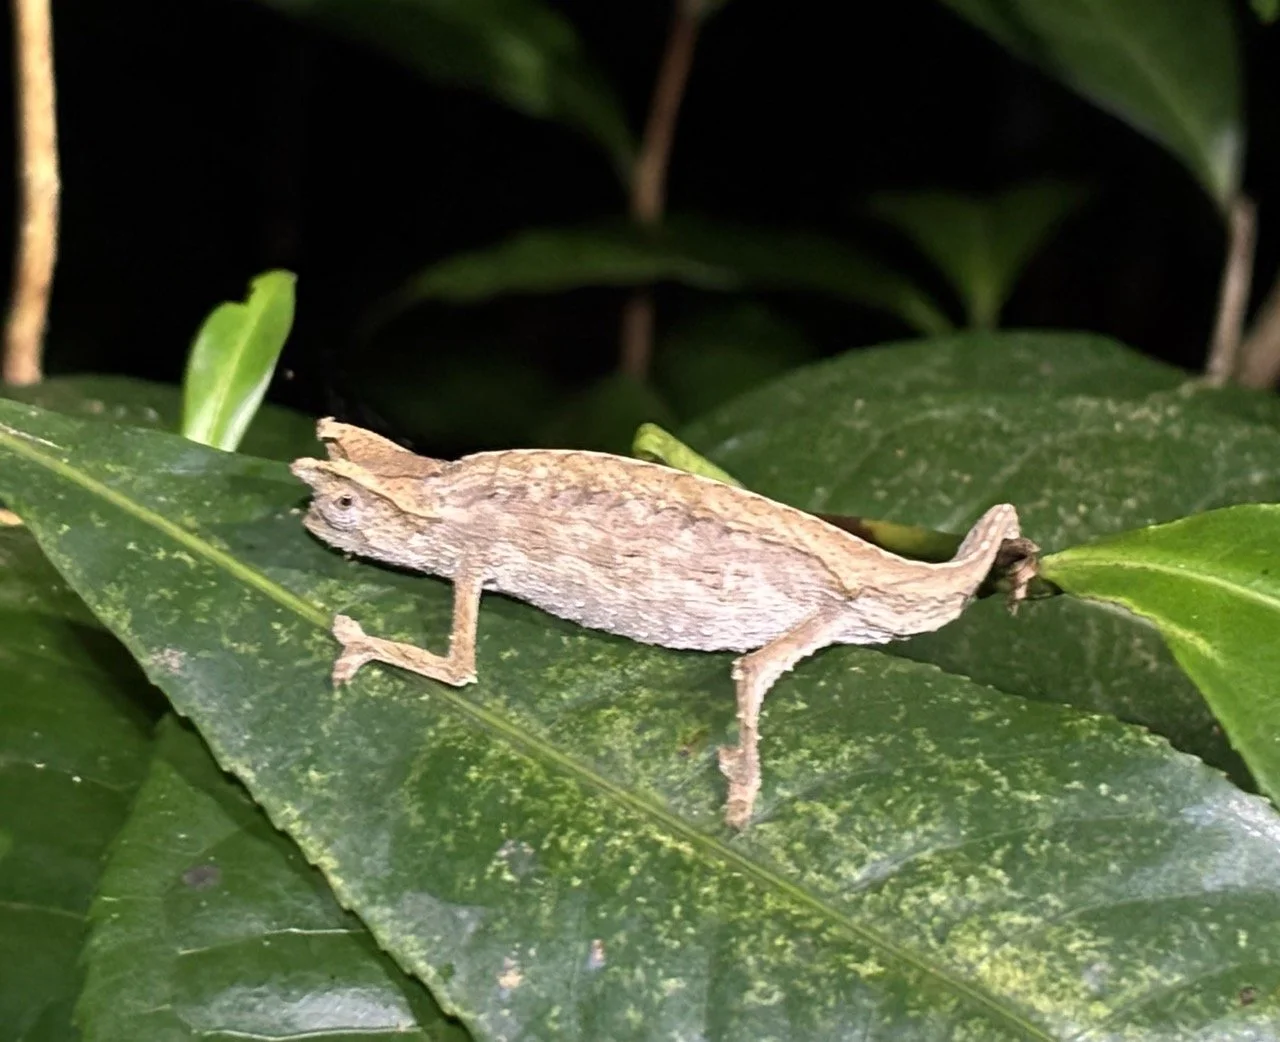
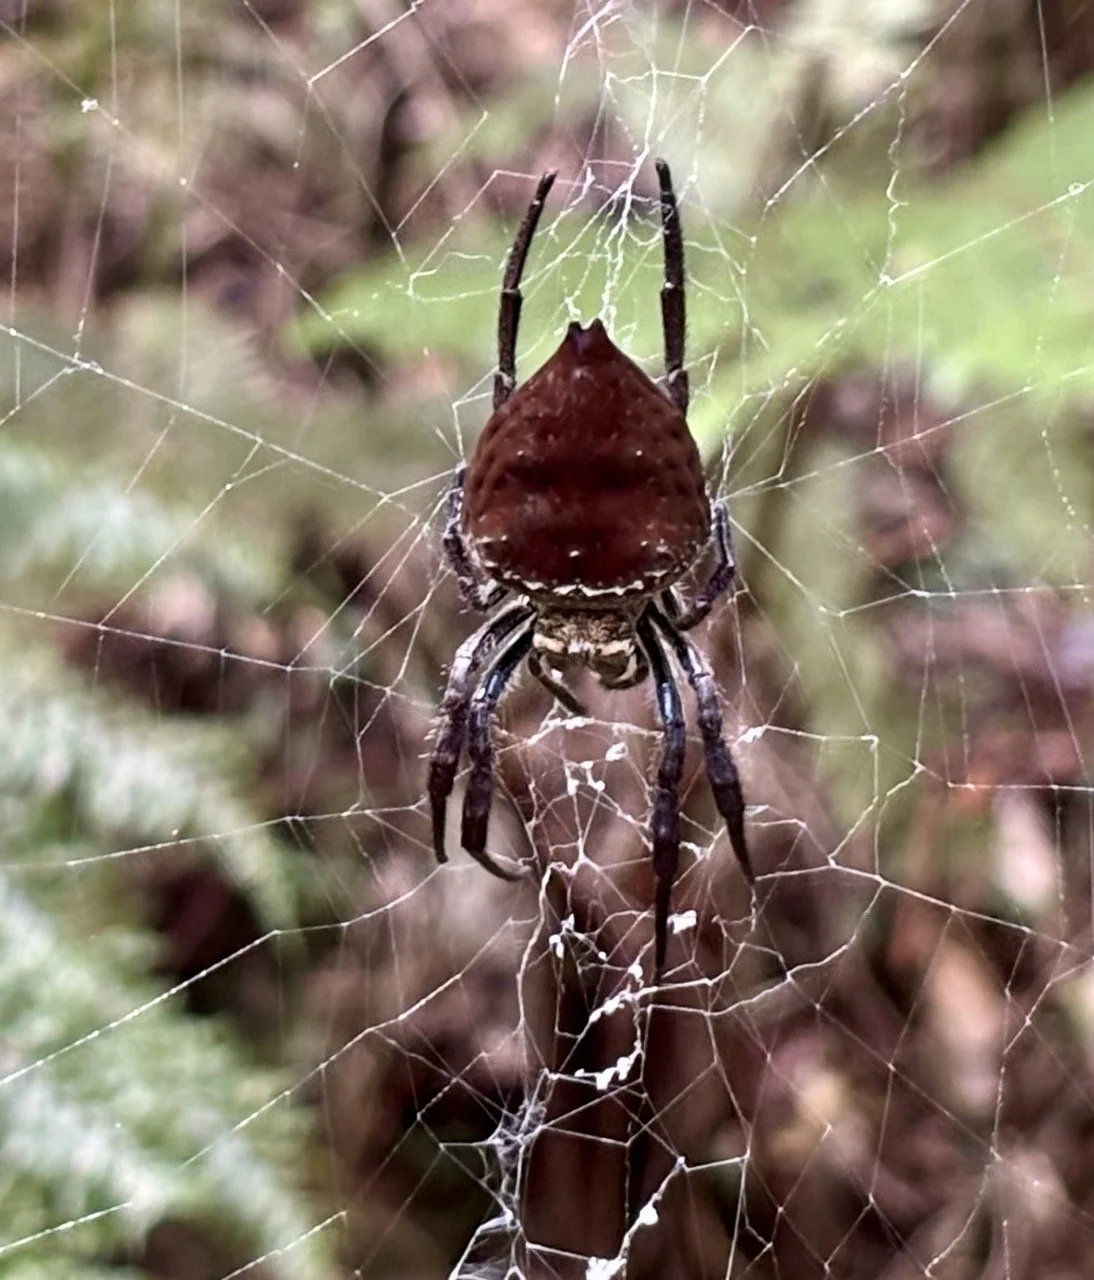
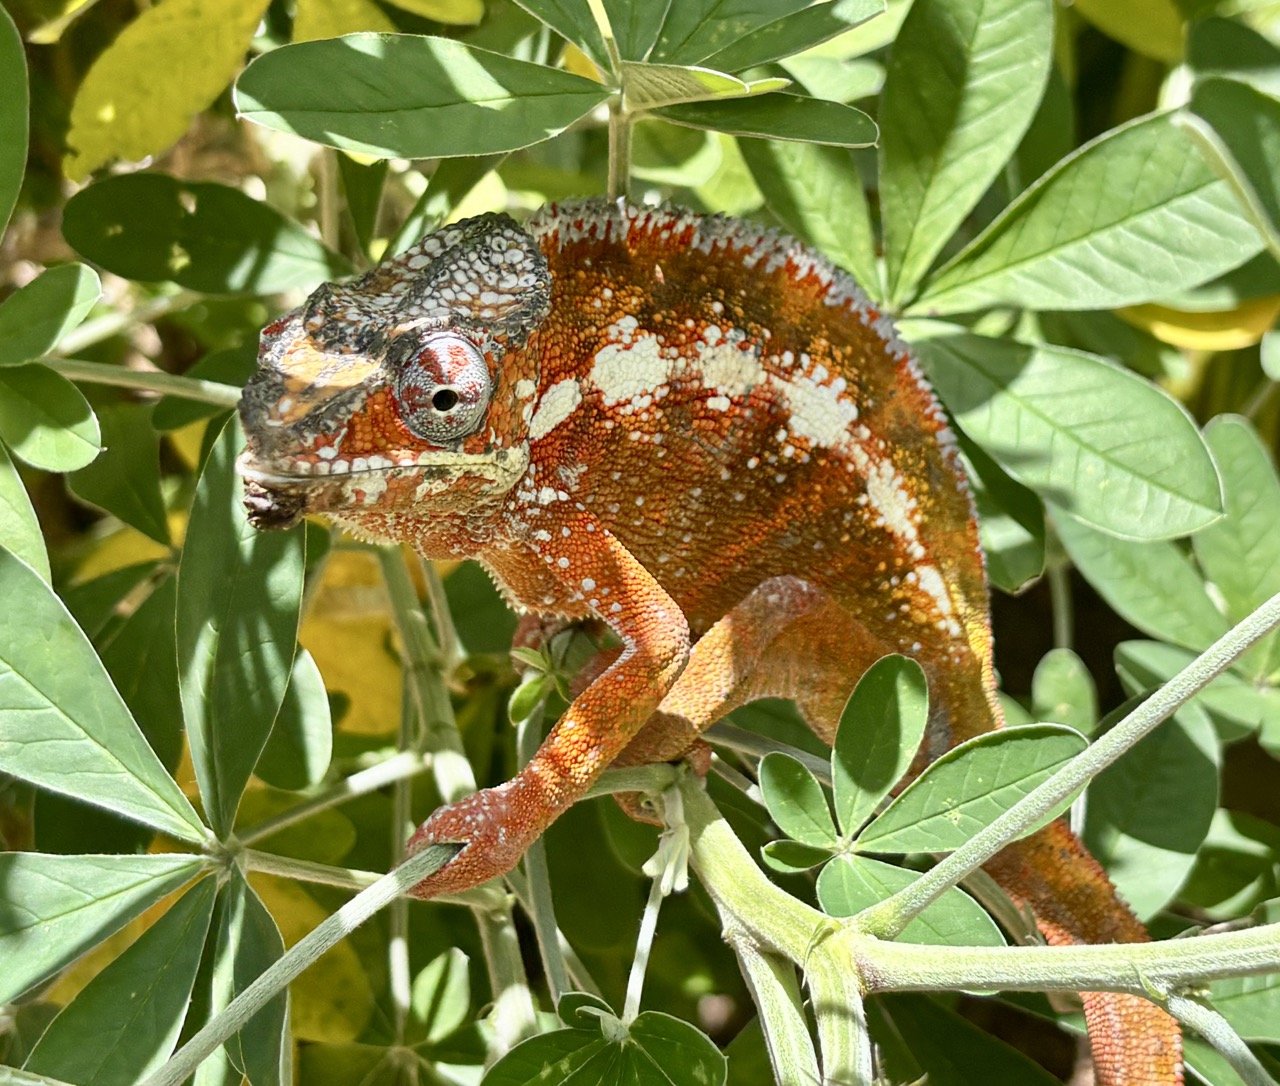
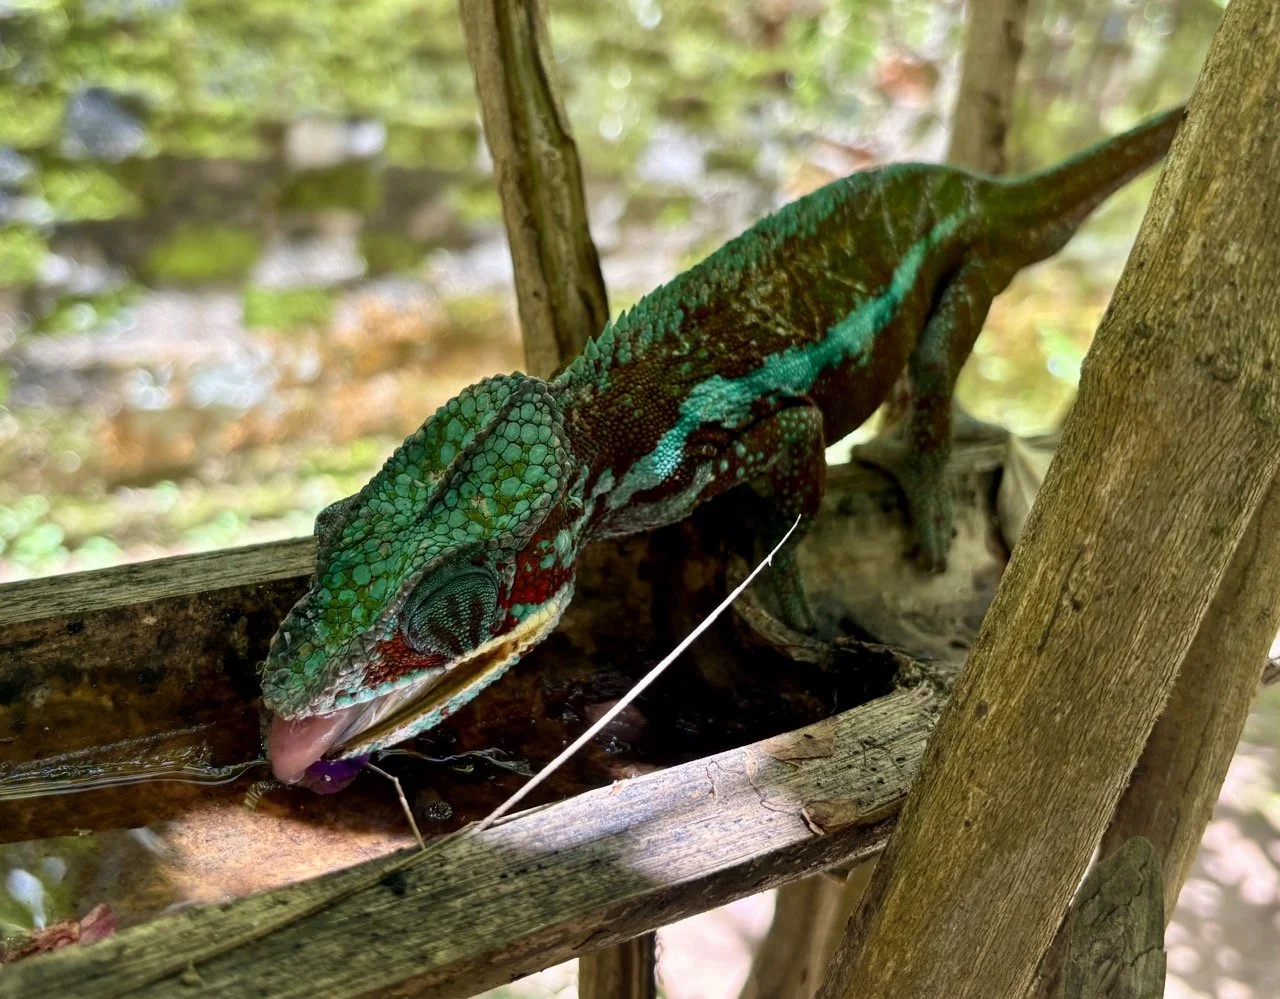
4. Parson’s Chameleon(帕森變色龍 / Calumma parsonii)— 體型龐大的變色大師
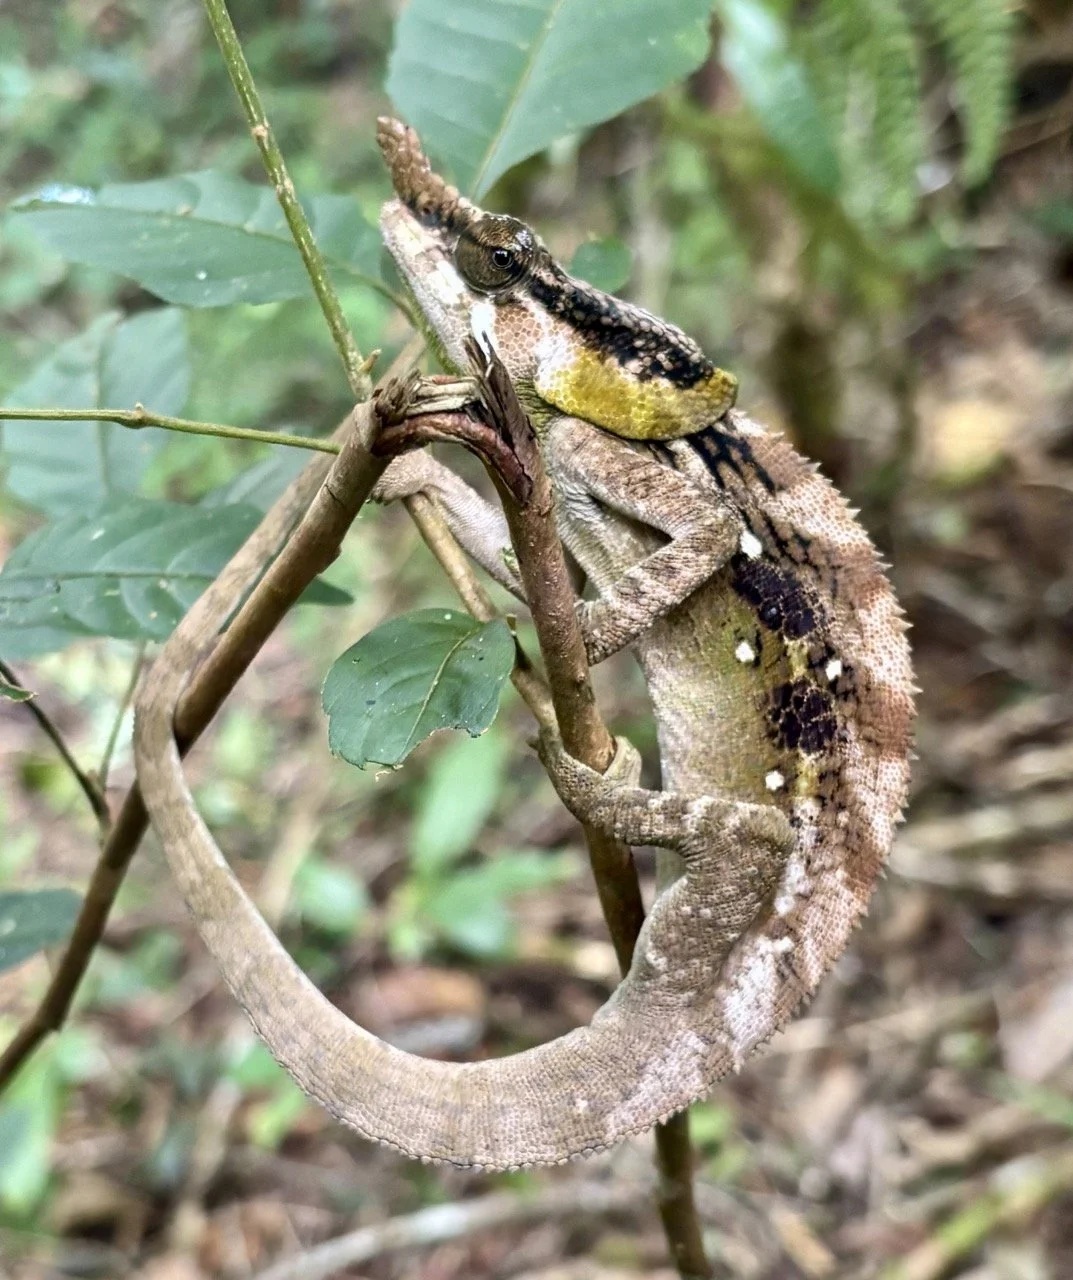
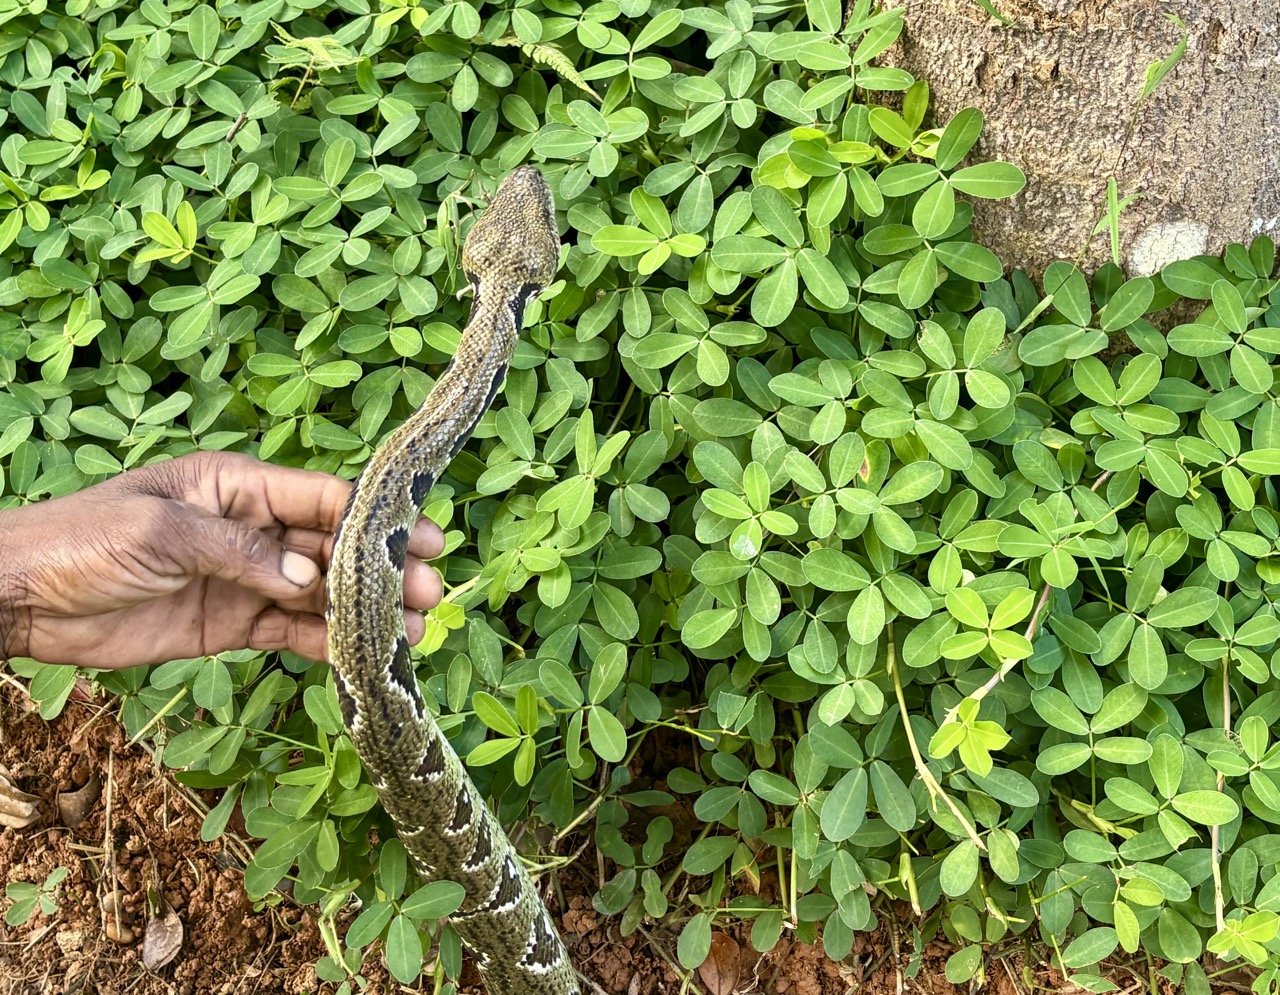
獨特之處:帕森變色龍是世界上體型最大的變色龍之一,顏色與紋理豐富,常棲於東部雨林中。牠們視覺有特色、舌頭伸出捕食迅速,是爬蟲類拍攝的夢幻對象。
在哪看:Mantadia、Maromizaha 與 Vohimana 等原始雨林,以及保育園區或私導覽路線可能遇見。
保育狀況:部分種群受棲地喪失與非法寵物貿易影響,需嚴格保護。
拍攝建議:微距或中焦(100mm–200mm)可拍皮膚細節與眼部特寫;使用自然側光或柔光補光展示色彩與紋理,避免驚嚇或強烈長時間照射。
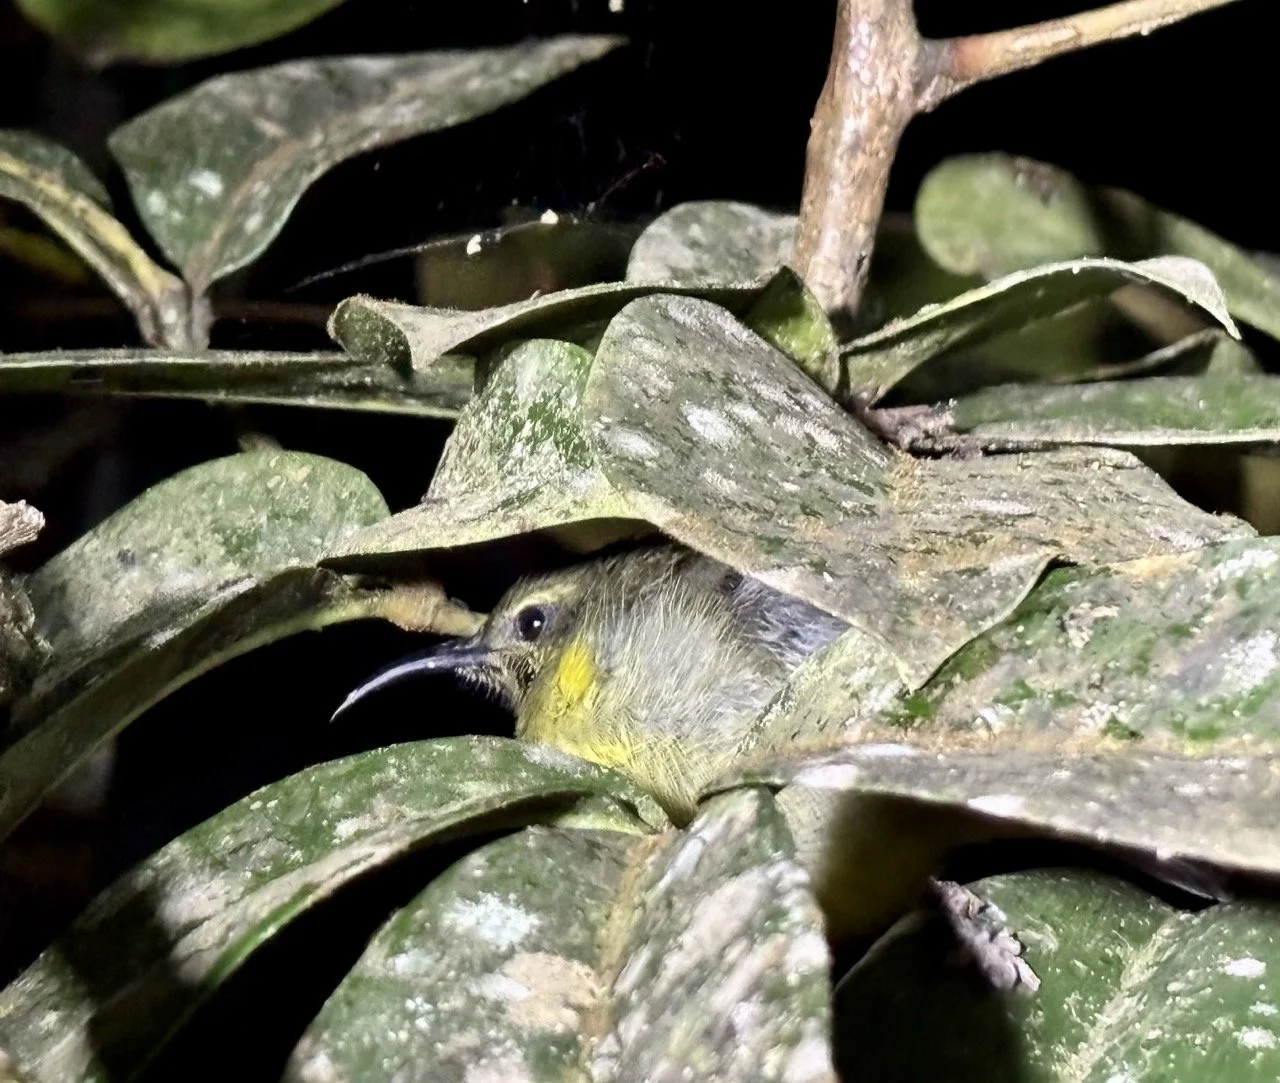
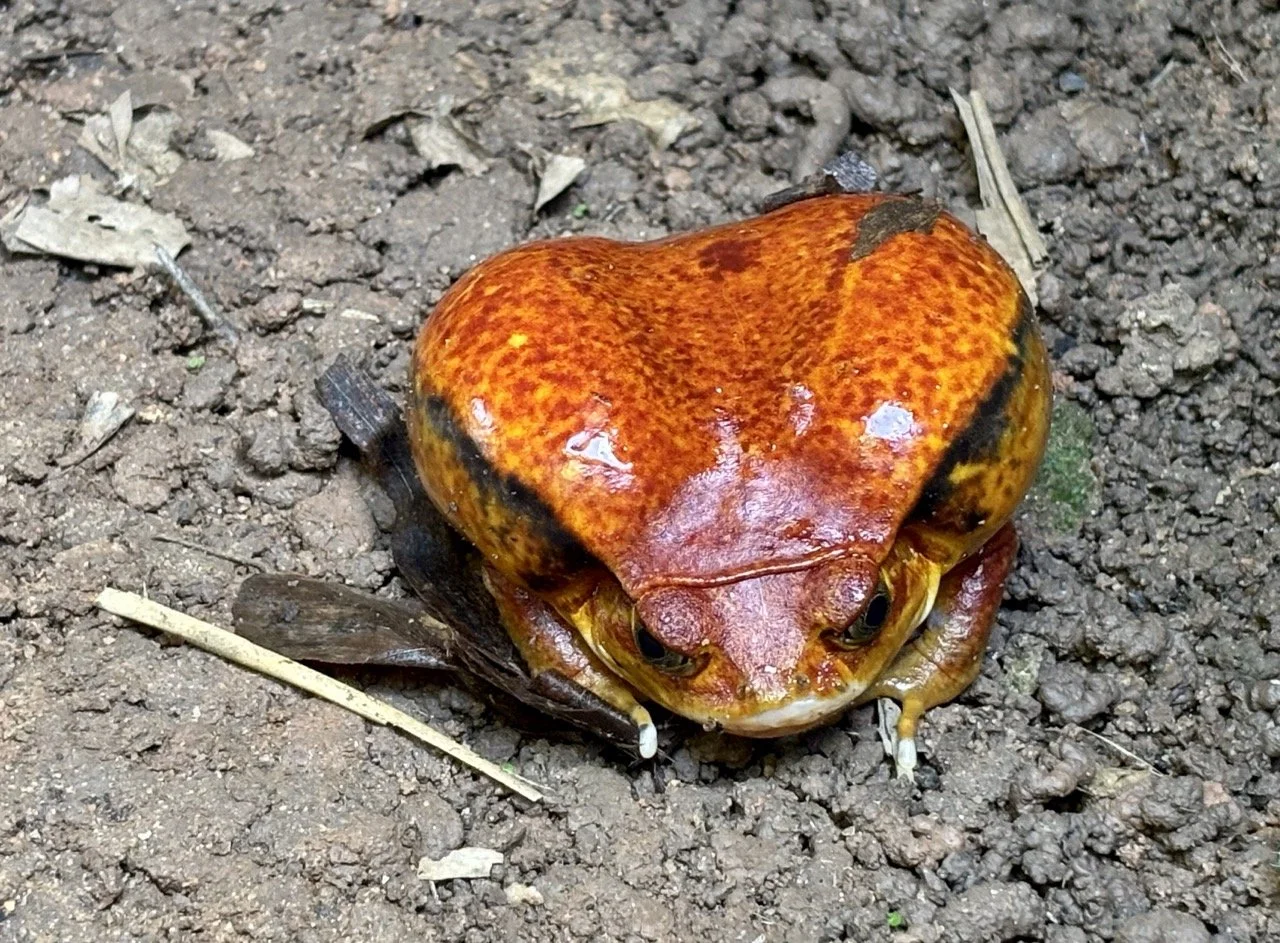
5. Mantella Frog(金斑蛙 / Mantella spp.)— 森林地表的微型寶石
獨特之處:Mantella 為馬島特有的毒蛙類,色彩鮮豔(黃、橙、紅),體型小但亮眼,常在潮濕地面或落葉層活動,適合微距與生態故事拍攝。
在哪看:Mitsinjo、Maromizaha 與 Mantadia 的潮濕地帶與落葉堆,夜間觀察機會高。
保育狀況:多為窄域種,對棲地破碎敏感,局部物種受威脅。
拍攝建議:夜間或陰天以微距鏡(100mm 或微距套件)拍特寫,使用柔光補光與低角度呈現蛙的生活場景;注意不觸碰、不移動動物並避免污染棲地。
安達西 Andasibe 馬達加斯加 FAQS(Andasibe Madagascar 常見問題)
計畫前往 馬達加斯加自由行(Madagascar travel),想看著名的大狐猴 Indri、雨林與變色龍嗎?東部的 安達西 Andasibe(又寫 Andasibe–Mantadia National Park) 是最容易從首都抵達、也最適合第一次踏入雨林的地點之一。以下整理幾個實用的 Andasibe Madagascar FAQS,幫助你安排行程。
Q1:安達西 Andasibe 在哪裡?為什麼值得去?
(Where is Andasibe and why visit?)
安達西 Andasibe 位於 馬達加斯加東部(eastern Madagascar),距離首都 塔那那利佛 Antananarivo 約 3–4 小時車程。這一帶包含 Andasibe–Mantadia National Park 與社區保護區,是最受歡迎的 Madagascar rainforest 目的地之一,原因包括:
能在野外聽見、看到最大型狐猴 Indri indri(大狐猴) 壯觀的叫聲與身影
步道難度相對親民,很適合第一次嘗試 Madagascar wildlife watching 的旅人
多家 lodge 與社區導覽資源完善,對初次前往 馬達加斯加國家公園 的遊客相當友善
Q2:怎麼從塔那那利佛到安達西?
(How do I get to Andasibe from Antananarivo?)
從 Antananarivo → Andasibe 的交通方式主要有:
包車+司機(private car with driver)
行程約 3–4 小時,可中途在小鎮或觀景點停留,是最舒適的 Madagascar travel 方式
長途巴士 taxi‑brousse
從首都東側車站出發,在 Andasibe 路口下車後再轉 tuk‑tuk 或安排接送
價格便宜但耗時較長、班次與舒適度較不穩定
許多人會將 Andasibe Madagascar 規劃成從塔那那利佛出發的 2–3 日小旅行。
Q3:安達西 Andasibe 什麼時候去最好?
(When is the best time to visit Andasibe Madagascar?)
Andasibe–Mantadia National Park 為濕潤雨林區,一年四季都可能下雨,但:
5–10 月:相對乾爽季節
步道不那麼泥濘,溫度舒適,被視為 best time to visit Andasibe
適合安排較長距離健行與多天 Madagascar wildlife trip
11–4 月:雨季
降雨較多、濕度高,森林顏色更飽和,適合喜歡雨林氛圍與霧氣照片的旅人
無論哪個季節,防水外套、雨傘、防水背包套與防滑鞋都非常重要。
Q4:在 Andasibe 可以看到哪些動物?
(What wildlife can I see in Andasibe?)
安達西 Andasibe Madagascar 最吸引人的野生動物包括:
Indri indri 大狐猴:最大型的現存狐猴,獨特的歌聲會在清晨迴盪整片森林,是許多人來 Andasibe–Mantadia National Park 的首要目標
其他狐猴:如 Diademed Sifaka(冠絹毛狐猴)與夜行狐猴
變色龍、青蛙、壁虎與各種昆蟲
多種馬達加斯加特有鳥類,安達西也是很棒的 birdwatching in Madagascar 地點之一
安排清晨健行與夜間導覽(night walk)可以大幅提升動物出沒機率。
Q5:安達西 Andasibe 一定要請導遊嗎?
(Do I need a guide in Andasibe–Mantadia National Park?)
在 Andasibe–Mantadia National Park 與周邊保護區,入園都需要當地認證導遊陪同:
導遊熟悉 Madagascar wildlife 的習性與棲地,能幫你在樹冠與灌木中找到狐猴與小型爬蟲
會依你的時間與體力安排合適路線(短程步道或長程健行)
也會解說保育、社區與森林故事,讓 Andasibe travel 不只是打卡而是真正理解這片雨林
Q6:在安達西應該待幾天比較好?
(How many days should I spend in Andasibe?)
對多數行程來說,2–3 天 / 2–3 晚 是很好的長度:
1 次白天健行 + 1 次夜間導覽
若停留 3 晚,可加碼前往 Mantadia 區較原始的步道,或多安排一場清晨狐猴觀察
搭配整體 Madagascar itinerary,很多人會在 Andasibe 停留後再往東邊海岸或南邊國家公園繼續旅行。
Q7:安達西住宿與餐飲方便嗎?
(What is accommodation and food like in Andasibe Madagascar?)
Andasibe accommodation 多為 lodge、簡單飯店與生態旅館,從預算型到中價位皆有
多數旅館附設餐廳,提供簡單西式與馬國料理,村莊內也有小餐館與雜貨舖
旺季建議提前訂房,特別是靠近 Andasibe–Mantadia National Park 的熱門 lodge
Q8:去安達西與馬達加斯加要注意哪些健康與安全問題?
(What about health and safety for Andasibe & Madagascar travel?)
健康建議:
在出發前諮詢醫師,了解 瘧疾、登革熱、黃熱病與其他疫苗 是否建議接種
在 Madagascar rainforest 停留時,務必使用防蚊液、穿長袖長褲並準備基本藥品
安全方面:
Andasibe 村與周邊對旅客通常友善,但仍要保管好現金與護照
夜晚行走請使用頭燈或手電筒,並遵從導遊與旅館人員的建議
透過良好準備與合理期待,安達西 Andasibe 馬達加斯加之旅 會成為你在非洲最難忘的雨林與狐猴體驗之一。
總結
安達西貝是馬達加斯加東部最具代表性的生態攝影目的地之一:從 Indri 的森林之歌到夜間微距的驚喜,每一張照片都有故事。如果你想預訂「當地專業導遊」或「包車含司機」以提升拍攝效率與安全,歡迎在下方留言或私訊我,我可以推薦可信的在地團隊並幫你量身規劃 1–3 天拍攝行程。快收藏此篇,開始規劃你的安達西貝攝影之旅吧!
延伸閱讀 :馬達加斯加完整旅遊攻略
關於作者|Toto Kuo
大家好,我是 Toto Kuo,來自台灣,目前定居在浪漫的 希臘聖托里尼。身為一名熱愛探索的攝影師與旅人,我曾以背包客的身分走遍 超過 80 個國家,並曾旅居 加拿大、紐約、巴黎,且在 4 個國家打工度假,用旅行的方式體驗世界的多元文化。目前,我與希臘先生在聖托里尼一起經營一家 希臘餐廳 Karma與 聖托里尼婚紗攝影工作室,同時把我最熱愛的攝影、旅行、美食與文化分享給更多人。無論是 希臘小島推薦、聖托里尼完整攻略、在地美食推薦、咖啡館探訪、旅遊攝影指南,和自由行的行程安排,我都會透過文字與影像帶你親身感受。如果你正準備來一趟 希臘跳島自由行,或者對聖托里尼婚紗攝影、旅遊攝影秘境、行程攻略有任何疑問,歡迎隨時與我聯絡。
—
English Version
Andasibe Travel & Photography Guide — Top 5 Photo Spots, 1–3 Day Itineraries, Dining & Pro Tips
Andasibe travel guide: Top 5 photo spots, 1–3 day itineraries, transport & lodging tips, local dining and pro wildlife photography advice. Ask for local driver/tour recommendations.

TOC
5 Reasons Not to Miss Andasibe
5 Interesting Facts
Top 7 Photo Spots
1–3 Day Itineraries
Getting There & Around
Where to Stay
Recommended Restaurants & Food
Best Time to Visit
Budget Tips
Packing Checklist
Photography Tips (Pro)
Andasibe Madagascar FAQS(Andasibe–Mantadia National Park FAQ)
Conclusion & Call to Action (Ask for local tour & driver recs)

5 Reasons Not to Miss Andasibe
Prime lemur encounters — home to the Indri indri and several lemur species.
Lush rainforest & waterfalls ideal for immersive nature photography.
High biodiversity — birds, chameleons and unique Malagasy flora.
Night walks reveal nocturnal species and macro photography opportunities.
Easy access from Antananarivo (approx. 2.5–3 hours by car).
5 Interesting Facts
The Indri’s calls carry for kilometers and are a signature forest sound.
Andasibe-Mantadia NP has two main areas: the accessible Andasibe (Analamazaotra) and the wilder Mantadia.
Many medicinal plants are endemic to Madagascar.
Night walks often reveal species not seen during the day.
Local villages keep traditional crafts ideal for souvenirs.
Andasibe Top 7 Photo Spots
VOI Community
Why visit & highlights: VOI Community blends community-based conservation with cultural experiences—perfect for capturing human‑interest stories, local crafts, and hands‑on conservation activities. The scenes here are warm, authentic and story‑rich.
How to get there: Short hire‑car or taxi ride from Andasibe town; many visits require advance booking.
Best photo tips: Shoot in soft morning light for candid activity shots. Use a 24–70mm for environmental portraits and 50–85mm for close headshots. Always ask permission and bring a small token of thanks for more natural expressions.Analamazaotra NP (Andasibe Reserve)
Why visit & highlights: The most reliable site to encounter Indri indri and several other lemur species. Trails are accessible and guided walks are well organized—ideal for both novice and experienced wildlife photographers. Dawn choruses add dramatic audio‑visual opportunities.
How to get there: Drive or taxi from Andasibe town (or Antananarivo) to the park entrance; guides register at the park office.
Best photo tips: Golden window 06:00–09:00. Use a 70–200mm for lemur portraits and 24–70mm for contextual forest scenes. Shoot in silent/burst mode, raise ISO as needed, and record ambient sound for richer storytelling.Vakona Forest Park (Vakona Lodge & Lemur Island)
Why visit & highlights: Famous for Lemur Island—tame lemurs allow close encounters—making it ideal for portrait‑style wildlife and visitor‑animal interaction photography. Trails, lakes and equestrian scenes add composition variety.
How to get there: 10–20 minute drive from Andasibe; many lodges include transfers.
Best photo tips: Use 50–85mm or 24–70mm for intimate portraits. Keep low and move slowly to avoid startling animals. A polarizer reduces glare; shoot at f/2.8–f/4 for pleasing background separation.Mitsinjo Reserve (Community Reserve)
Why visit & highlights: Community‑run reserve with excellent night walks, abundant frogs, insects and active reforestation programs—great for conservation storytelling and macro photography.
How to get there: Short walk or drive from Andasibe town; book guided walks with local volunteers for best results.
Best photo tips: Night macro needs a 100mm macro lens, tripod, LED lighting and remote shutter. Day birding works well with 24–70mm and 70–200mm telephoto lenses.Maromizaha Reserve
Why visit & highlights: A quieter semi‑primary forest with fewer visitors and more natural animal behavior—ideal for patient photographers who want undisturbed, authentic wildlife moments and immersive forest scenes.
How to get there: Reachable by hired car or 4x4; plan half‑ or full‑day hikes with a local guide and bring sufficient supplies.
Best photo tips: 16–35mm for expansive forest vistas, mid‑tele for behavior shots. Carry a lightweight tripod, quick‑release head and moisture protection for gear. Prepare high‑ISO backups for dark understory conditionsVohimana Reserve
Why visit & highlights: Known for botanical diversity and eco‑tourism facilities, Vohimana offers guided tours, lodging options and excellent opportunities for plant, bird and detailed landscape photography.
How to get there: Best accessed by hired car from Andasibe; consider staying overnight to maximize early‑morning birding.
Best photo tips: 24–70mm for plant scenes and close detail; 70–200mm for birds and canopy activity. Use side light and a polarizer to enhance foliage texture and dew.Madagascar Exotic / Palmarium‑style Reserves
Why visit & highlights: Private conservation reserves (similar to Palmarium) provide high chances for close lemur, chameleon and reptile encounters—excellent for macro, portrait and behavioral shots. Many reserves offer guided tours and lodging packages.
How to get there: Varies by reserve—usually by hired car with advance booking; some provide transfers and overnight options.
Best photo tips: Use 100–200mm or macro lenses for detailed closeups. Control background and lighting for crisp texture shots; always follow staff guidance to ensure animal welfare.Conclusion
These seven spots around Andasibe cover community conservation, hands‑on encounters, deep forest hikes and private reserves—offering diverse opportunities for wildlife, cultural and macro photography. Want a tailored 1–3 day photo itinerary, recommended shooting windows, or help booking local guides and a driver? Tell me your travel dates and photography priorities and I’ll create a custom plan and map.
Andasibe 1–3 Day Photography & Nature Itinerary
Intro
Andasibe is one of Madagascar’s top destinations for wildlife and nature photography. This 1–3 day itinerary covers VOI community, Analamazaotra NP (Andasibe Reserve), Vakona Forest Park, Mitsinjo Reserve, Maromizaha, Vohimana Reserve and private conservation areas like Madagascar Exotic. Included are transport tips, best shooting windows, gear suggestions, budgets and ethical guidelines to help you maximize photo opportunities. Save this guide and message us for driver + guide recommendations.
1‑Day Essentials (short visit — early start, late return)
05:30 wake → 06:00 arrive at Analamazaotra NP entrance.
Focus: Best window 06:00–09:00 for Indri activity and calls. Gear: 70–200mm + 24–70mm. Use silent mode, burst and higher ISO if needed.10:30 return to town for lunch.
13:30 VOI community visit or Mitsinjo for community conservation storytelling photography (24–70mm for environment, 50–85mm for portraits; always ask permission).
16:00 Vakona Forest Park (Lemur Island) close‑encounter portraits at golden hour.
19:00 dinner and optional Mitsinjo night walk.
Estimated budget: transport + guide €40–€80/day; park fees €10–€25 depending on activities.
2‑Day Recommended (wildlife + night macro)
Day 1 — Indri & community: 06:00 Indri tracking, lunch, VOI community, Vakona Lemur Island, 20:00 Mitsinjo night walk.
Day 2 — Maromizaha / Mantadia full‑day hike: forest vistas, waterfalls, birding. Gear: 16–35mm for forest, 70–200mm for birds, tripod, polarizer.
Estimated price: €120–€250 per person (shared vehicle/guide, park fees, some meals).
3‑Day Immersive Photographer Plan
Day 1: Indri morning + VOI community + Mitsinjo night macro.
Day 2: Full day Maromizaha deep forest exploration.
Day 3: Early birding at Vohimana + private reserve (Madagascar Exotic/Palmarium type) close encounters; return, backup and local market shooting.
Gear plan: morning wide/landscape, daytime mid‑tele, evening/night macro/tele. Daily backup & battery rotation required.
Estimated price: €250–€500 per person (professional guide/driver, private reserve access, lodging).
Transport Tips (efficiency & safety)
Best: hire a car with a local driver from Antananarivo to Andasibe. Drivers know timing for sunrise/sunset pickups.
Public buses exist but are inefficient for photo schedules—private hire recommended.
4x4 recommended in rainy season. Book guides and park permits in advance for tight schedules.
Practical Photo Advice (increase success rate)
Timing: schedule Indri, Maromizaha and Vakona for golden hours (sunrise/sunset).
Settings: animal portraits 1/500s+, f/4–f/8; waterfall long exposure with ND filter and tripod at f/8–f/11.
Ethics: no feeding, no chasing, avoid flash. Use silent shutter where possible.
Protection: humidity/dust protection, dry boxes, extra batteries spread across bags.
Night gear: macro lens (100mm), compact tripod, LED panel, remote shutter, fast lens (f/2.8+).
Money & Time Saving Tips
Share vehicle costs by grouping with other travelers.
Notify VOI/Mitsinjo in advance if you plan to photograph community projects.
Stay near park entrances to reduce transit times.
Backup daily—external HDD + cloud if possible.
Conclusion
Need local driver/guide recommendations? Reply with your travel dates, number of travelers, and budget, and I will send contact details for the local tour operators and guides I recommend for this itinerary.
Andasibe Getting There & Around
Fly to Antananarivo (TNR) then drive/transfer to Andasibe. Book a driver or join a small tour for convenience. 4x4 recommended in wet season.
Andasibe Where to Stay
Options range from basic bungalows and mid-range hotels to eco-lodges near the park. Book ahead during dry season.
Andasibe Top 5 Recommended Restaurants & Local Eats
Feon’ny Ala (Feon’ny Ala Restaurant)
Why visit: One of the most popular local spots near Andasibe reserve entrance — favored by guides and travelers for authentic Malagasy flavors and quick service.
Must-eat: Grilled fish, local stews (romazava-like dishes), fresh tropical juices.
Price range: ~€5–€15 per person (budget-friendly).
How to get there: Walkable or a short taxi ride from town; located along the main tourist route. Google Maps
2. Vakona Forest Lodge Restaurant (Vakona Lodge / Lemur Island dining)
Why visit: On-site lodge restaurant with pleasant setting—great option after visiting Lemur Island; convenient for visitors staying at or near Vakona.
Must-eat: Lodge set meals, grilled chicken or fish, simple Western-style mains and local desserts.
Price range: ~€10–€25 per person (lodge pricing).
How to get there: 10–20 minutes drive from Andasibe town; many lodges offer transfers. Google Maps
3. Andasibe Hotel Restaurant
Why visit: Reliable mid-to-upscale hotel dining with stable menu and comfortable atmosphere—perfect for reviewing photos and recharging.
Must-eat: Local rice mains, seafood or zebu dishes, fresh juices.
Price range: ~€12–€30 per person.
How to get there: Located in the Andasibe area; short walk or taxi from town. Guests staying in the hotel can dine on-site.Google Maps
4. Mitsinjo Community Café / Local community meals
Why visit: Community-run food options that support local conservation efforts; an authentic way to taste community cooking and help local projects.
Must-eat: Simple rice dishes, local snacks, fresh juice or coffee.
Price range: ~€2–€10 per person (very affordable).
How to get there: Short walk or drive from Andasibe town; check opening hours or book through local guides. Google Maps
5. Local market stalls & street eats
Why visit: For the most authentic and cheapest eats—perfect for travelers wanting to taste mofo (fried dough), sambos (savory pastries), grilled fish and seasonal tropical fruit. Great photo ops and cultural flavor.
Must-eat: Mofo, sambos, grilled fish, mango/pineapple.
Price range: ~€0.5–€6 per portion.
How to get there: Explore the town market and street vendors on foot; follow busy stalls for freshness. Google Maps example search
Practical Tips Reservations: Book dinner at Vakona or Andasibe Hotel during dry season (May–Oct) to avoid disappointment.
Payment: Carry Malagasy Ariary cash for small vendors; hotels and lodges may accept cards.
Food safety: Choose cooked items and bottled water if you have a sensitive stomach; pick busy stalls for freshness.
Photo tips: Golden hour light in outdoor seating is ideal for food and ambience shots; ask permission when photographing locals.
Best Time to Visit Andasibe — When to See Indri, Spot Lemurs & Capture Rainforest Photography
Best time to visit Andasibe: compare dry vs. rainy seasons, top months for Indri sightings, photography tips, packing and travel advice for Madagascar’s rainforest.
Intro — why timing matters
Choosing the right time to visit Andasibe can make or break your wildlife and photography experience. Visit in the optimal season and you’ll enjoy clearer light, easier trails and higher chances of hearing the Indri’s dramatic dawn calls. Visit in the wet months and you’ll see lush green rainforest, rampant amphibian activity and incredible macro subjects. Below is a practical, SEO‑friendly guide to help you pick the best months, plan shoots, pack smart, and maximize your chances of seeing lemurs and other wildlife.
Dry season (May–October) — Recommended rating: ★★★★★ (top choice)
Why go: Stable weather, minimal rain and dry roads make hiking, transfers and logistics far easier. Trails to Analamazaotra, Vakona and Maromizaha are more accessible.
Photography advantages: Crisp air and sharp golden-hour light at sunrise and sunset produce high‑contrast, detailed images — ideal for Indri portraits, forest landscapes and bird photography.
Wildlife viewing: Lemurs (including Indri), birds and reptiles are easier to find and photograph because trails are easier to traverse and animals are often more active in predictable windows.
Practical tip: This is peak season — book domestic flights, accommodations and any private drivers/guides 1–2 months in advance. If you need sunrise pickups, confirm exact times with your driver.
Suggested kit: 16–35mm wide for landscapes, 24–70mm for environmental portraits, 70–200mm for wildlife; tripod, polarizer, spare batteries.
Rainy season (November–April) — Recommended rating: ★★ (for specific interests)
Why go: The rainforest is at its most dramatic — saturated greens, lively waterfalls and an active macro world (frogs, insects, fungi). Photographers who love mood, mist and intimate macro subjects will find the wet months rewarding.
Limitations: Secondary and remote roads can be muddy or impassable; some transfers require a 4x4; schedules may be disrupted by heavy showers.
Photography advantages: Unique atmospheric shots (misty canopies, reflections, raindrop macro) and plentiful night-time macro opportunities.
Practical tip: Travel with flexible timing and a local 4x4 driver. Plan alternate activities (community visits, lodge-based photography) if trails are closed.
Suggested kit: rain covers for camera and bag, microfibre cloths, waterproof clothing, fast lenses (f/2.8 or faster) for low‑light, and durable protective cases.
Quick month-by-month summary
Best months: June–September — most stable weather, excellent light and high wildlife visibility.
Good shoulder months: May & October — fewer crowds and generally good conditions.
Months to avoid if possible: December–March — heavy rains increase the risk of road closures and limit overland travel.
Practical pre-trip checklist
Book early: Secure domestic flights, popular lodges and private drivers during the dry season.
Health & safety: Bring DEET insect repellent, any personal medication and travel insurance that covers remote rescue or medical evacuation.
Money & comms: Carry Malagasy Ariary in small bills for remote purchases; network coverage can be patchy — save offline maps and driver contact details.
Safety in reserves: Never enter protected areas alone at night — always go with a registered guide for night walks.

Photography tips by season
Dry season: Prioritize sunrise & sunset sessions for Indri calls and landscape silhouettes. Use burst mode for animal action; employ polarizer to manage highlights on leaves.
Rainy season: Focus on macro (frogs, insects, fungi), slow-shutter waterfall shots with ND filters, and atmospheric compositions with mist and reflections. Avoid harsh flash; prefer continuous LED if filling light is needed.
All seasons: Use silent/electronic shutter if available, keep noise to a minimum, respect buffer zones, and never bait or feed animals.
Gear & protective measures
Essentials: wide, standard and telephoto lenses; sturdy tripod; polarizer and ND filters; spare batteries and memory cards.
Wet weather: rain covers for camera and backpack, silica desiccant packs for storage, quick-dry clothing and waterproof footwear.
Power & backup: external battery pack, portable SSD or external HDD and daily photo backups (two copies recommended).
Conclusion —
Ready to plan your Andasibe trip? Tell me your travel dates, the number of travelers and your photography priorities (wildlife, macro, landscape), and I’ll recommend the best travel window and trusted local drivers/guides to maximize your chances of a successful photo trip.
Andasibe Budget Tips
Daily mid-range estimate: €50–€120 per person. Share transfers or join group tours to lower costs.
Andasibe Packing Checklist
Documents & cash, sun protection, hiking boots, rain jacket.
Camera gear: 16–35mm, 24–70mm, 70–200mm, tripod, polarizer, ND filters, spare batteries, rain protection for gear.
Essentials: insect repellent (DEET), headlamp, first-aid kit, snacks, water bottle.
Andasibe Photography Tips (Pro)
Respect wildlife: no feeding or chasing. Follow guides’ instructions.
Golden hours: early morning and late afternoon are best for Indri calls and soft light.
Night shooting: use fast glass and high ISO; avoid disruptive flashes.
Composition: include habitat to tell ecological stories; use low angles to emphasize lemurs and forest scale.
Gear care: protect from humidity and dust; rotate batteries in heat.
Andasibe Madagascar FAQS(Andasibe–Mantadia National Park FAQ)
If you’re planning Madagascar travel and want an accessible rainforest destination close to the capital, Andasibe–Mantadia National Park should be at the top of your list. These Andasibe Madagascar FAQS cover the essentials for lemur watching, hiking and planning your stay.
Q1: Where is Andasibe and why visit?
Andasibe lies in eastern Madagascar, about 3–4 hours by road from Antananarivo. Together with Andasibe–Mantadia National Park and nearby community reserves, it’s one of the best places for:
Seeing the largest living lemur, the Indri indri
Experiencing lush Madagascar rainforest without extremely long travel days
Combining nature with comfortable lodges and guided hikes, ideal for a first Madagascar trip
Q2: How do I get to Andasibe from Antananarivo?
Typical Andasibe Madagascar transport:
Private car with driver:
Around 3–4 hours from Antananarivo, the most convenient and flexible option for independent travelers
Taxi‑brousse (local bus):
Cheaper but slower and less comfortable
Usually involves getting off near Andasibe and arranging local transport to your lodge
Many travelers include Andasibe as a 2–3 day side trip at the start or end of their Madagascar itinerary.
Q3: When is the best time to visit Andasibe Madagascar?
Because Andasibe is a humid forest region, rain is possible year‑round, but:
May–October (drier months):
Often considered the best time to visit Andasibe, with less mud and more pleasant hiking conditions
November–April (wetter months):
More frequent showers, but deeper greens and atmospheric mist that many photographers enjoy
Whatever month you choose, bring a rain jacket, waterproof cover for your bag and sturdy shoes.
Q4: What wildlife can I see in Andasibe–Mantadia National Park?
Andasibe Madagascar is famous for:
The iconic Indri indri, whose haunting calls echo through the forest
Other lemur species such as sifakas and nocturnal lemurs
Chameleons, frogs, geckos and a variety of insects
Endemic forest birds, making it a rewarding stop for birdwatching in Madagascar
Early morning and guided night walks are essential for maximizing sightings.
Q5: Do I need a guide in Andasibe–Mantadia National Park?
Yes, hiring a local guide in Andasibe–Mantadia National Park is required and highly beneficial:
Guides know where wildlife is likely to be and help you spot animals high in the canopy or hidden in the undergrowth
They can tailor routes to your fitness level and time
Their knowledge of ecology and local communities adds depth to your Madagascar travel experience
Q6: How many days should I spend in Andasibe?
A typical Andasibe Madagascar stay is 2–3 days (2–3 nights):
One daytime hike in the Andasibe section
One night walk for nocturnal animals
Optional extra day to explore the more remote Mantadia area or revisit favorite trails
This fits well into a broader Madagascar itinerary that also includes other national parks.
Q7: What is accommodation and food like in Andasibe?
Andasibe accommodation:
A mix of eco‑lodges, simple hotels and guesthouses along the road and near the park entrance
Food:
Most lodges have on‑site restaurants serving basic Malagasy and international dishes
Small shops and eateries in the village supplement your options
Booking ahead is wise during busier months, especially if you want popular Madagascar rainforest lodges.
Q8: What should I know about health and safety for Andasibe and Madagascar travel?
Health:
Consult a travel doctor about malaria, dengue and recommended vaccinations before your Madagascar trip
Use insect repellent, wear long sleeves at dusk and bring a basic first‑aid kit
Safety:
Andasibe and its surroundings are generally friendly and calm, but always keep valuables secure
Use a headlamp or flashlight at night and follow your guide’s instructions on the trails
With realistic expectations and good preparation, Andasibe Madagascar offers some of the most accessible and rewarding rainforest and lemur experiences in the country, making it a key highlight of many Madagascar travel plans.
Conclusion
Andasibe offers profound rainforest experiences, iconic Indri encounters and abundant photographic subjects. If you’d like recommendations for reliable local tour operators, private drivers or customized 1–3 day photography itineraries (with driver/guide included), please leave a comment or send a message — I’ll be happy to help you plan a focused, safe and photo-rich Andasibe trip. Save this guide and start packing your lenses!
Further Reading: A Complete Travel Guide to Madagascar
About the Author | Toto Kuo
I’m Toto Kuo, a Taiwan-born photographer and traveler now based in Santorini, Greece. After exploring 80+ countries and living abroad in Canada, New York, and Paris, I settled in Oia, where I run Karma Greek Restaurant and a Santorini wedding photography studiowith my Greek husband.
Here I share my passions for photography, travel, food, and culture — from Greek islands travel guides and Greek island hopping tips to local food recommendations and secret photo spots. If you’re planning a trip to Santorini or looking for wedding photography inspiration, I’d love to help you capture the island’s magic.